
If you are enjoying these projects, please donate to help us continue our work.
Golden Pennies for the Sacred Heart – Audio Story and Coloring Page
Audio Story and Coloring Page
Golden Pennies for the Sacred Heart

Blessed Sacrament Project
The Thursday after Trinity Sunday is the Feast of Corpus Christi. This is a feast Our Lord asked to have instituted to celebrate the wonderful gift of the Sacrament of the Holy Eucharist. Saint Juliana of Liege had visions which led her to understand that Our Lord desired this feast. At the Last Supper Our Lord instituted the Holy Eucharist that He may remain with us here on earth in the tabernacle until the end of time. On this day Father will take the monstrance and process around the church and stop at a few outside altars and give us a blessing. This is such a wonderful day and we should all be there to thank Our Lord for this wondrous gift of Himself.
Items Needed
- Pool noodle
- Glue
- Gold spray paint
- Adhesive gems
- White paper
- Popsicle sticks
- Gold or silver pipe cleaners
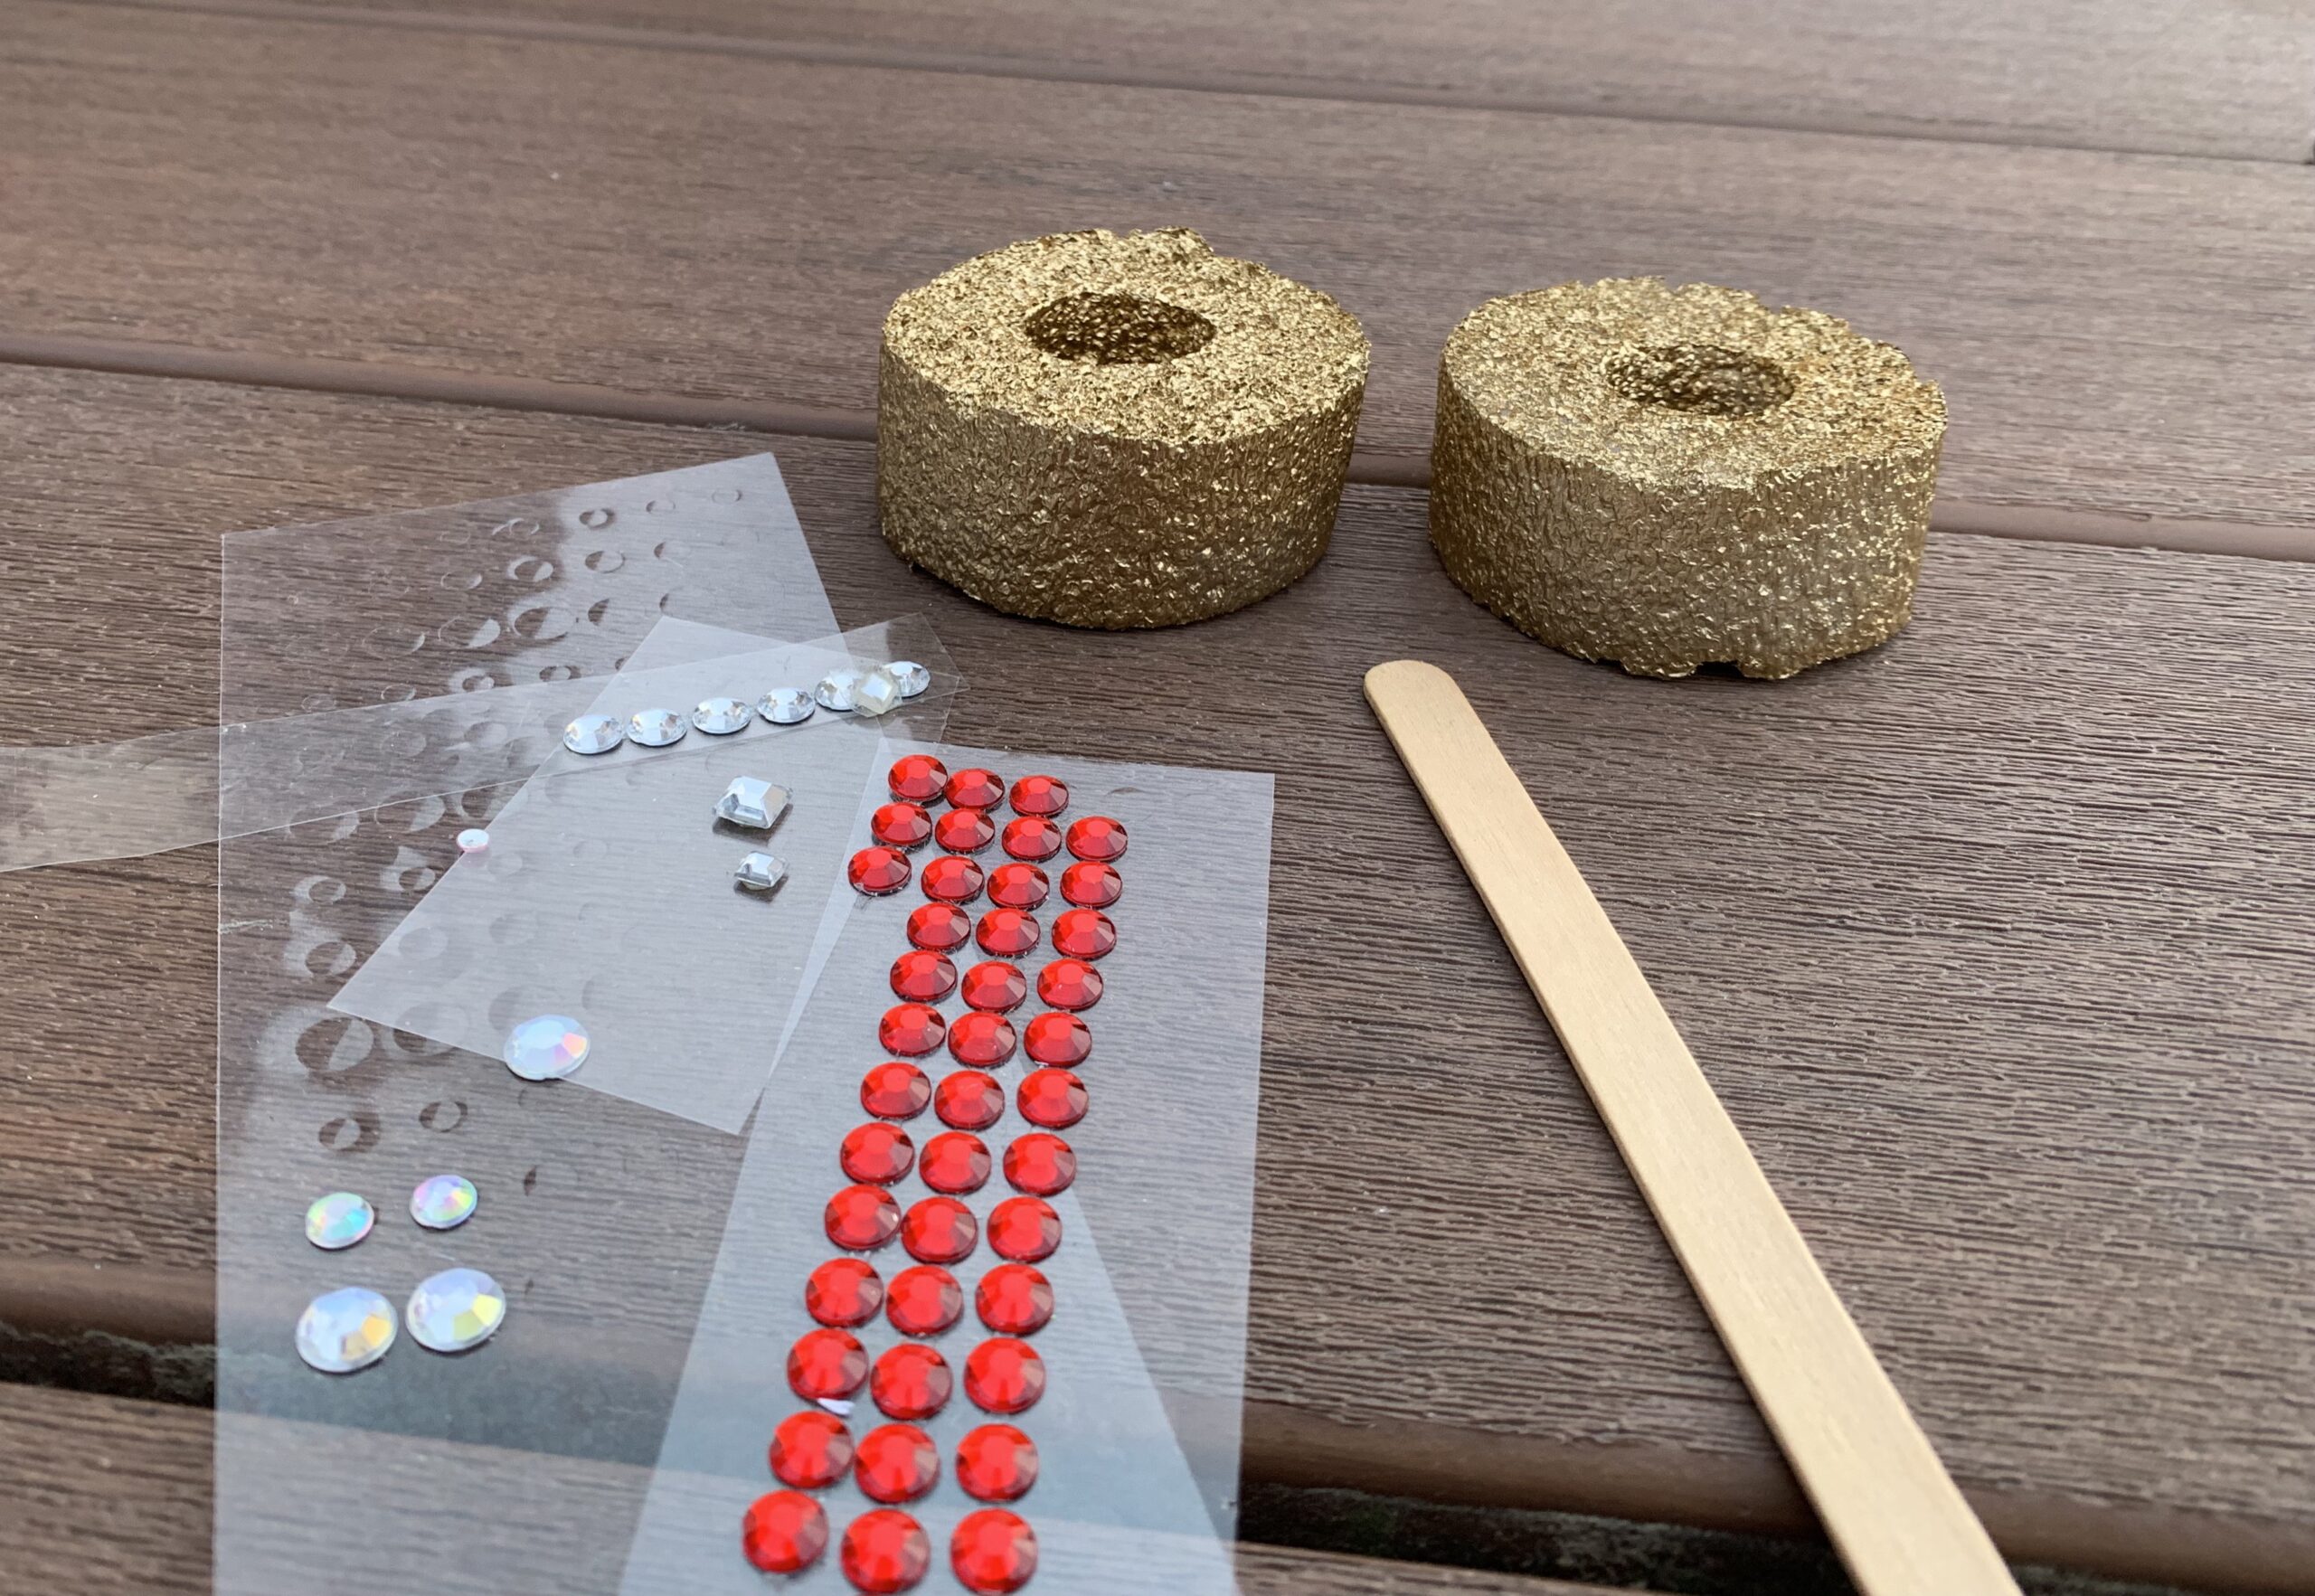
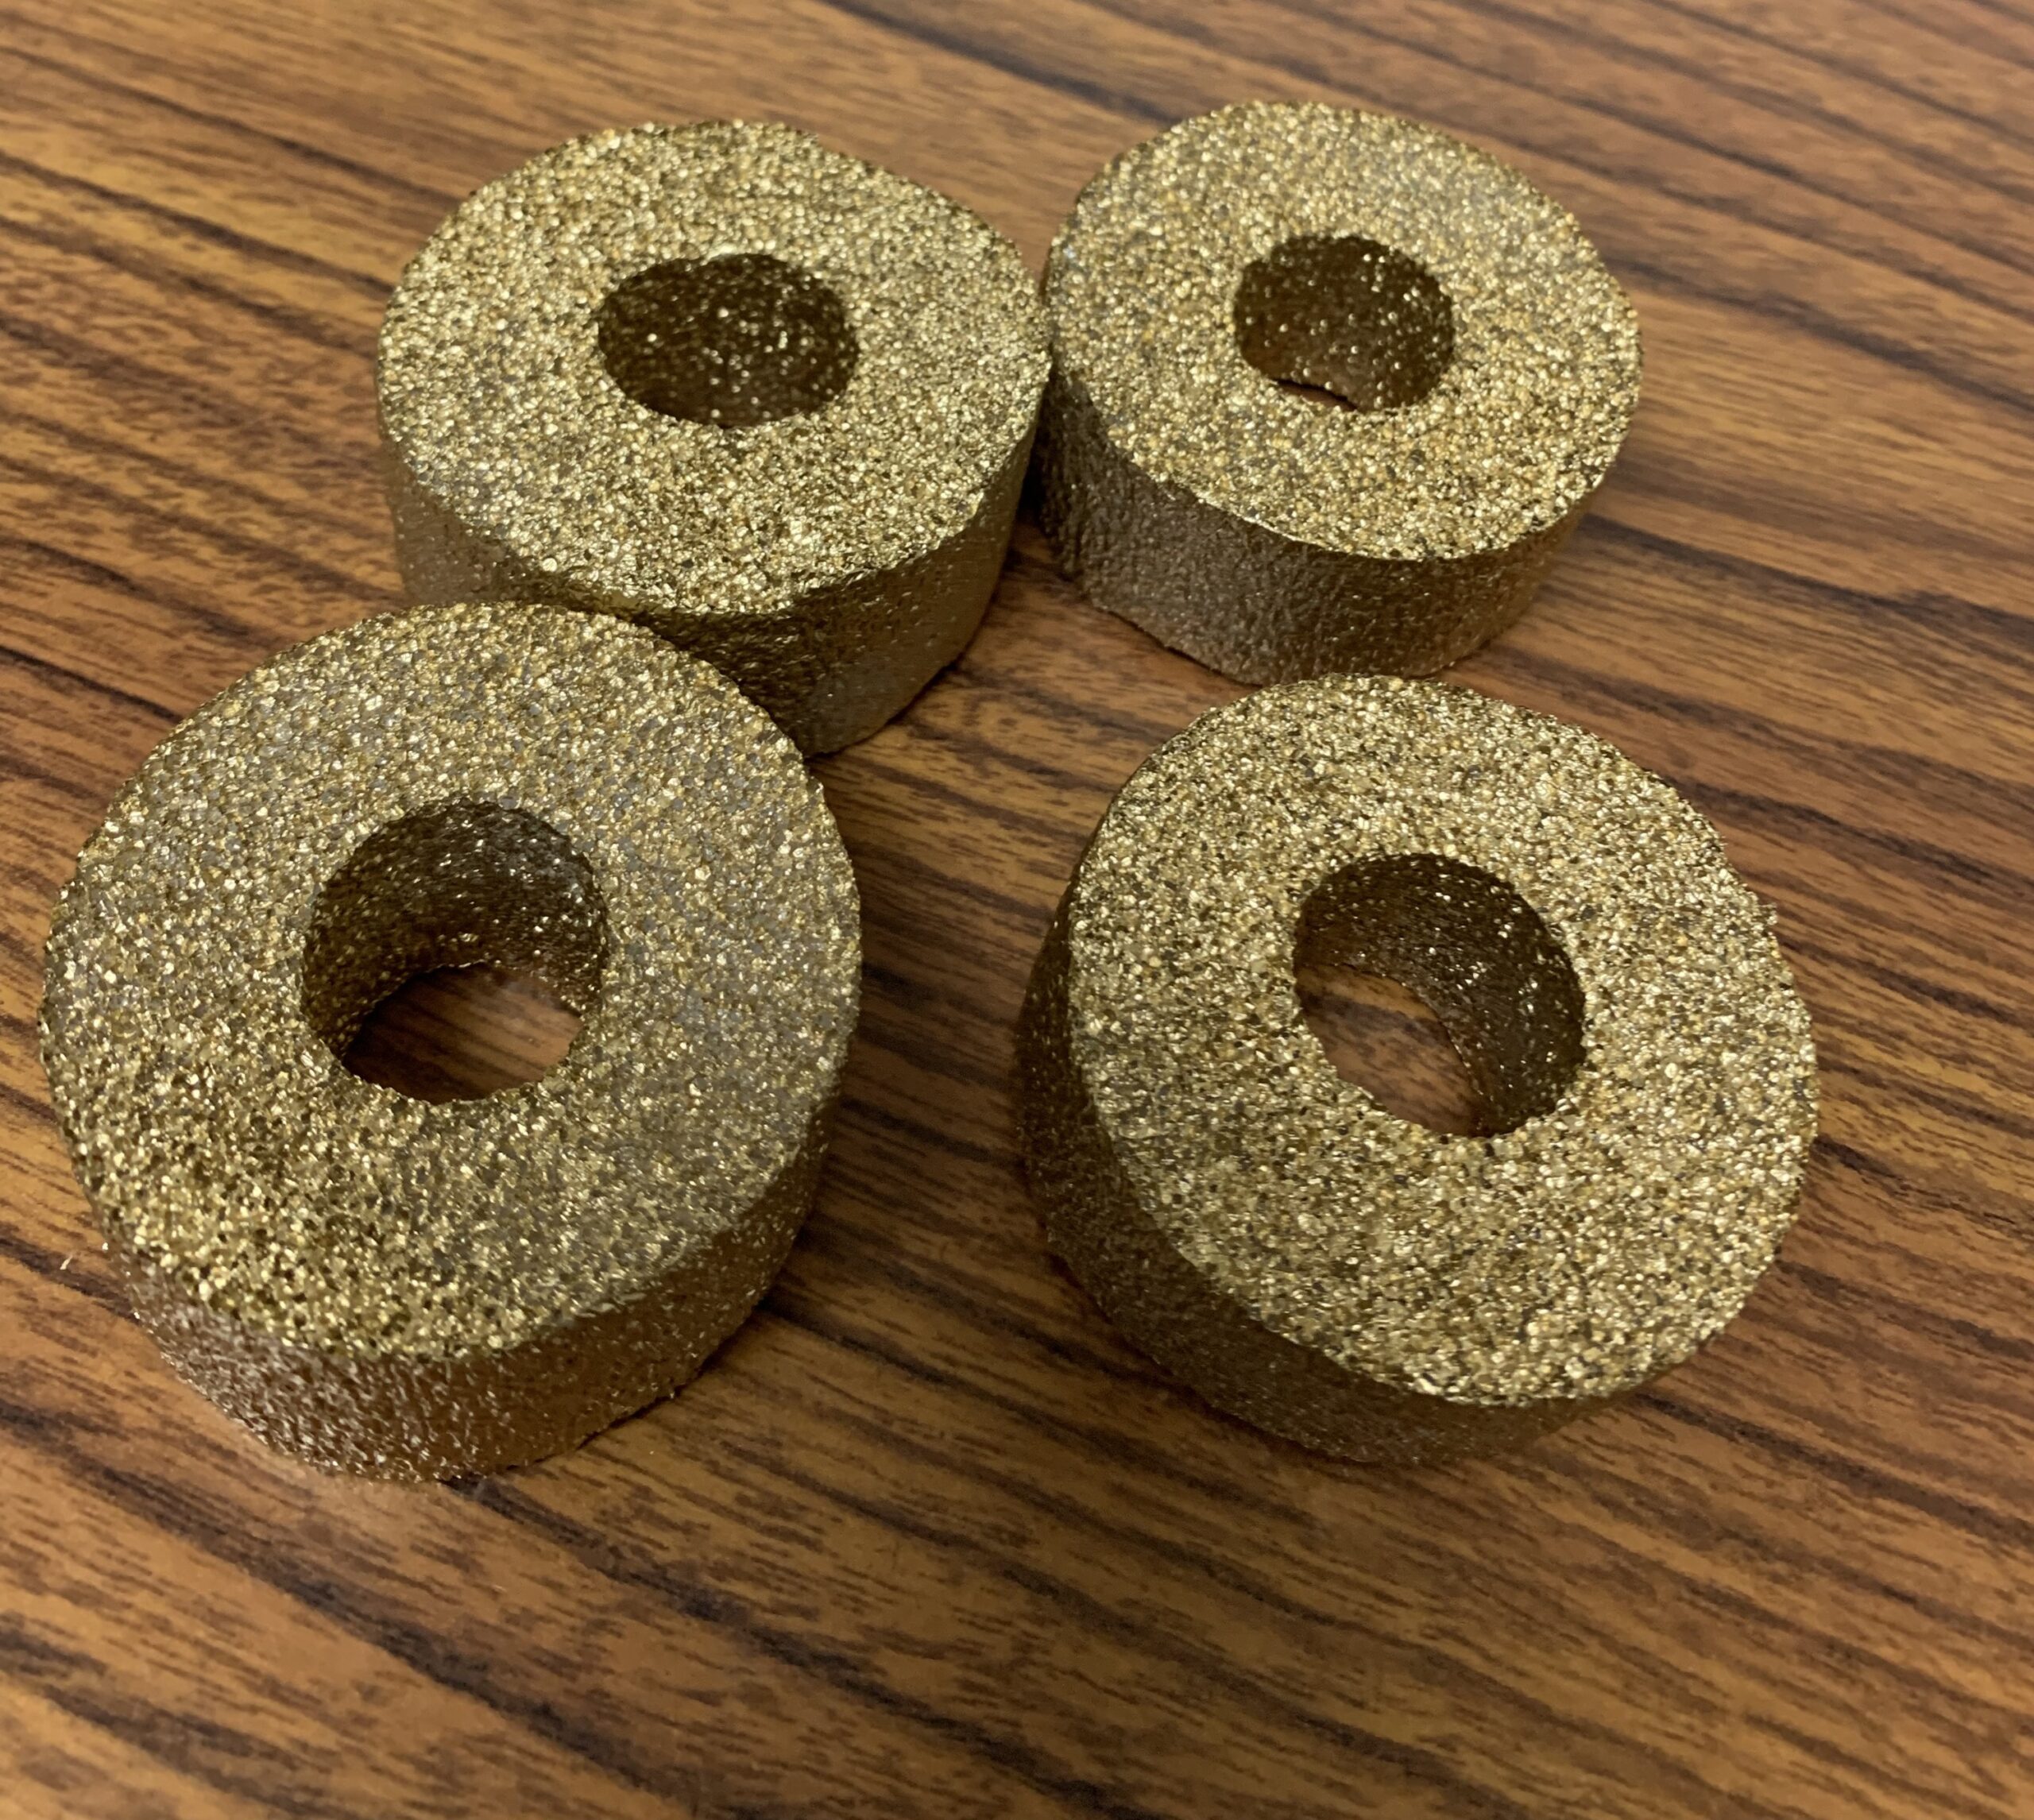
- If you do not have a yellow or goldish colored pool noodle then spray paint it gold or silver. If you paint the noodle you will need to paint the popsicle stick as well. With a knife, cut the noodle into rings 1-inch thick. See picture #1.
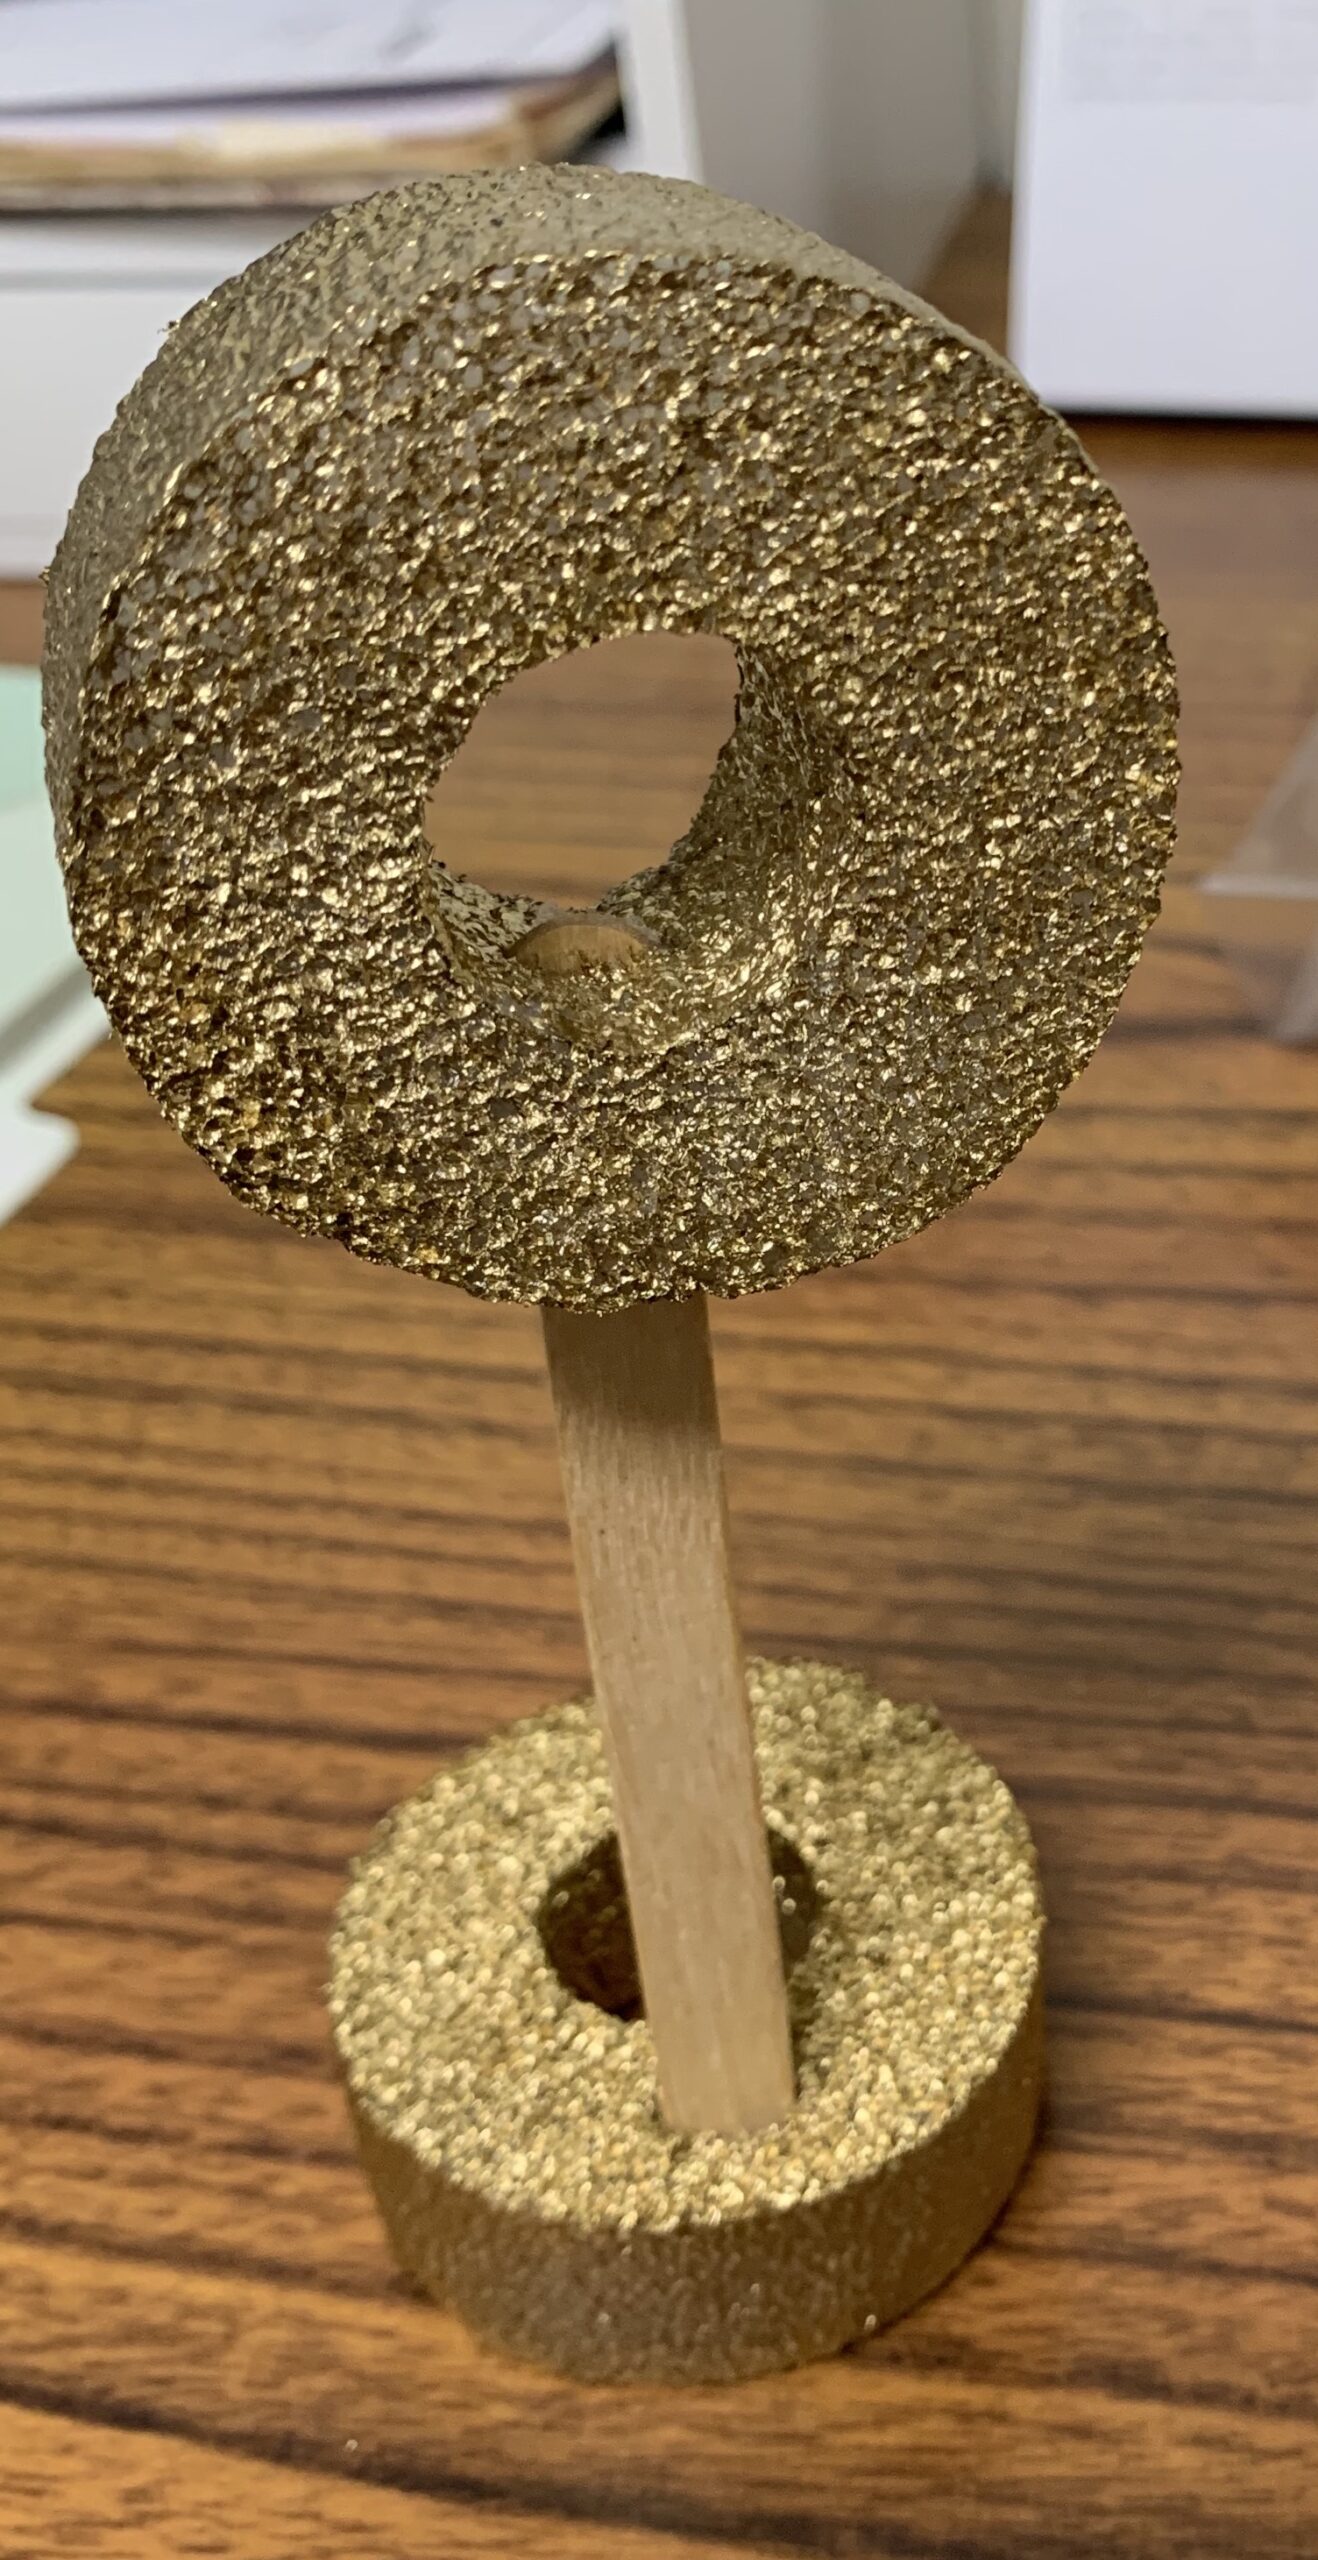
- Lay one ring flat and poke the popsicle stick standing up straight in the front of the ring. Take a second ring and poke the popsicle stick into the side. See picture #2.
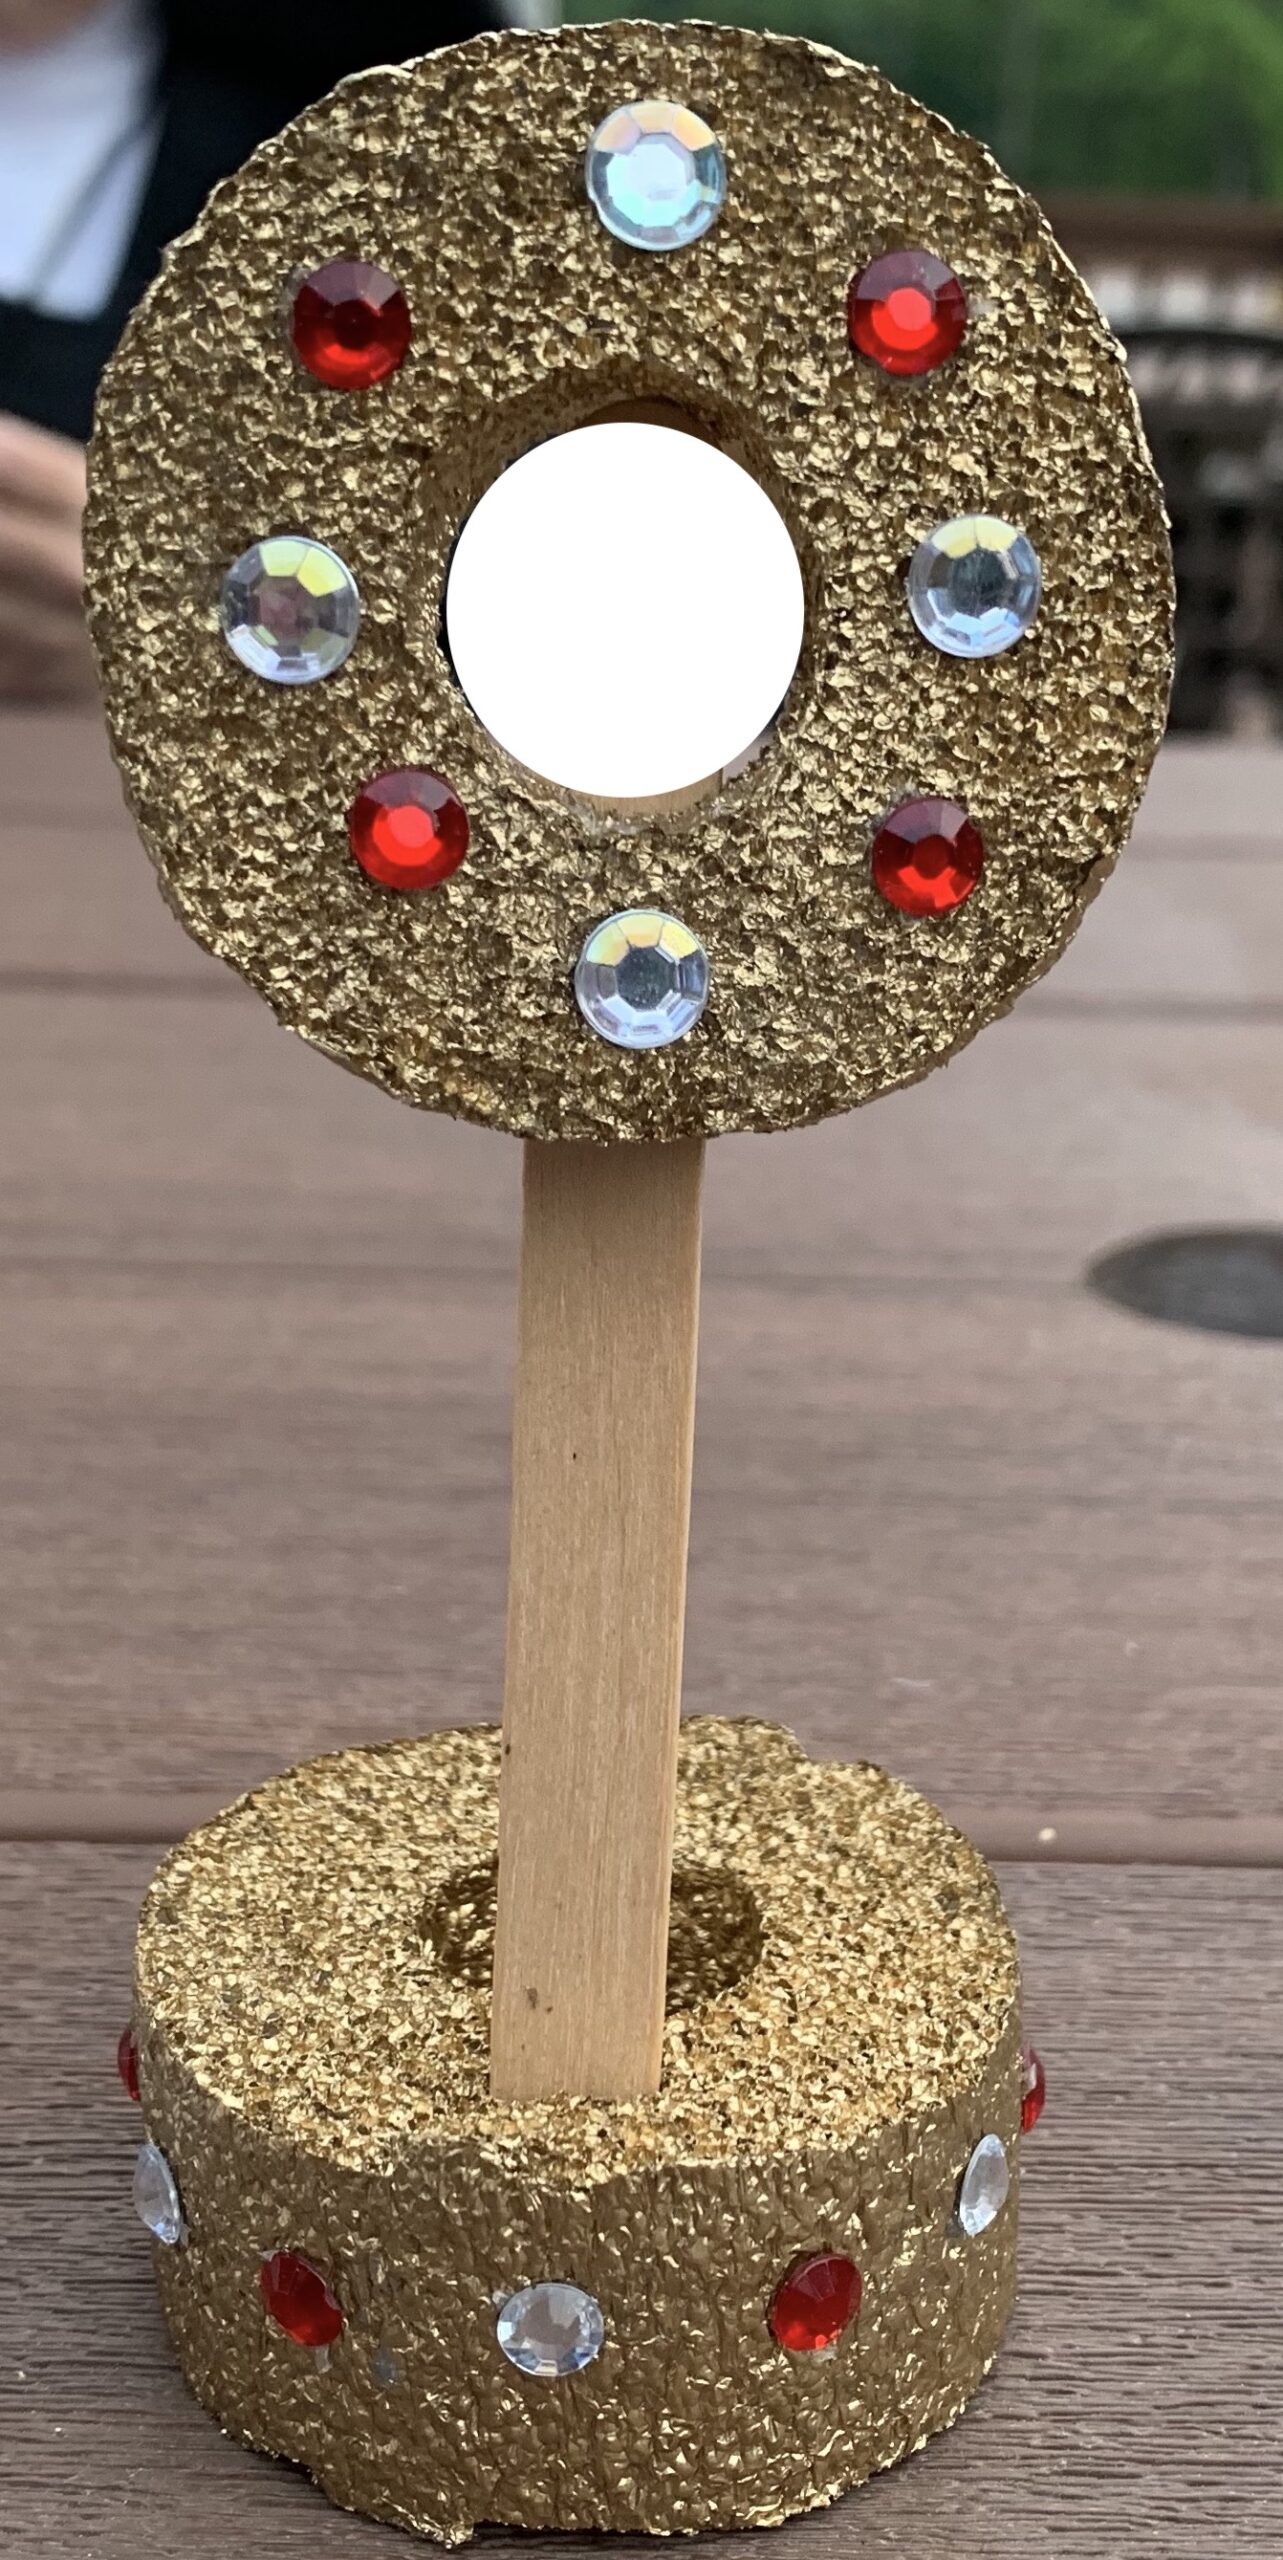
- Cut a 2-inch circle from the white paper for the host. Paste the white paper to the back of the top circle, and decorate your monstrance with gems. See picture #3.
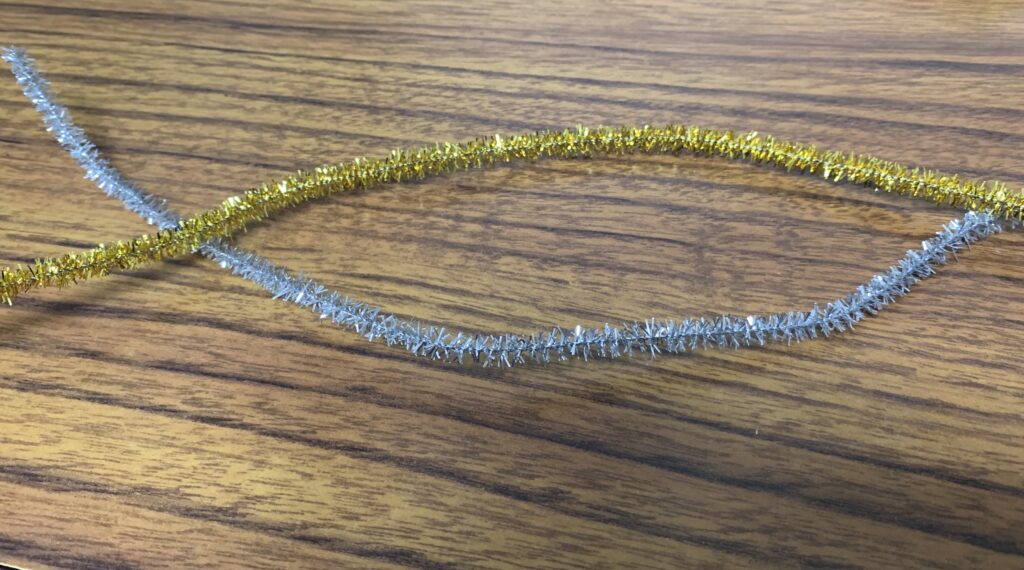
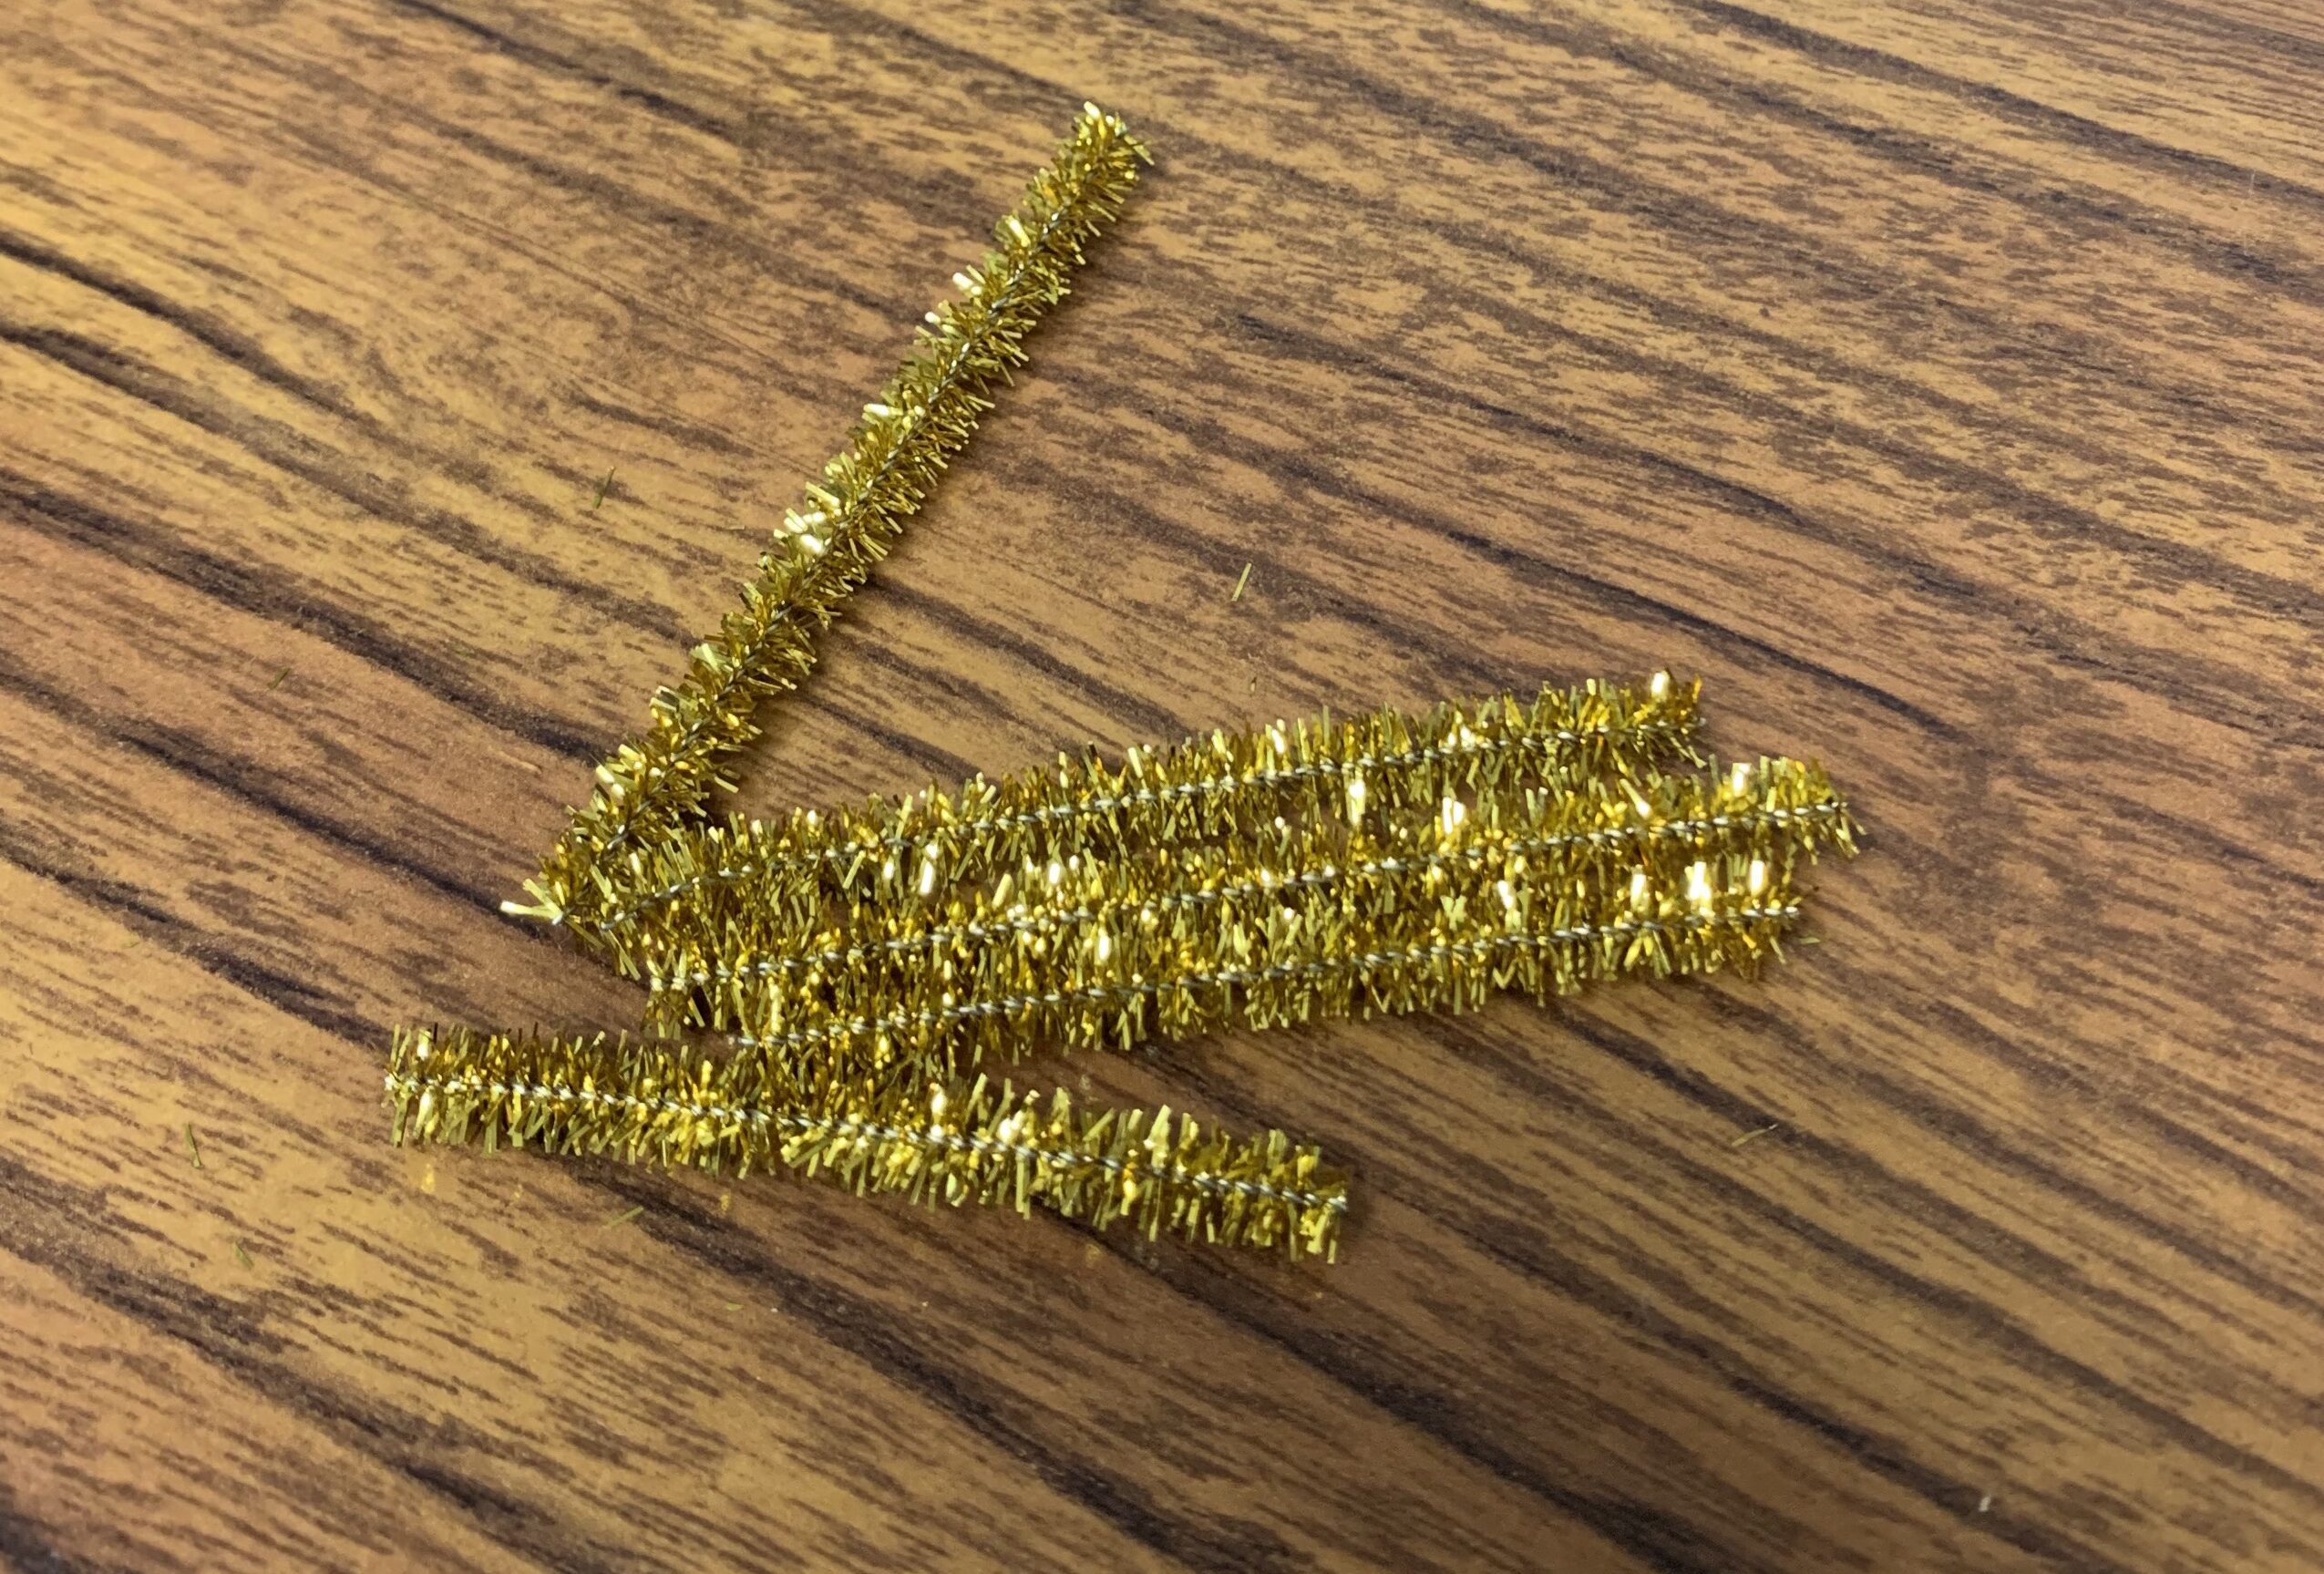
- Take the pipe cleaner and cut into 1-inch pieces. Poke into the top side of your monstrance for rays. See pictures #4 and #5.
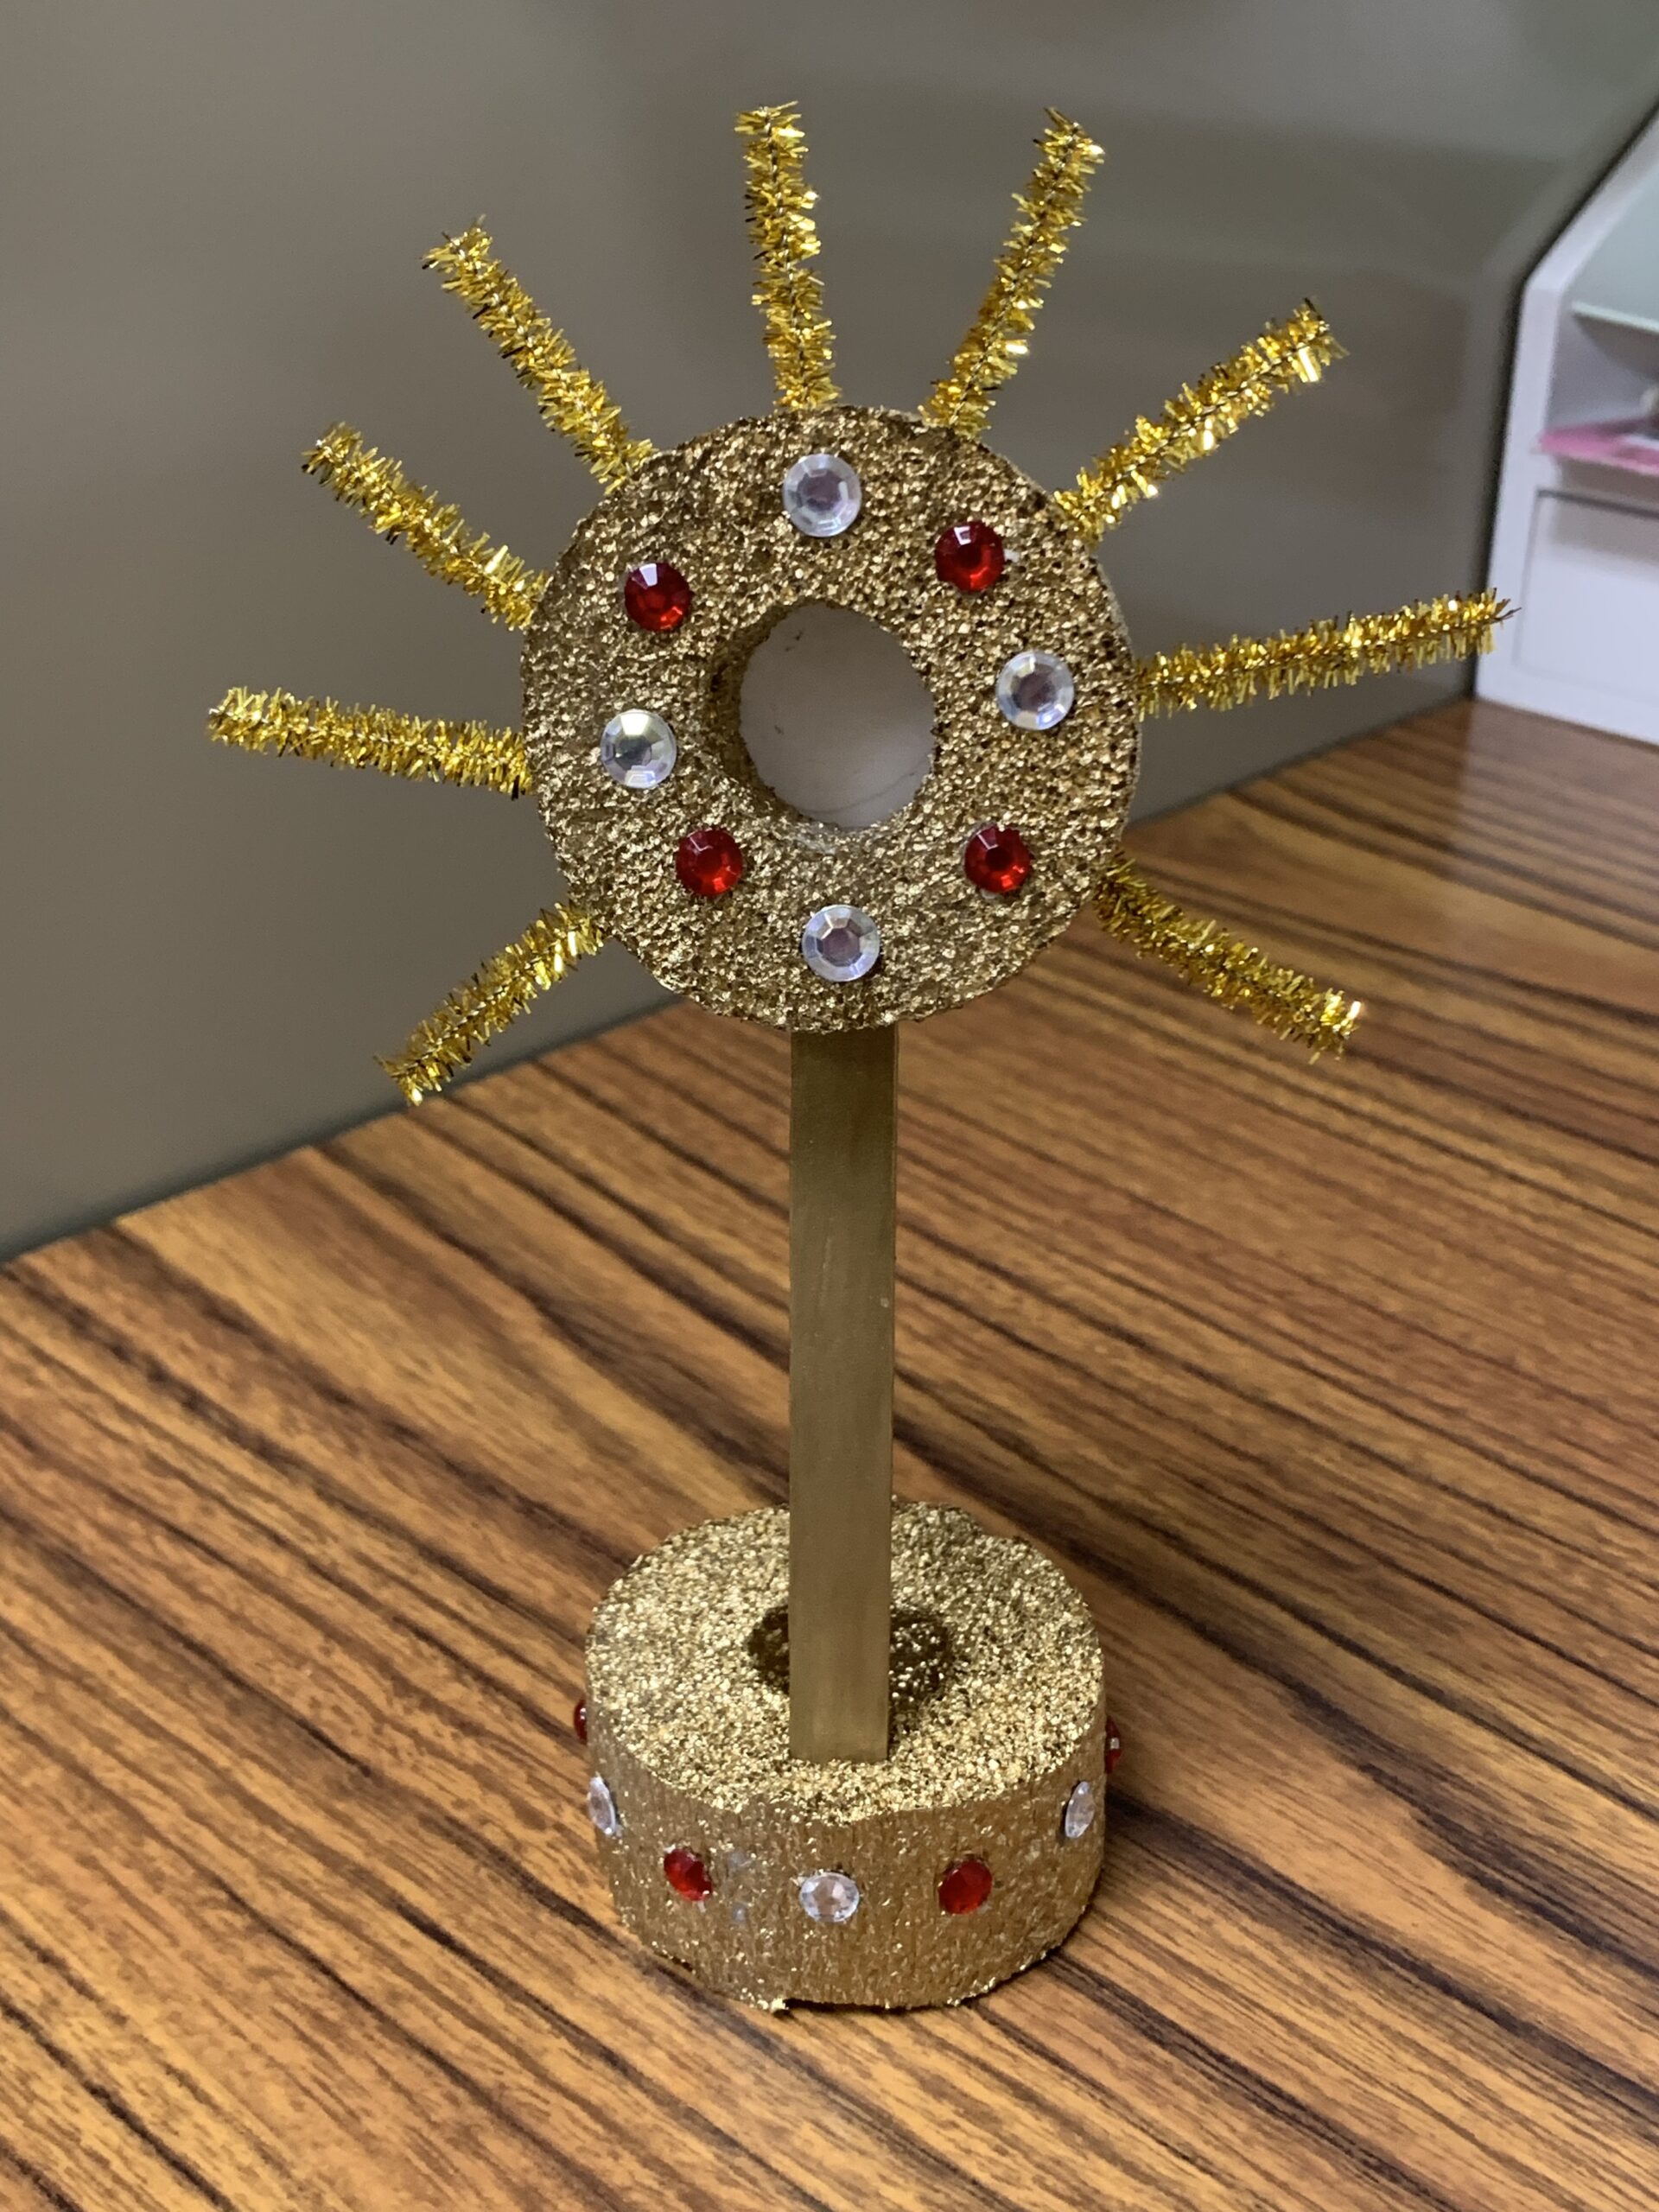
Now the monstrance is finished. God bless you!
Links for Supplies
Pool noodle:
https://www.dollartree.com/halloween-themed-foam-pool-noodle-assorted-colors-1-ct/305939
https://www.walmart.com/ip/Big-Joe-Swim-Pool-Noodle-Single-Unit-Teal-50-inches-long/7768269880https://www.walmart.com/ip/Big-Joe-Swim-Pool-Noodle-Single-Unit-Teal-50-inches-long/7768269880
Adhesive gems:
https://amzn.to/4dJJ6R2
Spray paint
https://amzn.to/3PVF7ZQ
Popsicle sticks
https://amzn.to/4uwyAUA
Pipe cleaners:
https://amzn.to/3PFCrPO
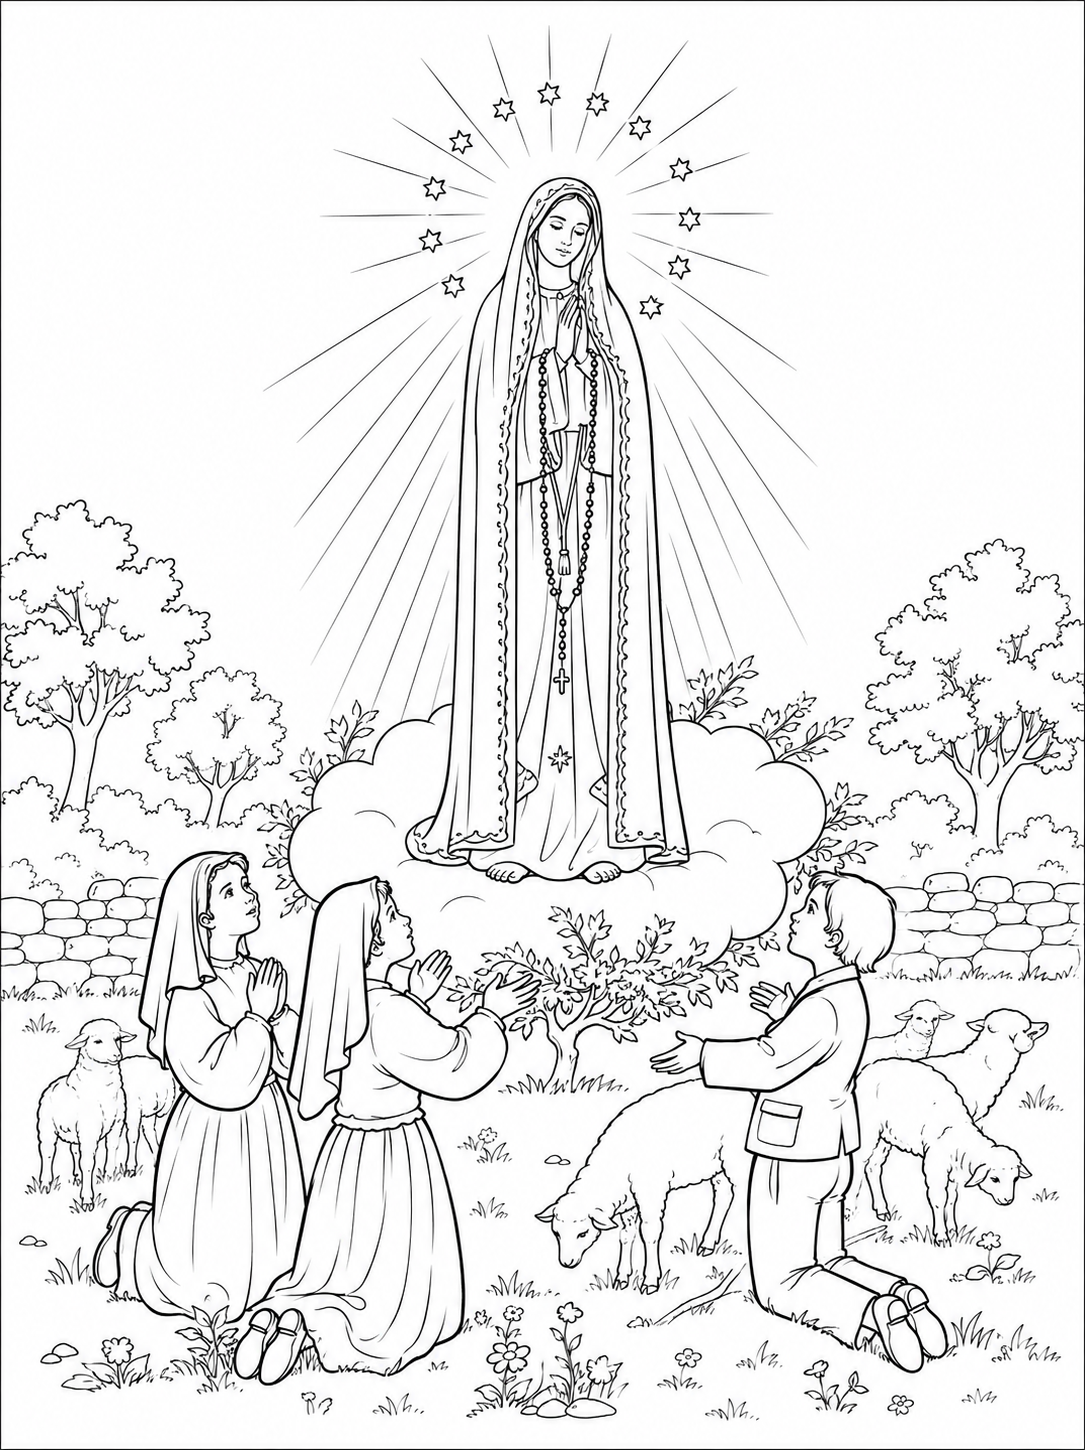
Fatima Story
Audio Story and Coloring Page
Fatima Story

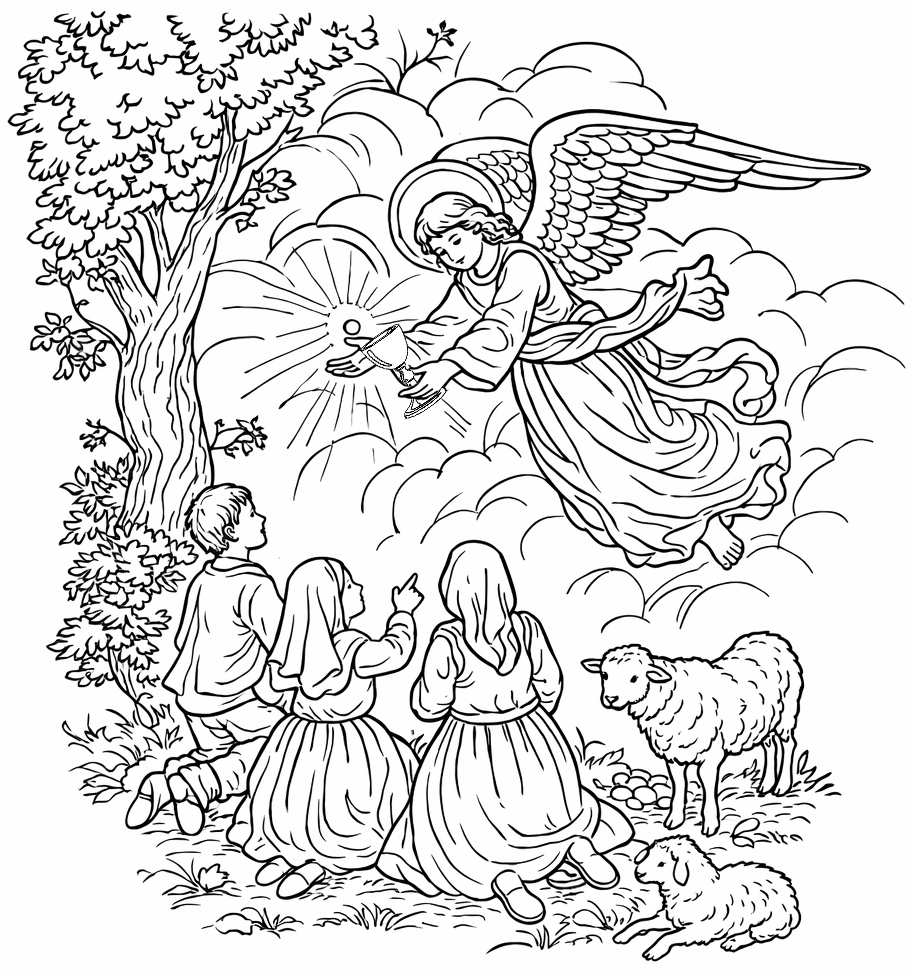
The Angel of Portugal Audio Story and Coloring Page
Audio Story and Coloring Page
The Angel of Portugal
Saint Veronica Meditation
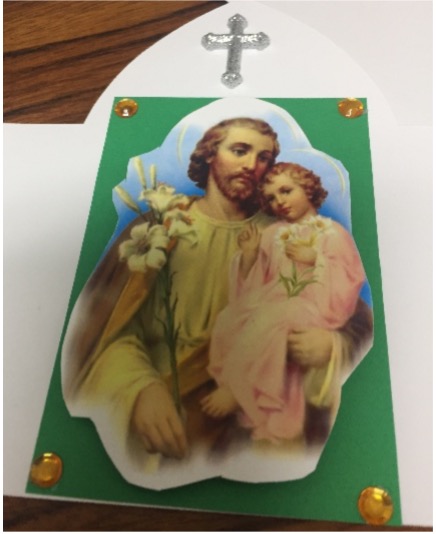
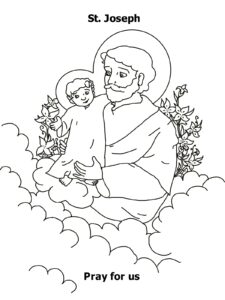
Saint Joseph Shrine
Saint Joseph was the foster-father of Our Lord and the spouse and guardian of Our Blessed Mother. He is the protector of Holy Mother the Church and one of the most powerful saints in Heaven. You can go to him in all your needs and he will help you.
Items Needed
- Cardstock paper – any color
- Construction paper – green and any color
- Patterned scrapbook paper
- Lily template (see attached)
- Pictures of St. Joseph or holy cards (see attached file)
- Stencil template (see attached template)
- Prayers to St Joseph (see attached file)
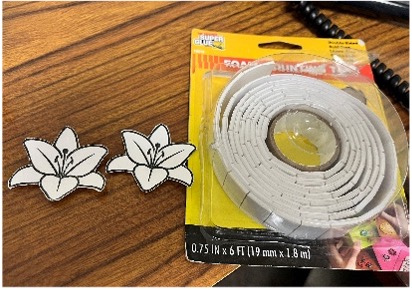
- Adhesive foam squares
- Gem stickers
- Flower stickers
- Cross stickers
- Glue stick
- Ribbon

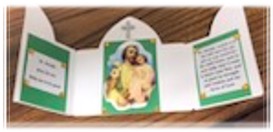
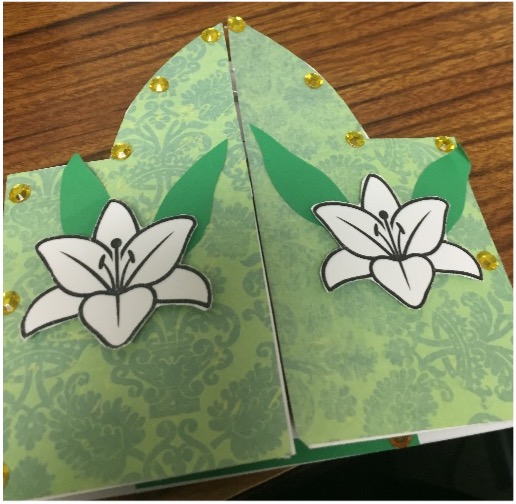
- Download and print the stencil template. Use the template to cut out the shrine on cardstock. It must be a heavy paper or it won’t stand up. See picture #1. Cut out other stencils and set aside. Fold shrine along lines.
- With the other stencils cut out 2 fronts on patterned paper. See picture #2. Glue to each door.
- Download and print the lily template. Cut out two lilies and glue one to the outside of each front piece. You can use foam squares for a 3D effect. See picture #3.
Add two leaves to each lily.
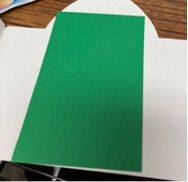
- Now for the inside cut out a piece of colored paper 2¼” x 3½”. The color of the paper should complement your holy card of St. Joseph. Glue in center of shrine. See picture #4.
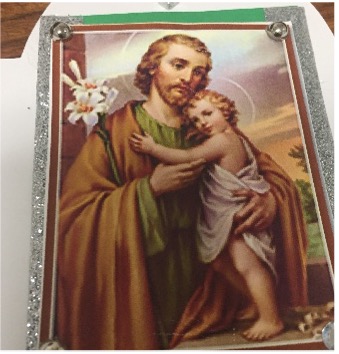
- Download and print the St. Joseph pictures. Glue on one picture (or a St. Joseph holy card) or use two foam squares to attach if you prefer. Now add ribbon if desired. See picture #5.
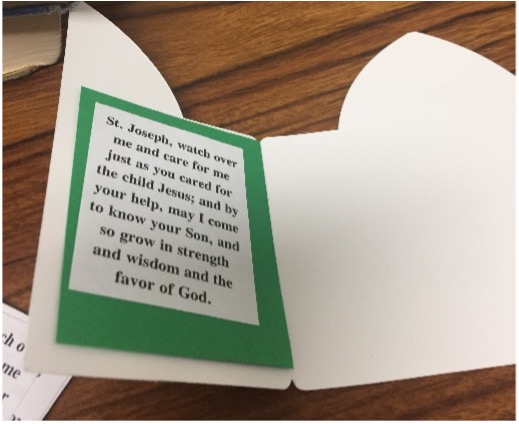
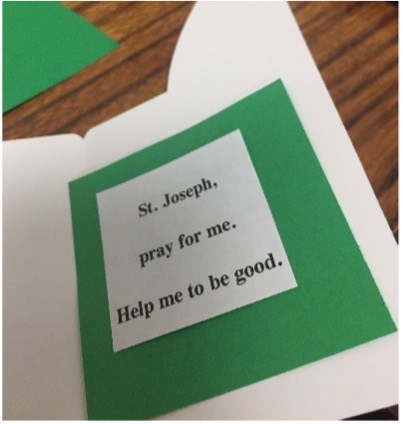
- Cut two rectangles of paper measuring 2” x 2½”. Glue inside doors of shrine. See picture #6. Download, print, cut out and glue on the prayers to St. Joseph. See picture #6A.
- Now decorate the shrine inside and out with gems, flowers, crosses, and ribbon as desired.
Links for Supplies
Cardstock:
https://amzn.to/3P8LYhP
Construction paper:
https://amzn.to/3P6LZ60
Patterned paper:
https://amzn.to/46XNcTk
Flower punches:
https://amzn.to/4bJG8MD
Crosses:
https://amzn.to/4bsfqGY
Glue sticks:
https://amzn.to/4bclQvc
Ribbon:
https://amzn.to/40BONKO
Lenten Sacrifice Calendar and Sacred Heart Project
Items Needed
- Download the Sacred Heart picture template – click here
- Red or white paper
- Foam sheet
- Toothpicks
- Tape or glue
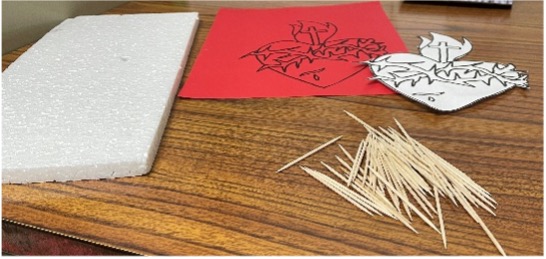
- Print the Sacred Heart template on red or white paper.
- Have your child color the Heart, if desired, then cut out the Heart.
- Tape or glue the Sacred Heart image onto the foam sheet.
- Stick in toothpicks all over the crown of thorns.
Each time your child makes a sacrifice he removes a thorn from Our Lord’s Sacred Heart. This is a great way to help children stay focused during Lent. Also available is a calendar of Lenten sacrifices for children.
Links for Supplies for the Sacred Heart Project
Foam Boards: https://amzn.to/4rOkewQ
Toothpicks: https://amzn.to/3MKWJGe
Red Paper: https://amzn.to/4tI3edu
Stations of the Cross Coloring Booklet
Stations of the Cross Coloring Booklet
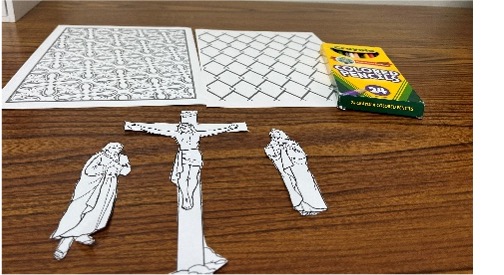
3D Crucifixion Coloring Project
Items Needed
- Cardstock paper – white
- Crucifixion template (see attached)
- Background template (see attached)
- Crayons, markers or colored pencils
- Adhesive foam squares
Links for Supplies
Cardstock:
https://amzn.to/4dAMnDN
Foam Stickers:
https://amzn.to/4v1gjiW
Crayons:
https://amzn.to/4lVJeAH-small
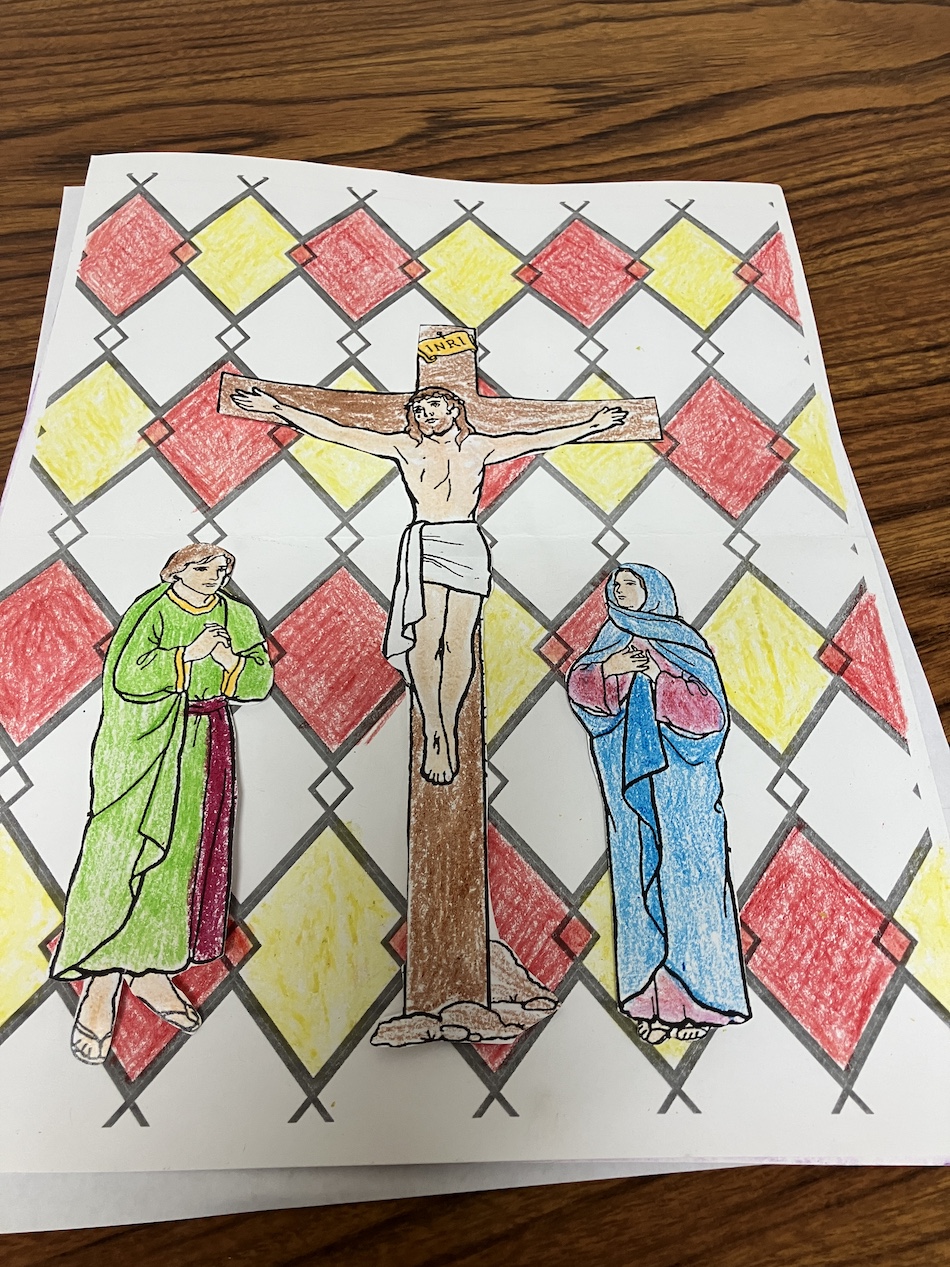
- Download and print the Crucifixion template on cardstock paper. Cut out Our Lady, St. John and Our Lord hanging on the Cross. See picture #1.
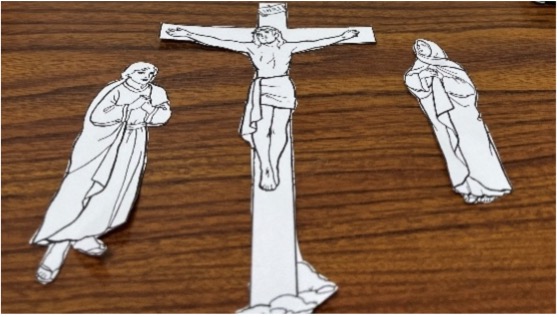
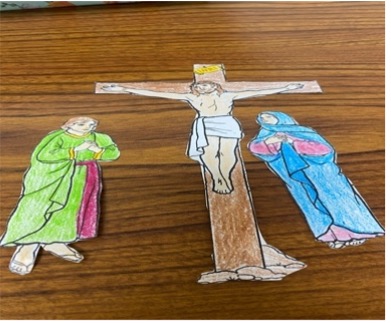
- Color these pictures. See picture #2.
- Download and print the background template of your choice. You will only need to color one. See picture #3 or #4.


- Put two foam squares on the back of the image of Our Lady and two on St. John. Stick three on the back of the Crucifixion image.
- Now stick the images to the background paper for a 3D Crucifixion scene to help remind you of all Our Lord suffered for us. You can punch a hole at the top and hang with a string or ribbon, or use tape to stick the scene to a wall or window.
Saint Joseph Shrine
Saint Joseph was the foster-father of Our Lord and the spouse and guardian of Our Blessed Mother. He is the protector of Holy Mother the Church and one of the most powerful saints in Heaven. You can go to him in all your needs and he will help you.
Items Needed
- Cardstock paper – any color
- Construction paper – green and any color
- Patterned scrapbook paper
- Lily template (see attached)
- Pictures of St. Joseph or holy cards (see attached file)
- Stencil template (see attached template)
- Prayers to St Joseph (see attached file)
- Adhesive foam squares
- Gem stickers
- Flower stickers
- Cross stickers
- Glue stick
- Ribbon
- Download and print the stencil template. Use the template to cut out the shrine on cardstock. It must be a heavy paper or it won’t stand up. See picture #1. Cut out other stencils and set aside. Fold shrine along lines.
- With the other stencils cut out 2 fronts on patterned paper. See picture #2. Glue to each door.
- Download and print the lily template. Cut out two lilies and glue one to the outside of each front piece. You can use foam squares for a 3D effect. See picture #3.
Add two leaves to each lily.
- Now for the inside cut out a piece of colored paper 2¼” x 3½”. The color of the paper should complement your holy card of St. Joseph. Glue in center of shrine. See picture #4.
- Download and print the St. Joseph pictures. Glue on one picture (or a St. Joseph holy card) or use two foam squares to attach if you prefer. Now add ribbon if desired. See picture #5.
- Cut two rectangles of paper measuring 2” x 2½”. Glue inside doors of shrine. See picture #6. Download, print, cut out and glue on the prayers to St. Joseph. See picture #6A.
- Now decorate the shrine inside and out with gems, flowers, crosses, and ribbon as desired.
Links for Supplies
Cardstock:
https://amzn.to/3P8LYhP
Construction paper:
https://amzn.to/3P6LZ60
Patterned paper:
https://amzn.to/46XNcTk
Flower punches:
https://amzn.to/4bJG8MD
Crosses:
https://amzn.to/4bsfqGY
Glue sticks:
https://amzn.to/4bclQvc
Ribbon:
https://amzn.to/40BONKO
Lenten Sacrifice Calendar and Sacred Heart Project
Items Needed
- Download the Sacred Heart picture template – click here
- Red or white paper
- Foam sheet
- Toothpicks
- Tape or glue
- Print the Sacred Heart template on red or white paper.
- Have your child color the Heart, if desired, then cut out the Heart.
- Tape or glue the Sacred Heart image onto the foam sheet.
- Stick in toothpicks all over the crown of thorns.
Each time your child makes a sacrifice he removes a thorn from Our Lord’s Sacred Heart. This is a great way to help children stay focused during Lent. Also available is a calendar of Lenten sacrifices for children.
Links for Supplies for the Sacred Heart Project
Foam Boards: https://amzn.to/4rOkewQ
Toothpicks: https://amzn.to/3MKWJGe
Red Paper: https://amzn.to/4tI3edu
Stations of the Cross Coloring Booklet
Stations of the Cross Coloring Booklet
The Tree in the Garden of Eden
Tell the children the story of Adam and Eve, and how the devil, disguised as a snake, tempted Eve.
Items Needed
- Construction paper – brown, green, yellow, and red
- Pom-poms – red or any color you prefer
- Googly eyes
- Pipe cleaner – any color
- Glue or hot glue
- Download the tree and snake templates – click here
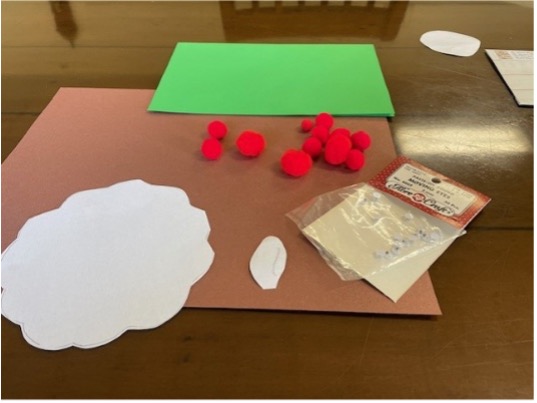
- Gather supplies
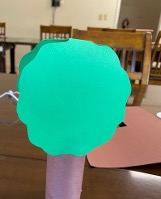
- Cut out a 4 ½ in. x 6 in. rectangle out of brown paper.
- Roll paper into a tube and glue closed with a hot glue gun or tacky glue.

- Fold the green paper in half, and cut out the tree shape (using the pattern), making sure to leave the top edge of the treetop shape connected at the fold.
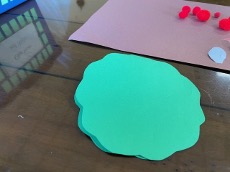
- Attach the treetop to the trunk.
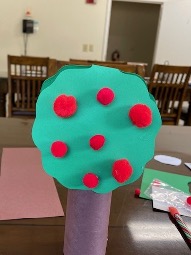
- Glue on pom-poms for apples.
- Fold yellow paper, and cut out the snake shape, making sure to leave the flat edge connected at the fold. Glue on googly eyes. Cut out the snake tongue from red paper. (See attached patterns.)
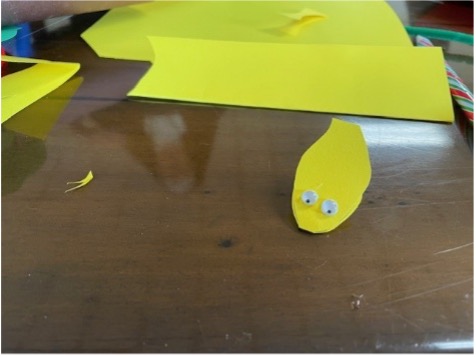
- Glue the snake head to the pipe cleaner.
- Now wrap the snake around the tree and your project is finished.
Links for Supplies
Construction Paper: https://amzn.to/4aERm39
Pom-Poms:
Red: https://amzn.to/4apP8pH
Variety Colors: https://amzn.to/4aAGlA4
Pipe Cleaners: https://amzn.to/46dWzhb
Googly Eyes: https://amzn.to/4rnFgTh
St. Joseph Coloring Page
Saint John Bosco Audio Story and Coloring Page
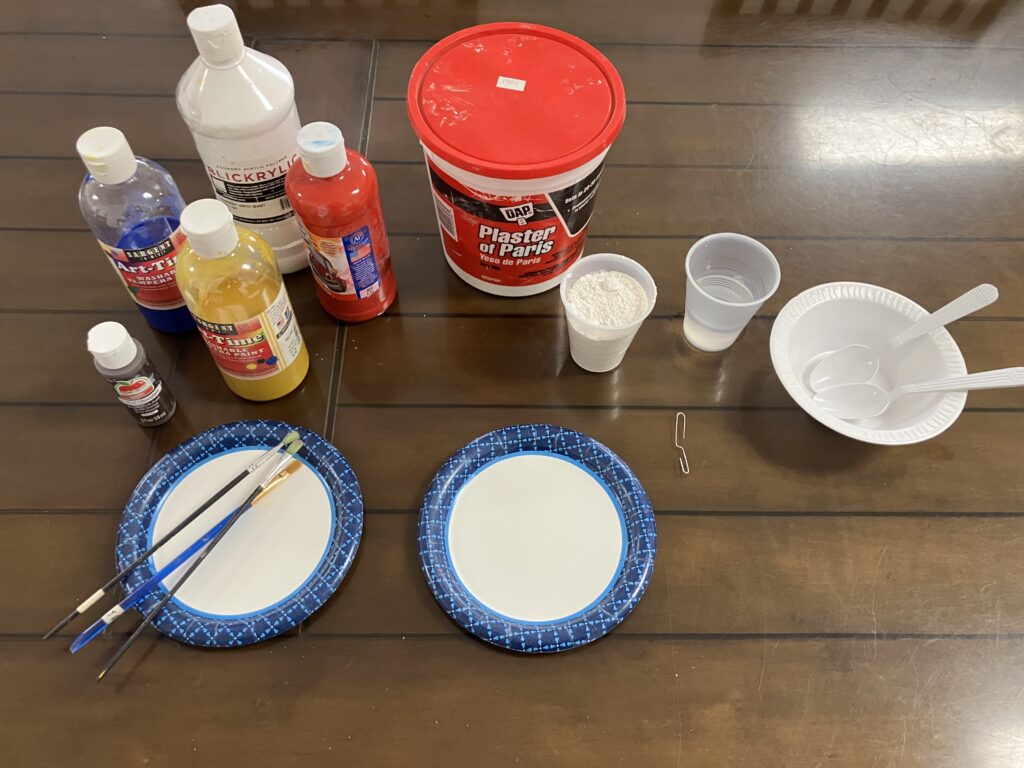
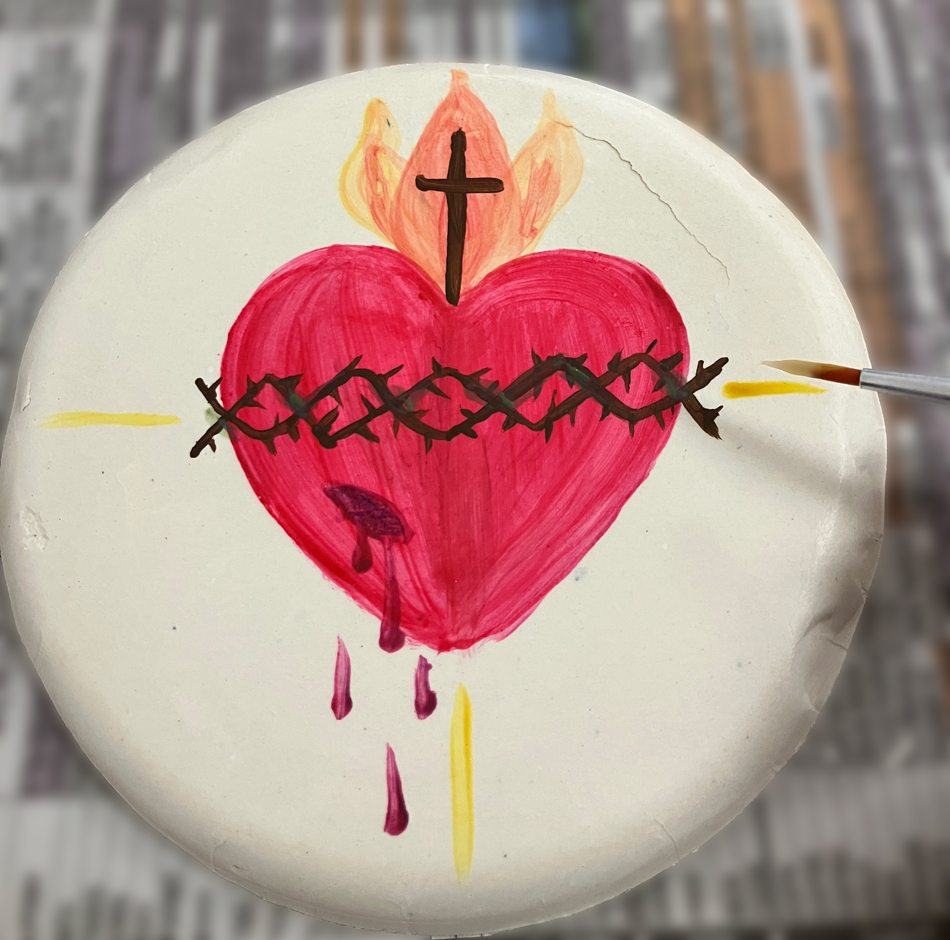
Sacred Heart Fresco
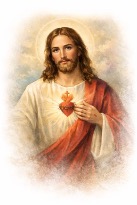
We will celebrate the Feast of the Sacred Heart soon. This is such a big day for all of us. The Sacred Heart is the Heart of Our Lord Who willingly died for us on Calvary. His heart burns with love for each and every one of us. He appeared to St. Margaret Mary in 1675 and begged for the love of our hearts. He said, “If only they would make some return for My love I would count as nothing all that I suffered for them.” If we can, we should go to Mass on the Feast of the Sacred Heart and offer Him our hearts and tell Him that we are going to do all we can to make Him a return of love. We can do this simply by smiling when we are tired or in a bad mood, trying to be more helpful, doing what we are told without question or complaint. These are just little ways of showing Our Lord we love Him and He will reward us with many special graces.
Items Needed
- Plaster of Paris
- Paper plates
- Newspaper
- Paper clip
- Tempera paints
- Paint brushes
- Mixing bowl
- Measuring cups
- Clear glue
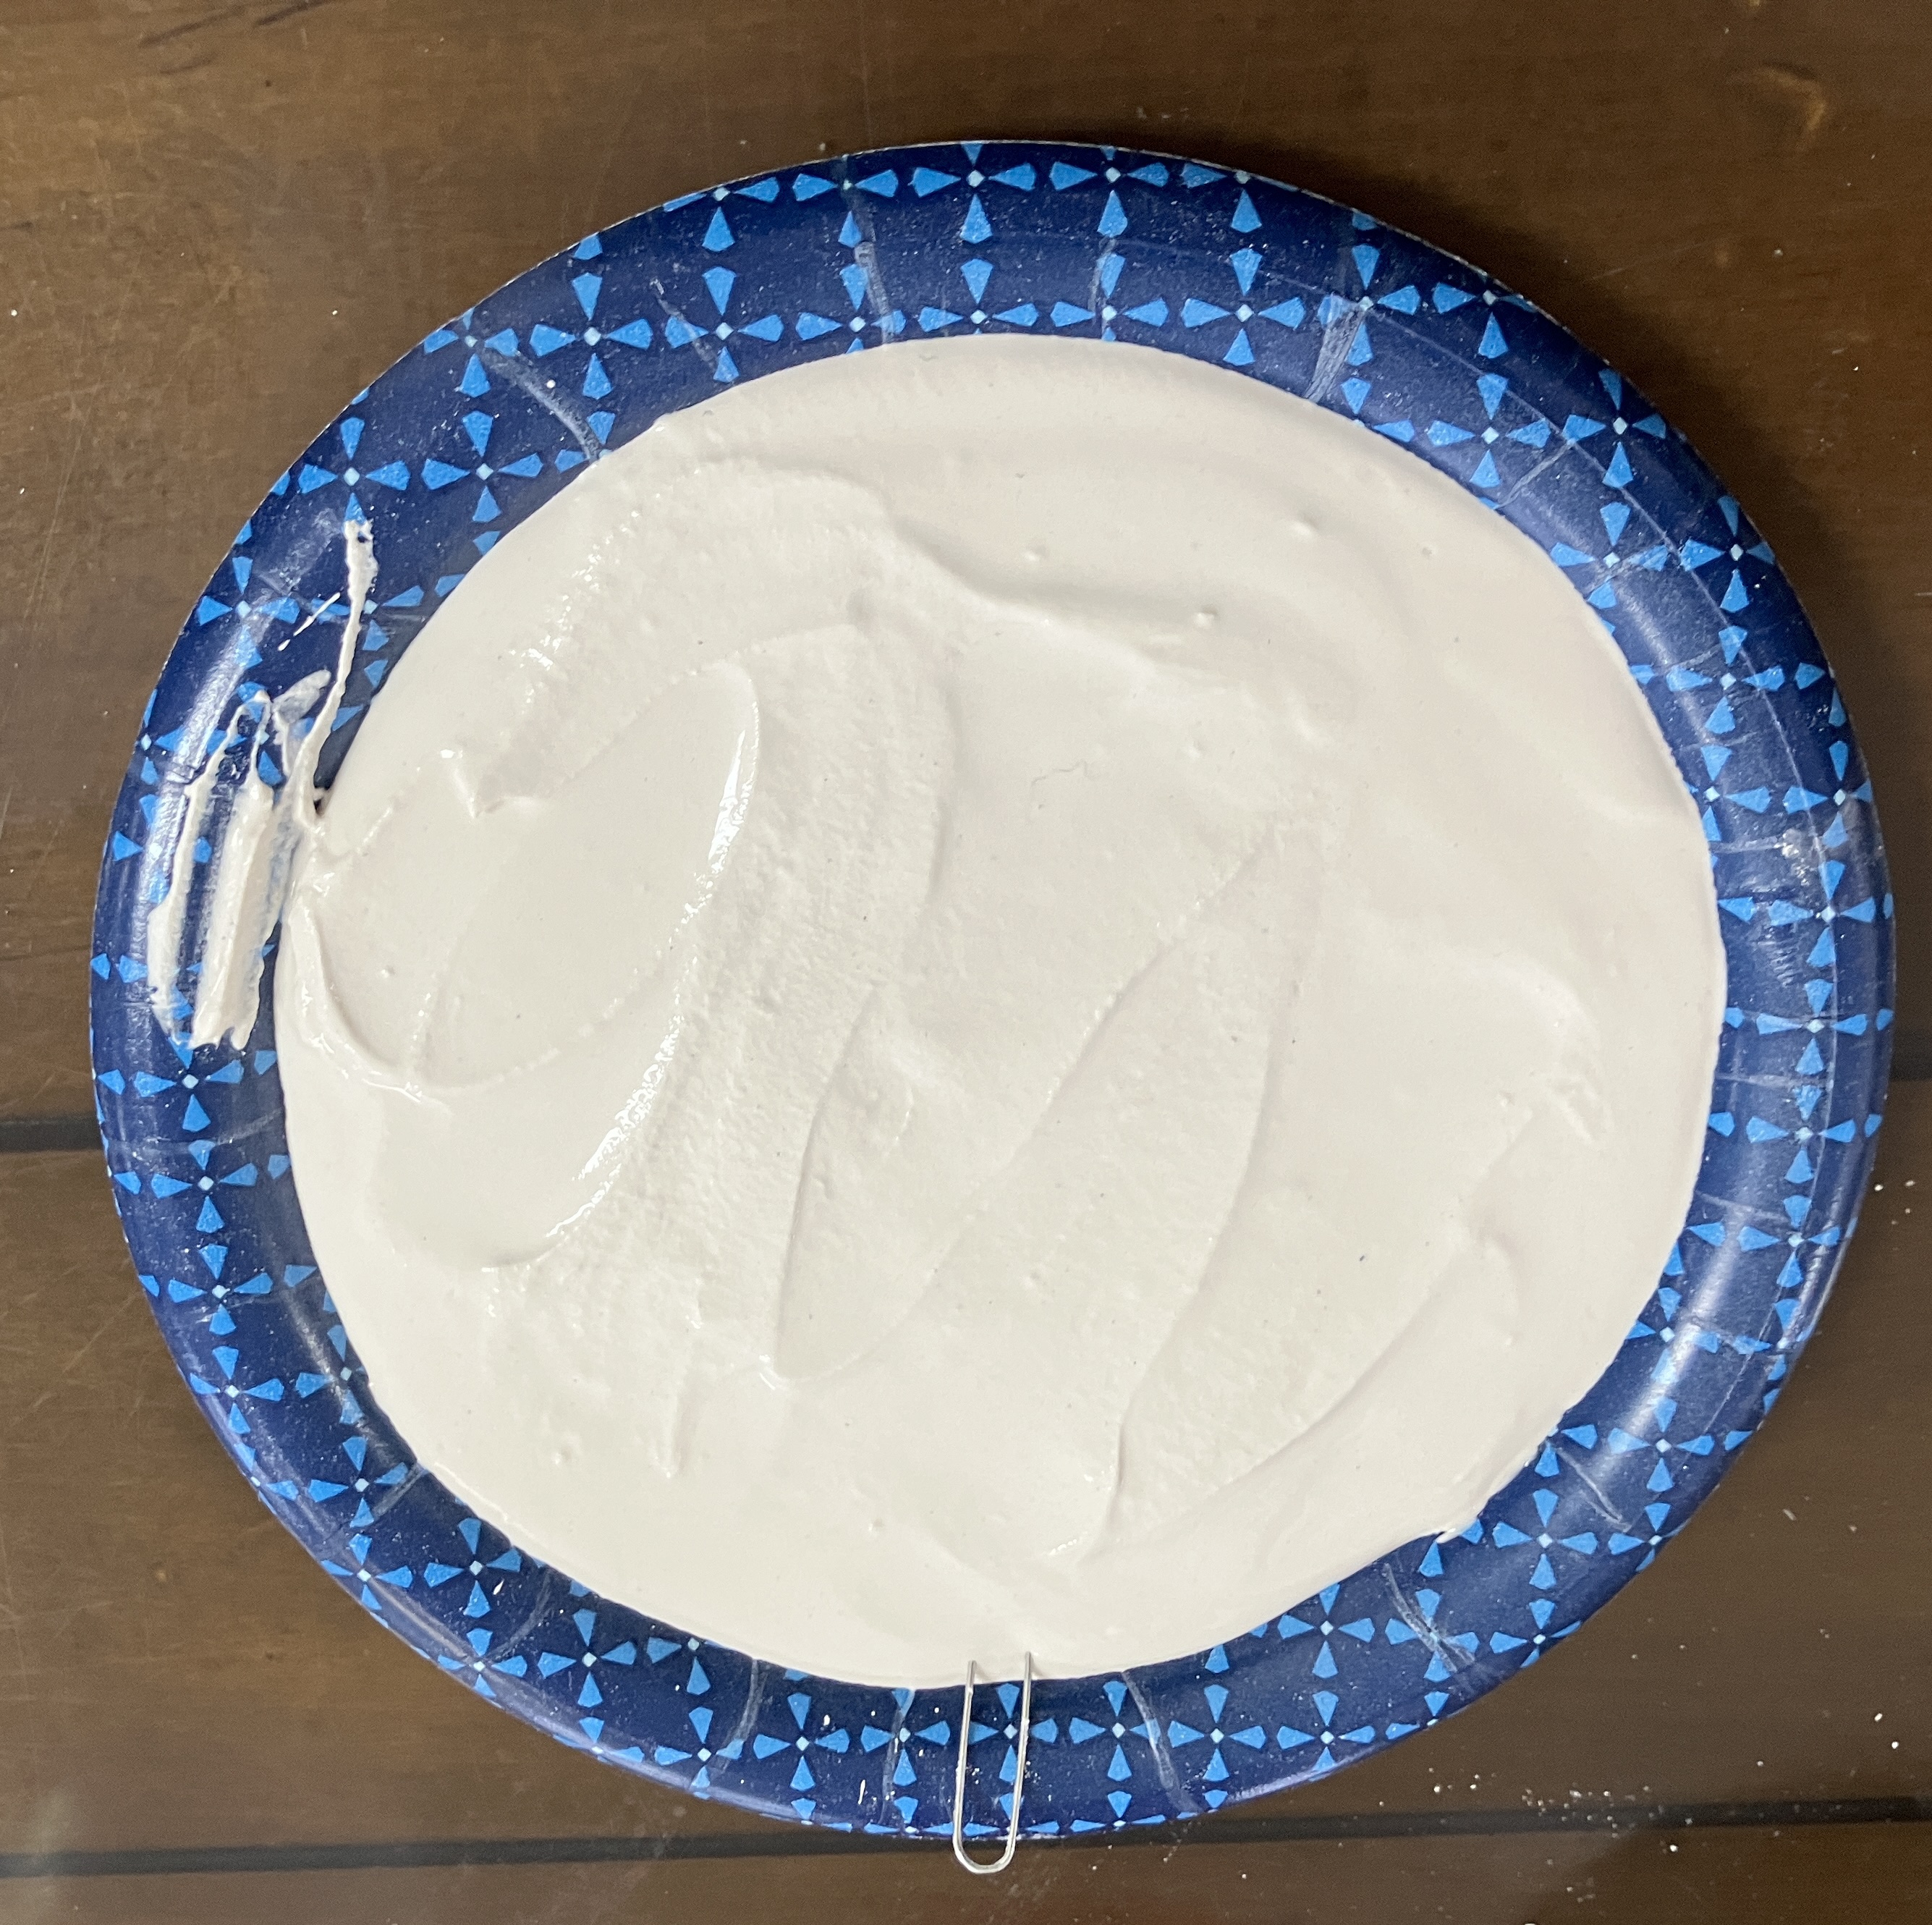
- Prepare plaster of Paris by combining 1 cup of plaster with ½ cup of water. Pour ingredients into a bowl and mix well. The plaster will become thick quickly. See pictures #1 and #2.
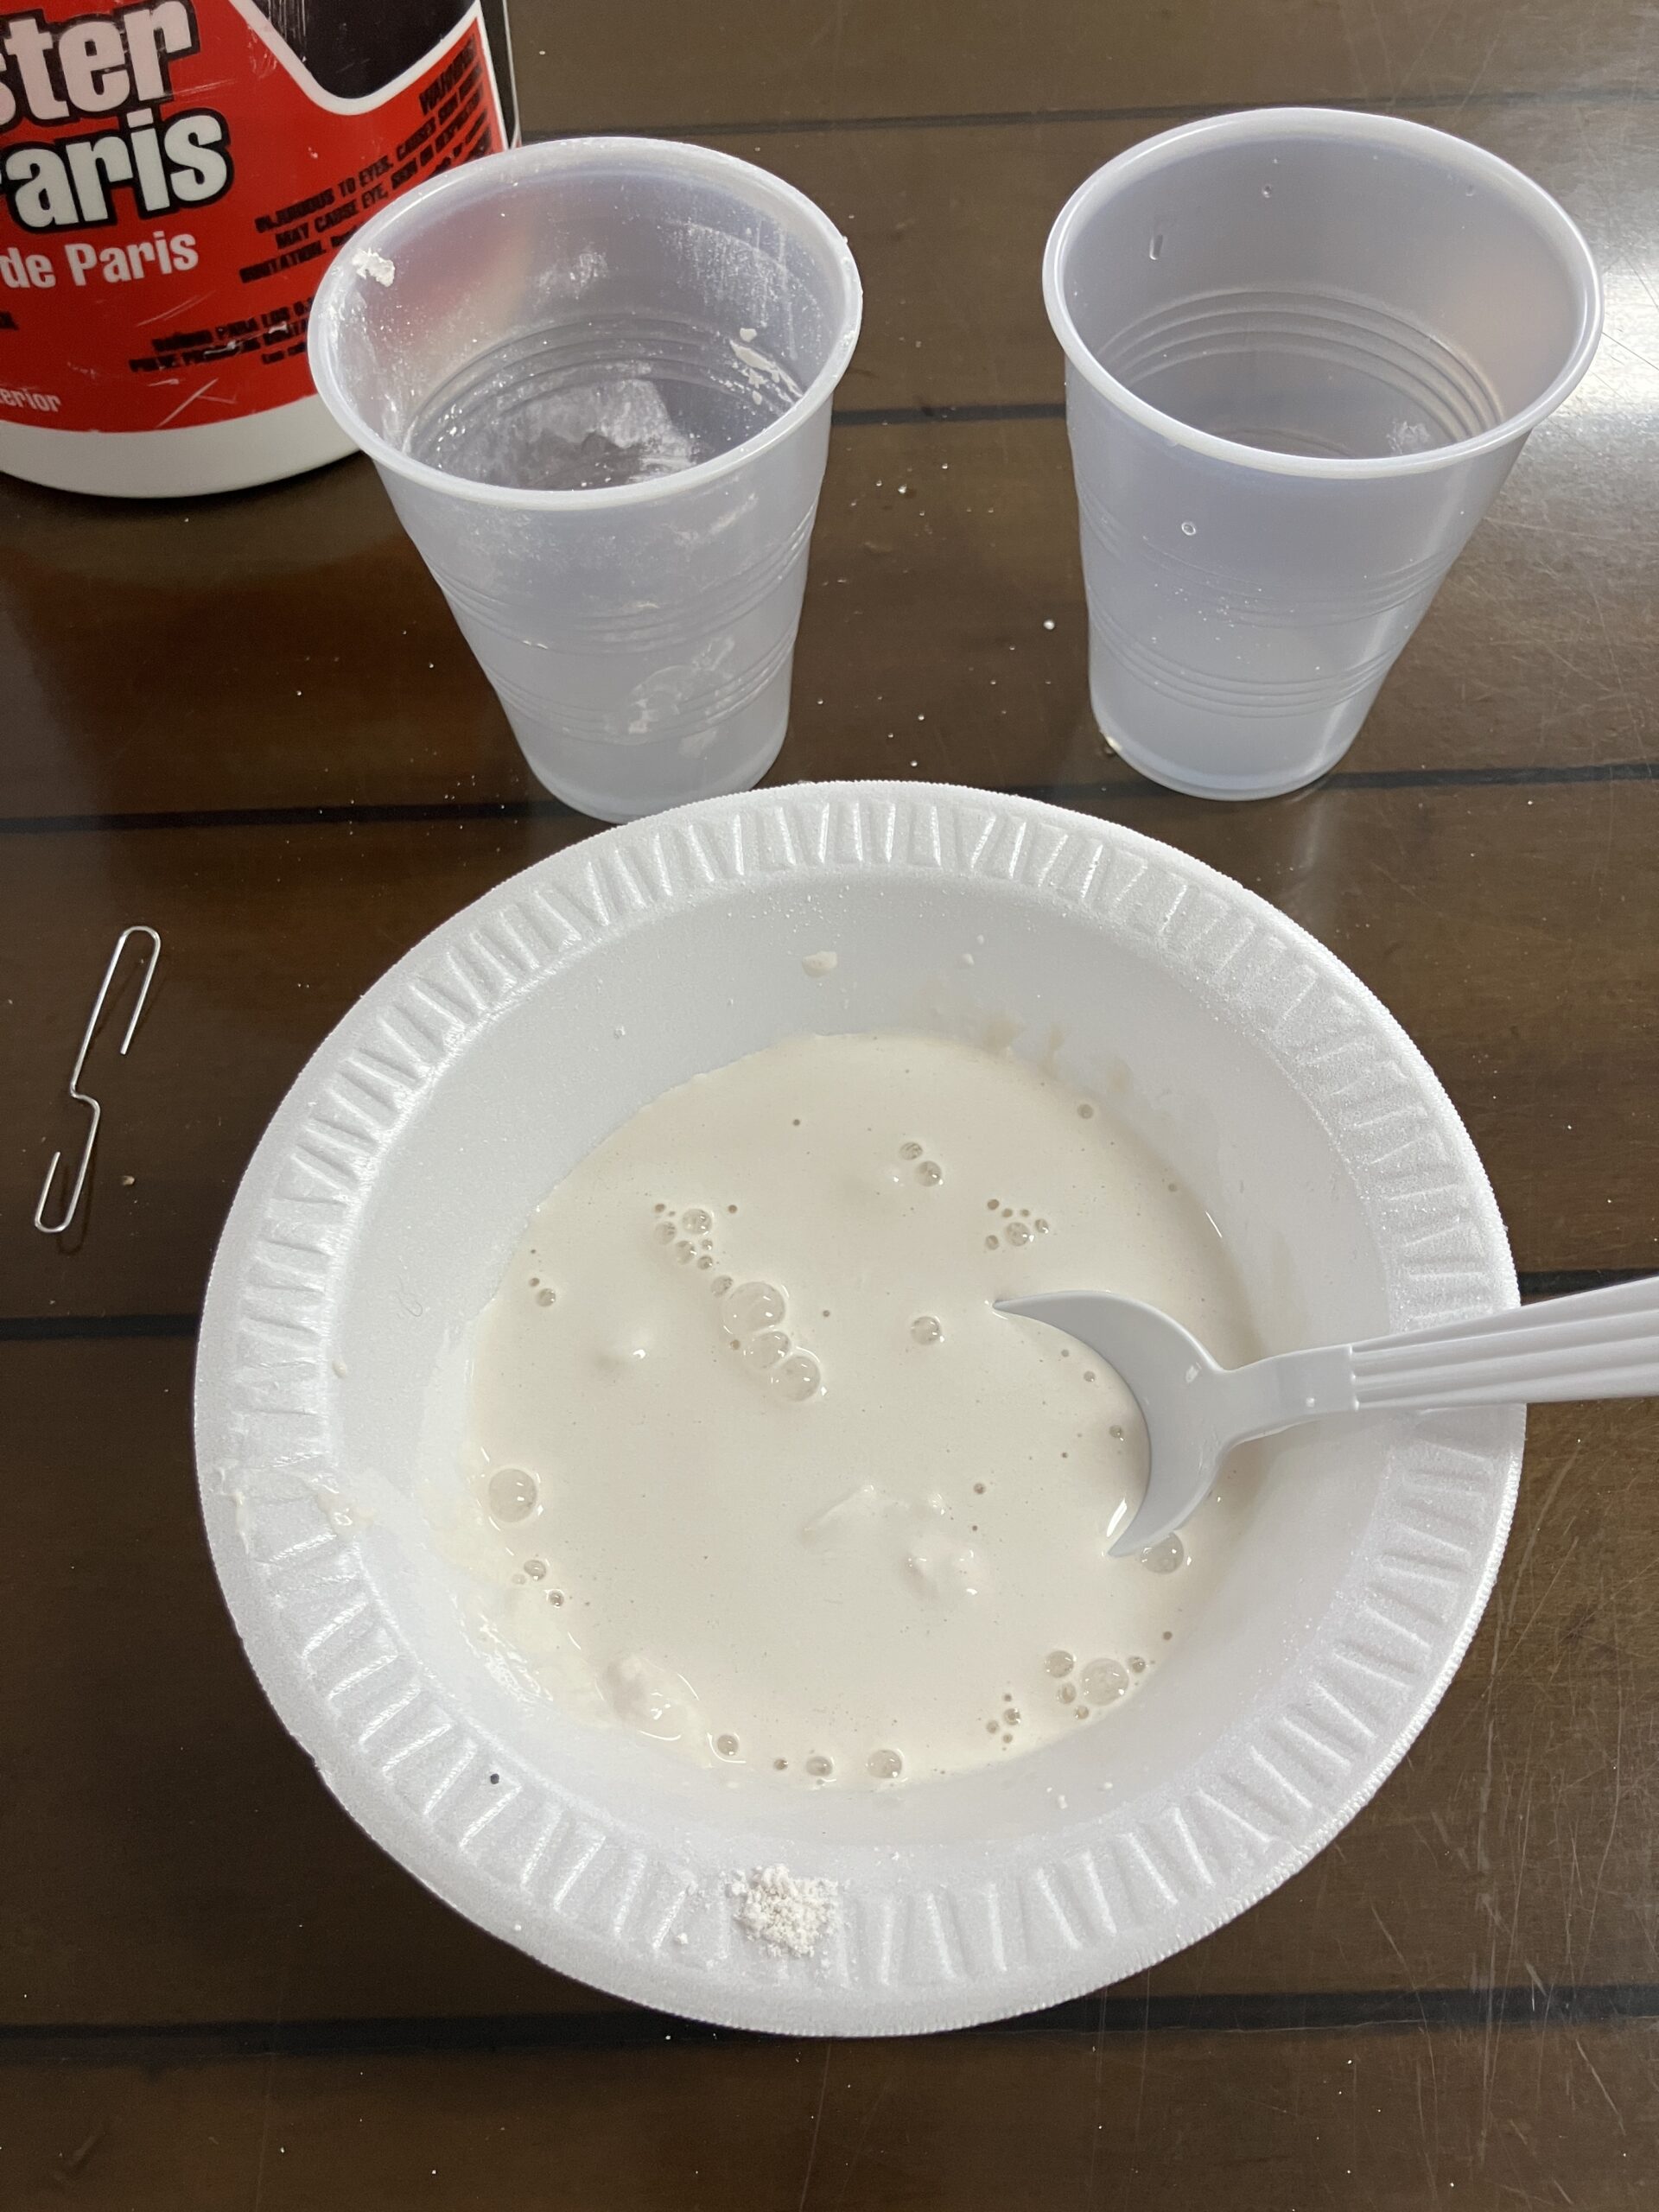
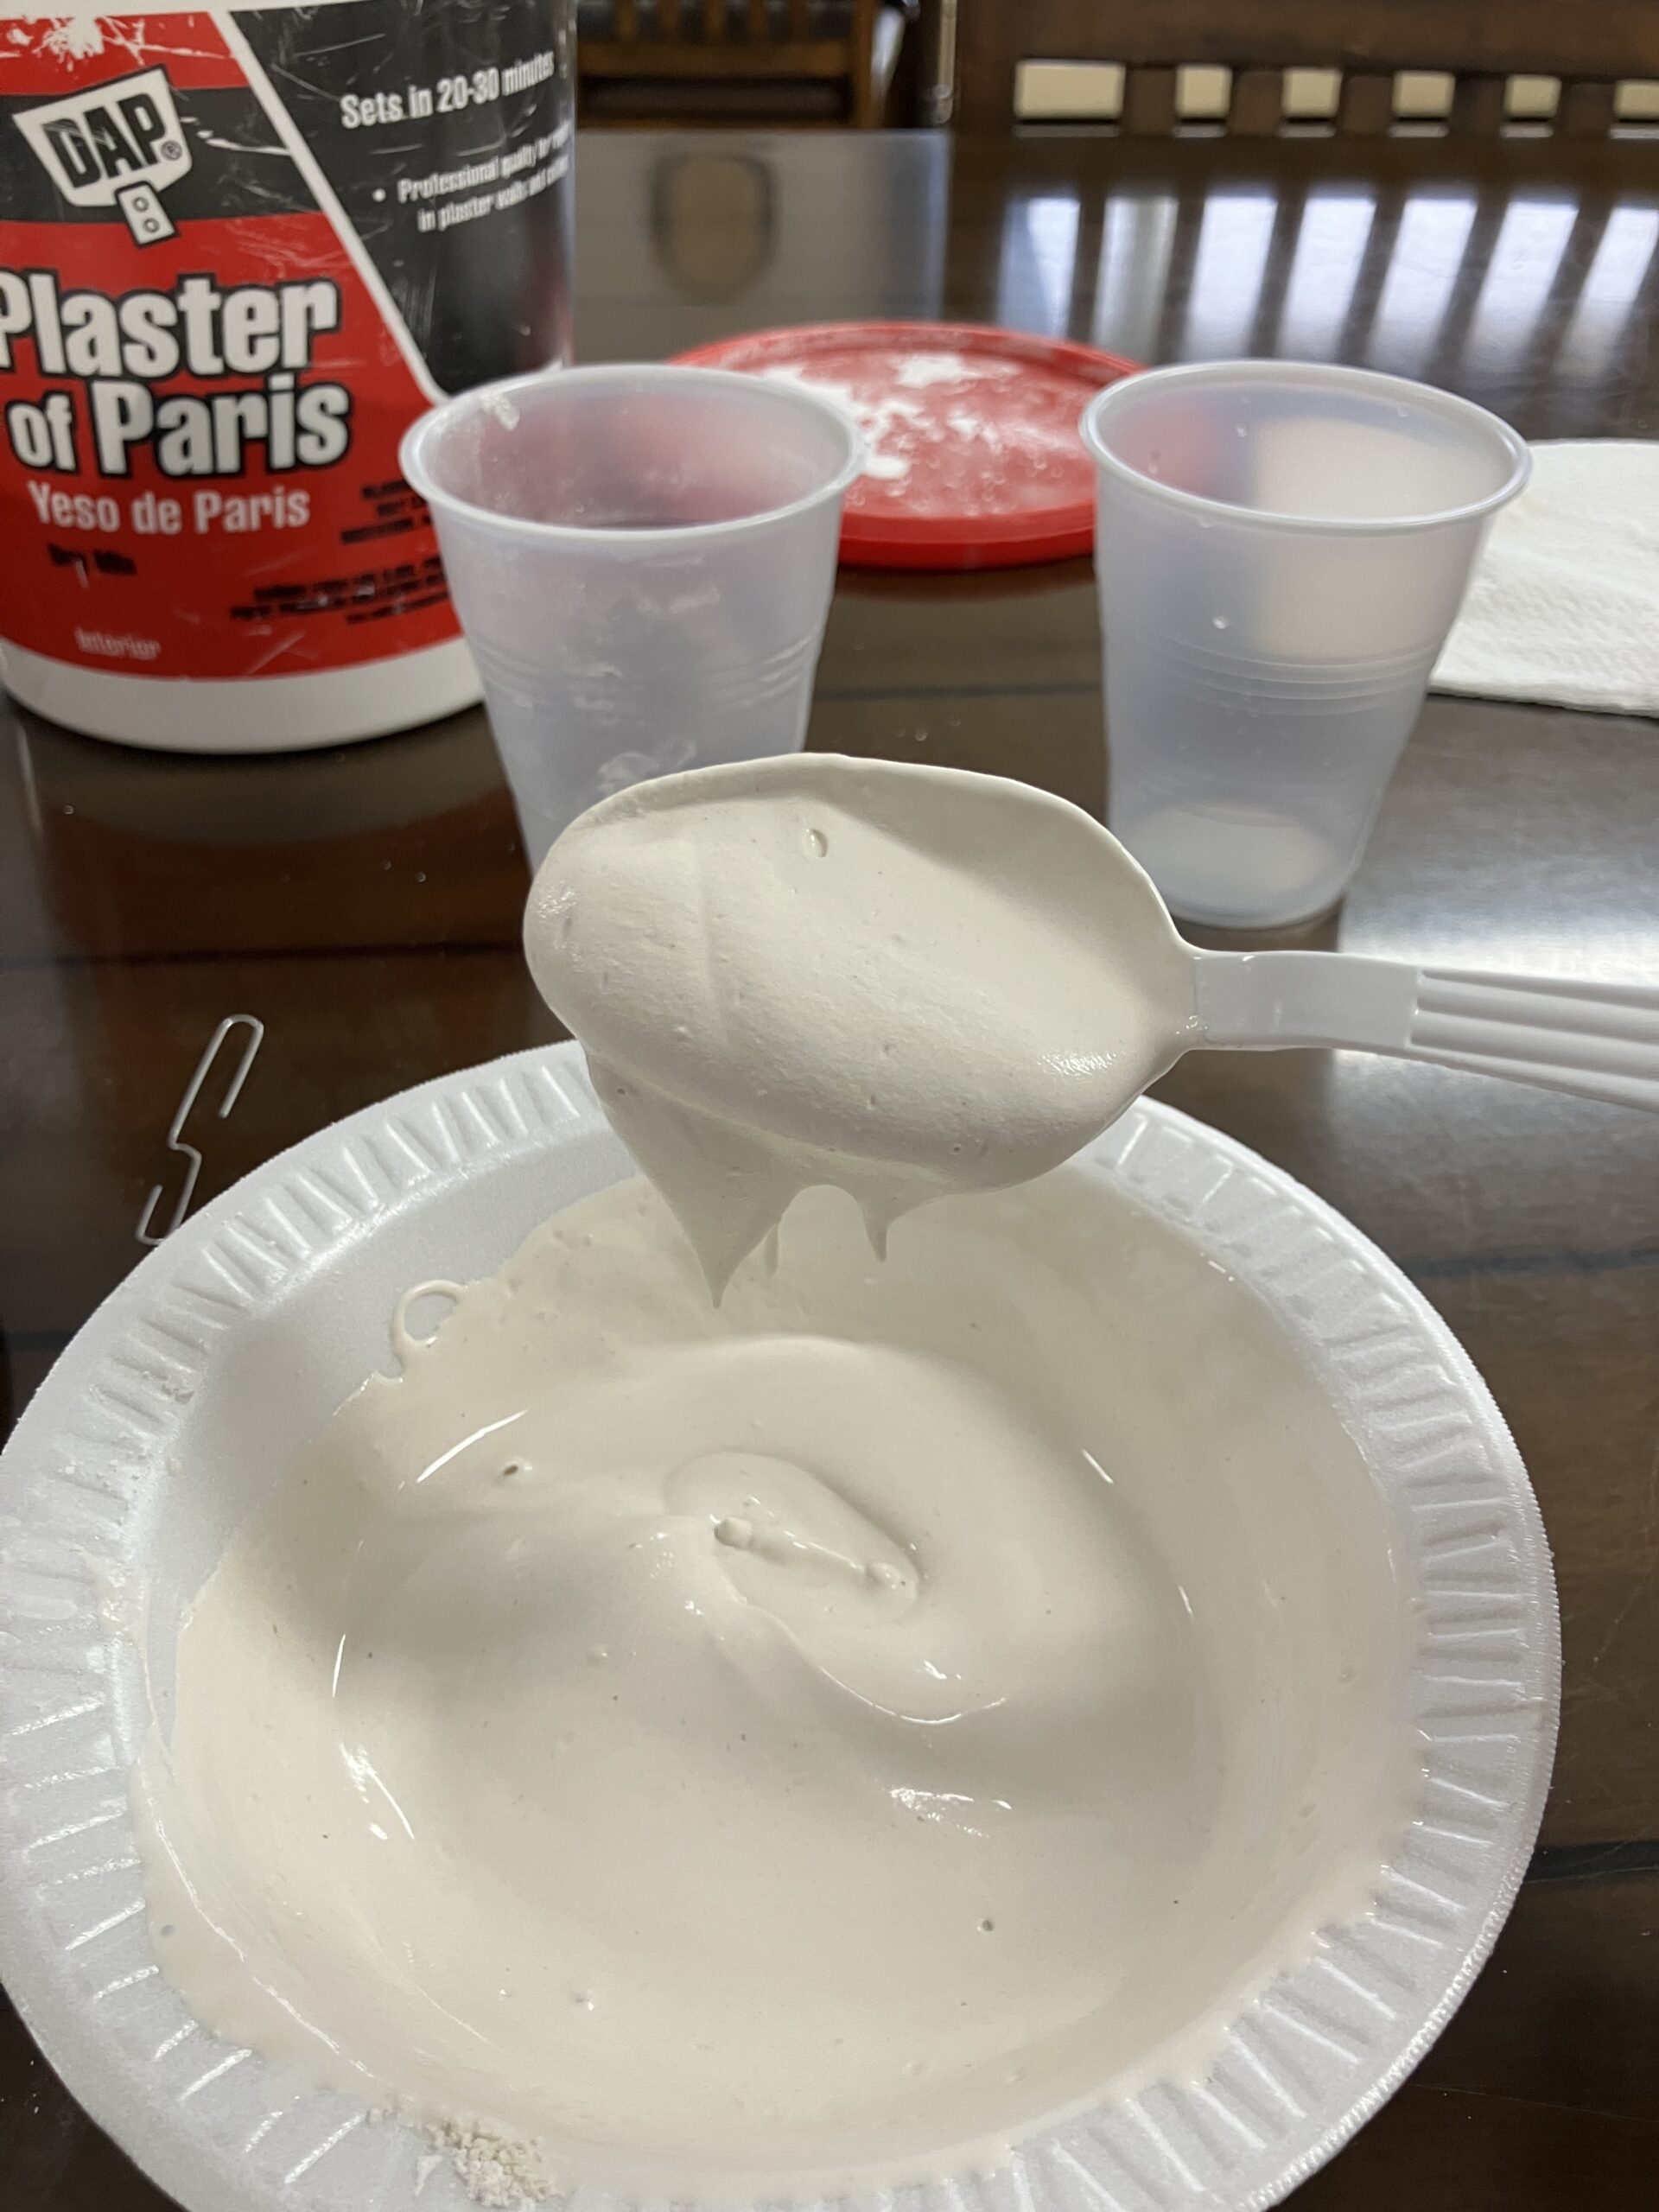
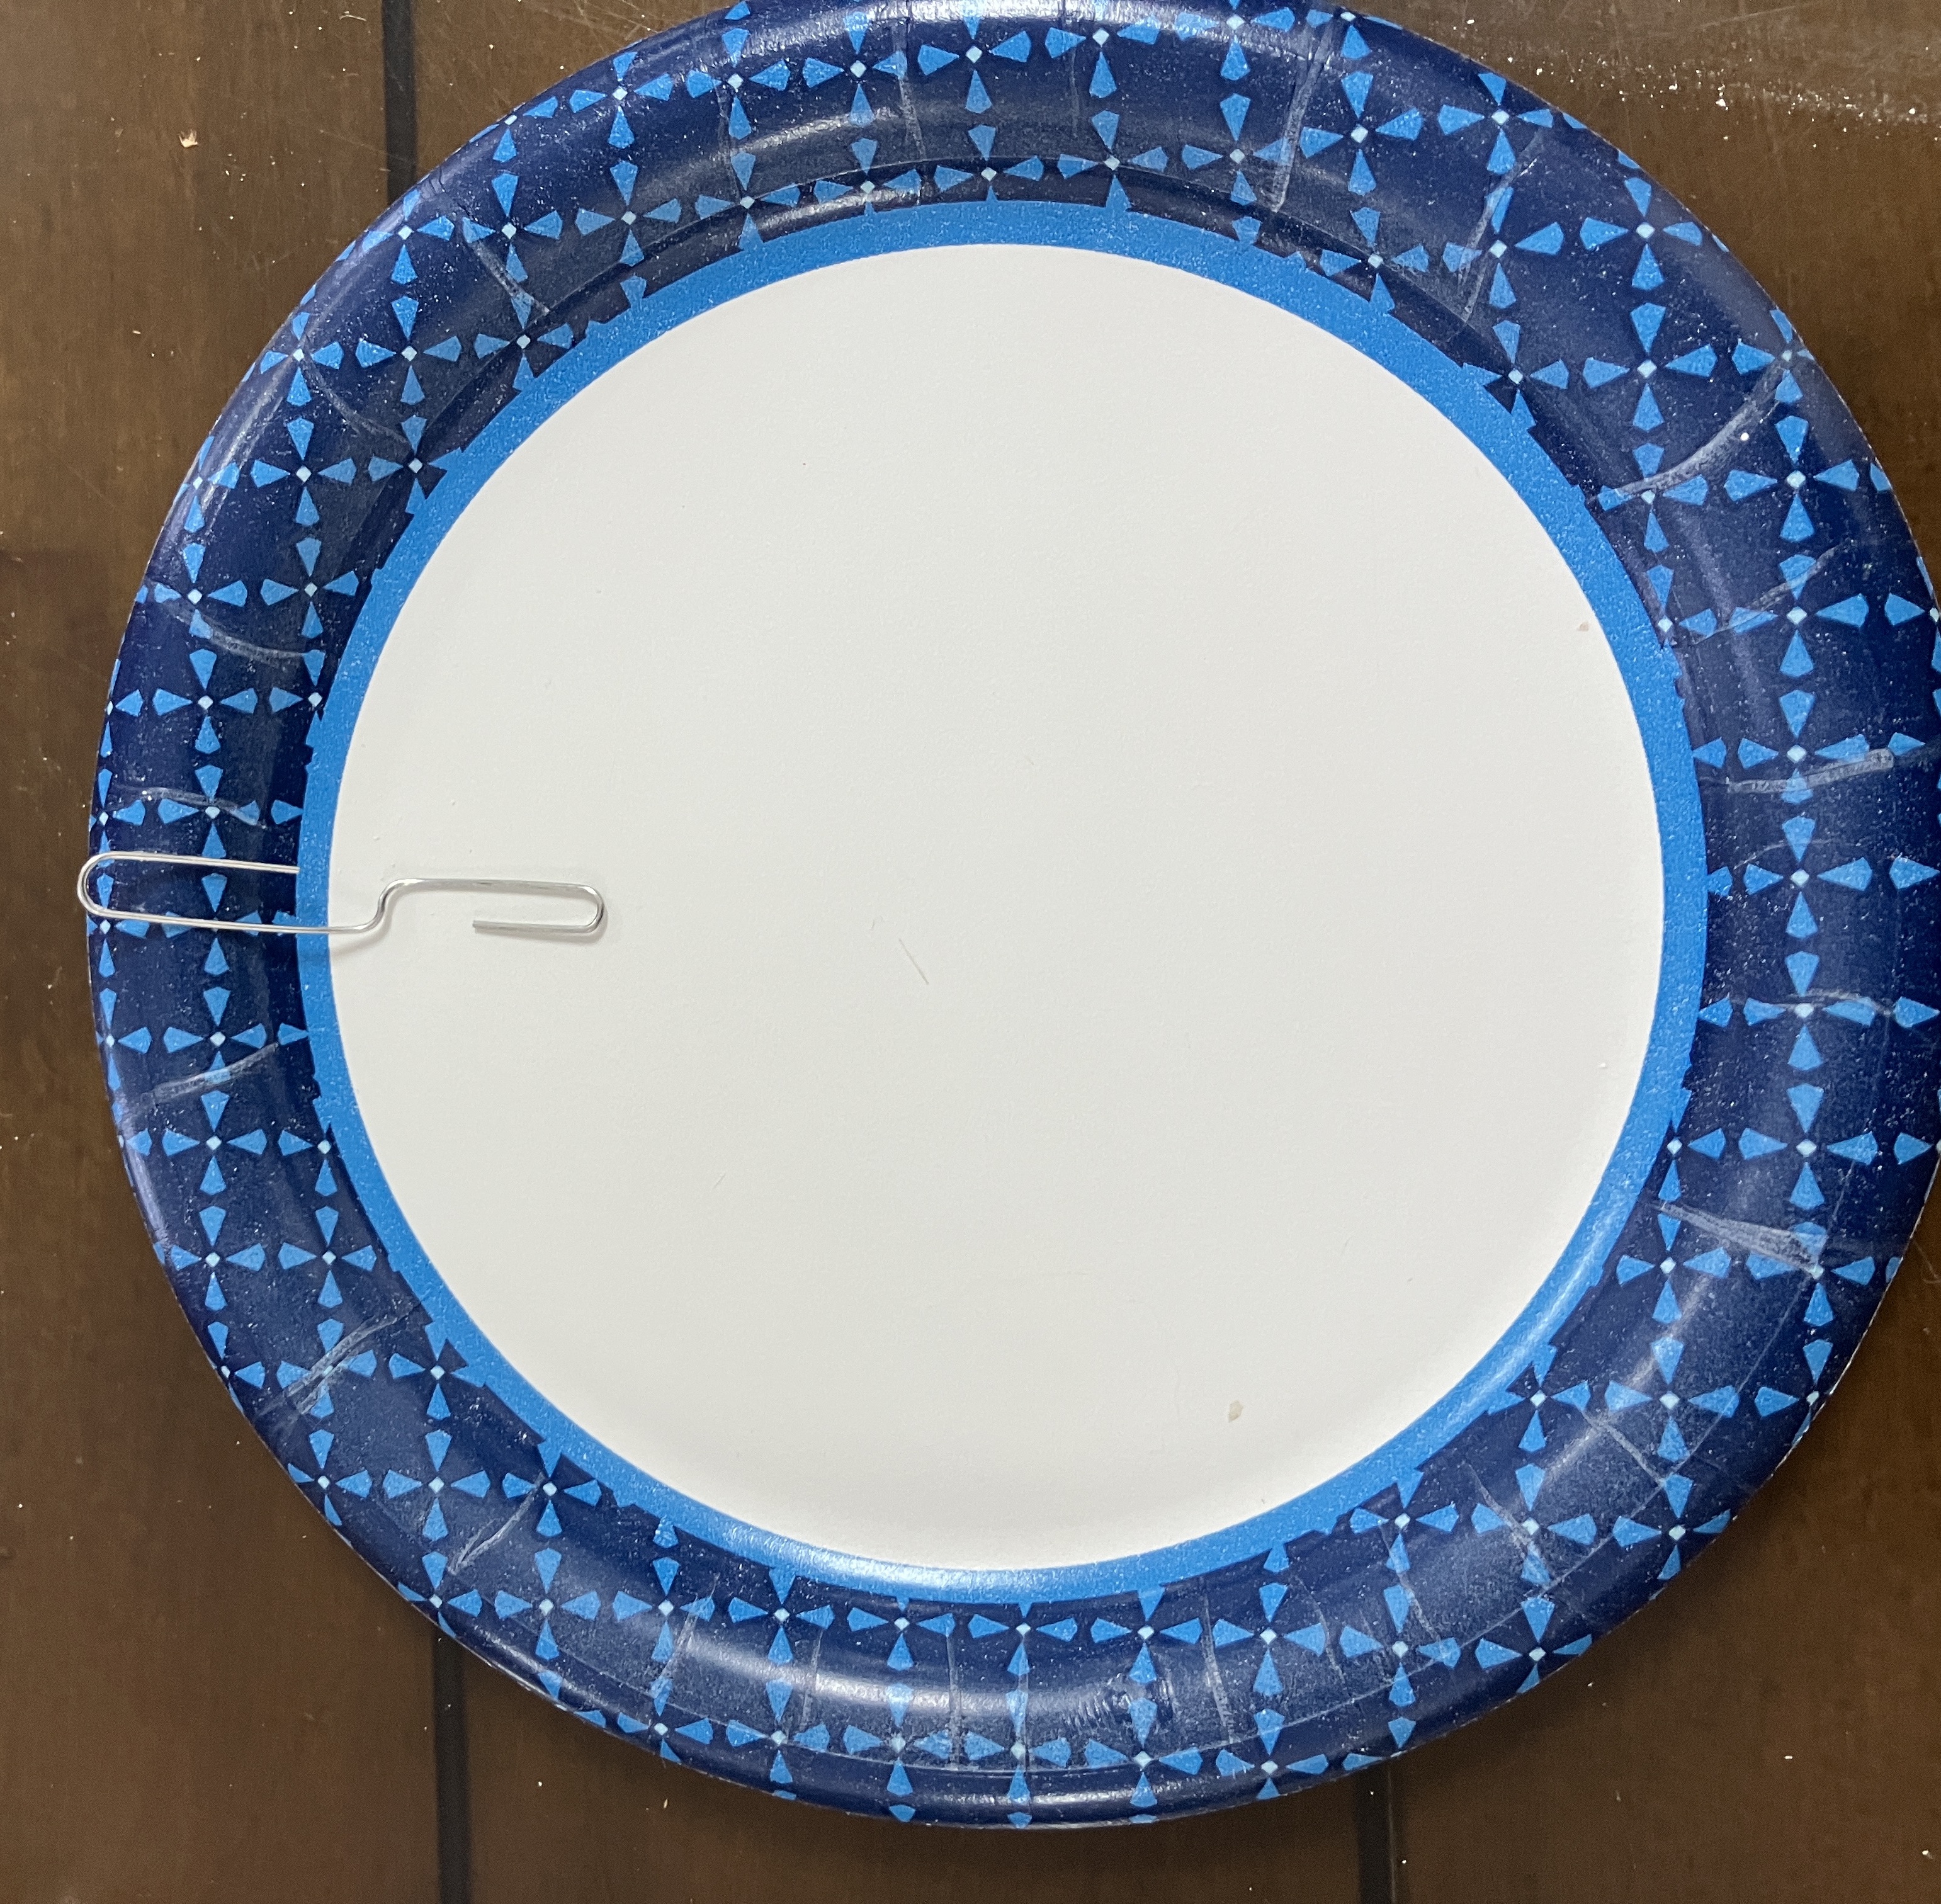
- Pour the mixture onto a paper plate to form a circle. Unbend the paper clip to form a hanger and place on the plate sticking into the plaster. Let the plaster sit and dry for about half an hour. When the plaster has completely dried, remove from the plate and place on some newspaper. See pictures #3 and #4.
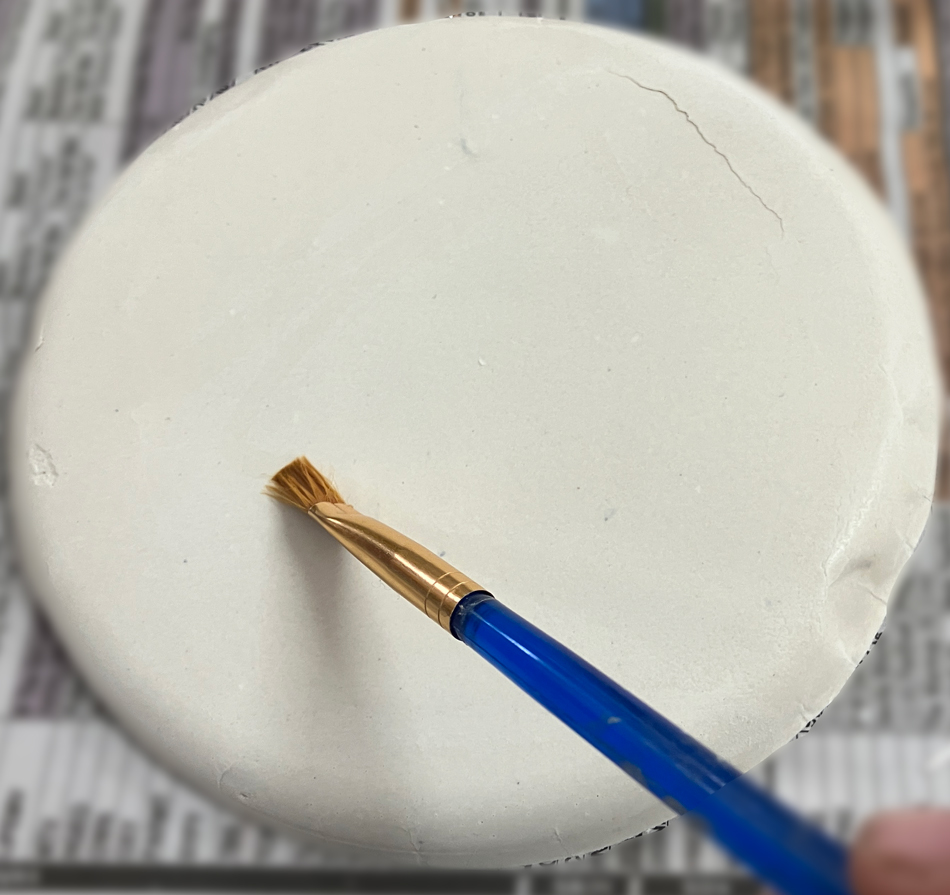
- With a pencil draw your desired picture, or you can use the attached template to trace a heart and flame.
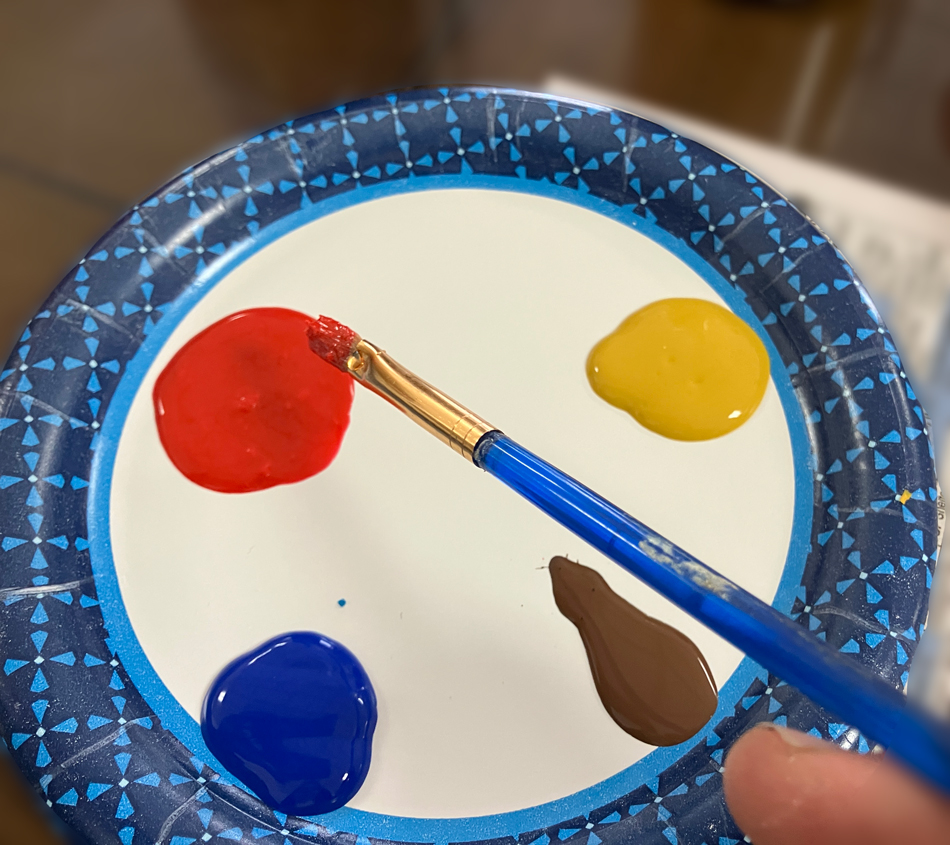
- Brush the plaster with water to dampen. Then paint in the design with tempera paint. Now you can decorate the fresco with any additional designs or embellishments that you wish. See pictures #5, #6, and #7.
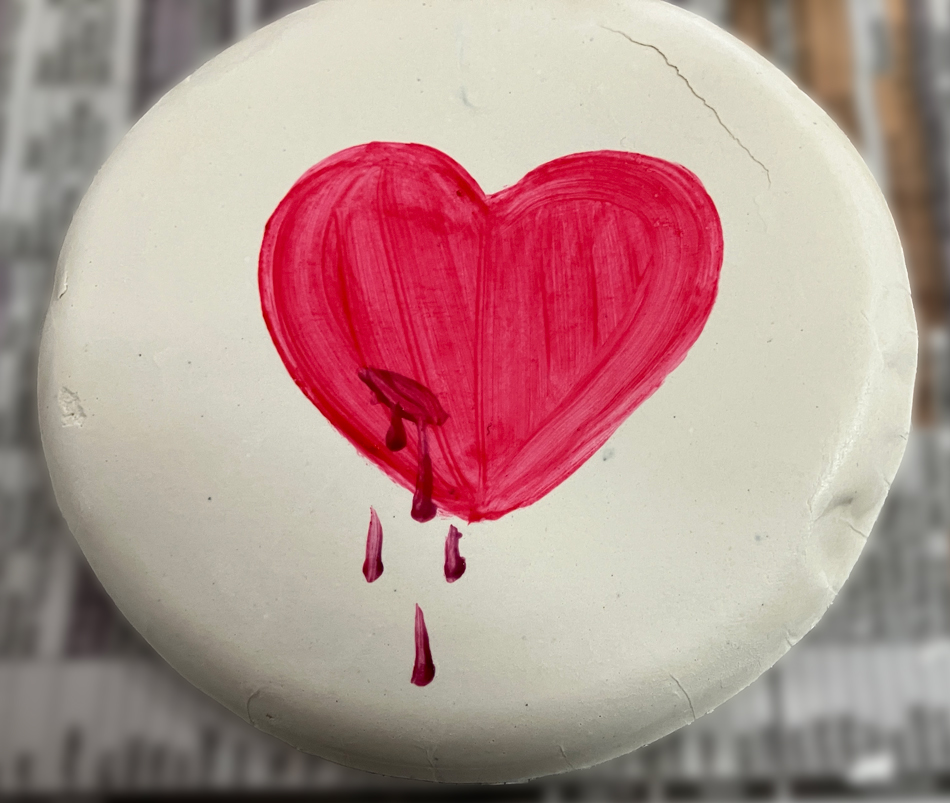
- Once you have painted the fresco let it sit to dry completely. Then take some clear glue and paint over the entire picture. This will preserve your painting and also make it a bit shiny.

Links for Supplies
Plaster of Paris:
https://amzn.to/4xhSJQ4
Paint:
https://amzn.to/4dR9ObU
Paint brushes:
https://amzn.to/4o9cswW
Golden Pennies for the Sacred Heart – Audio Story and Coloring Page
Audio Story and Coloring Page
Golden Pennies for the Sacred Heart
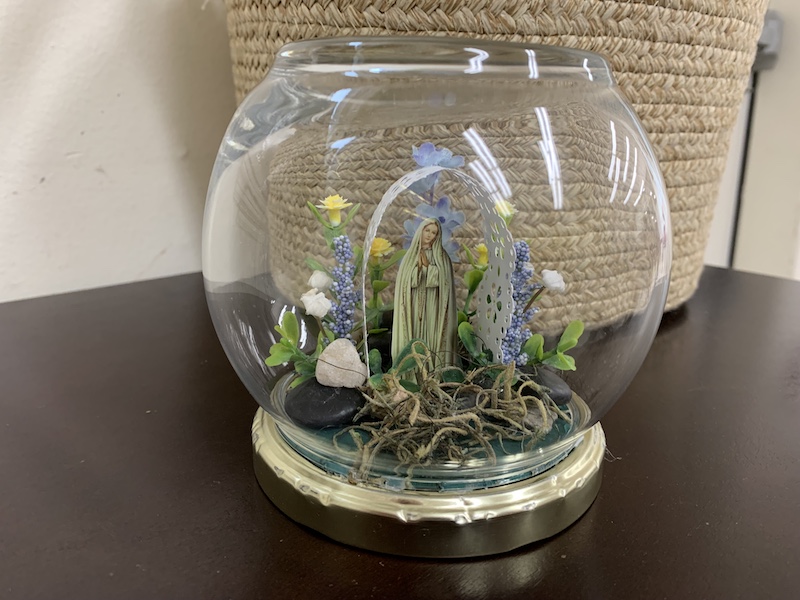
Our Lady’s Garden
May is Mary’s month because in this month nature and all of the flowers come to life and this reminds us of our Mother Mary. Each flower reflects her virtues that we as her children wish to emulate. Remember to think of Mary and offer her a flower of virtue as a special gift. Build a garden of these flowers in your heart. Go to Mary in all your needs – she is our Mother and is always there for us.
 Lily – Our Lady’s purity
 Rose – Mary’s love of neighbor
 Violet – Our Lady’s humility
 Peony – Mary’s love of God
 Ivy – Our Lady’s hope
 Forget-Me-Not – Our Lady’s piety
 Daffodil – Our Lady’s diligence
 Carnation – Our Lady’s obedience
Items Needed
- Glass globe vase 4 ½ inch or larger
- Pickle jar lid or cardboard
- Rocks
- Small artificial flowers and leaves
- Border punch
- Grass or moss
- Green and white paper
- Hot glue gun
- Scissors
- Felt – any color
- Holy card or picture of Our Lady (see attached document)
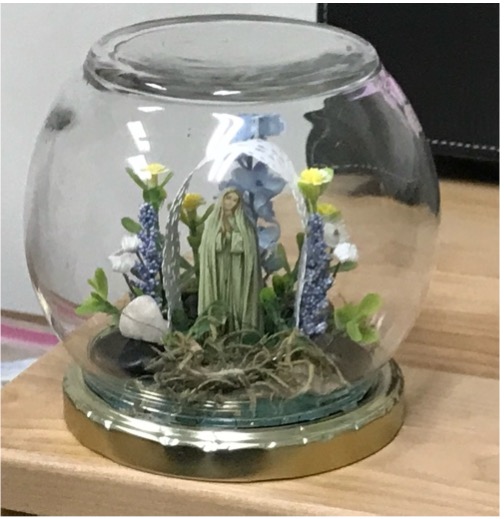
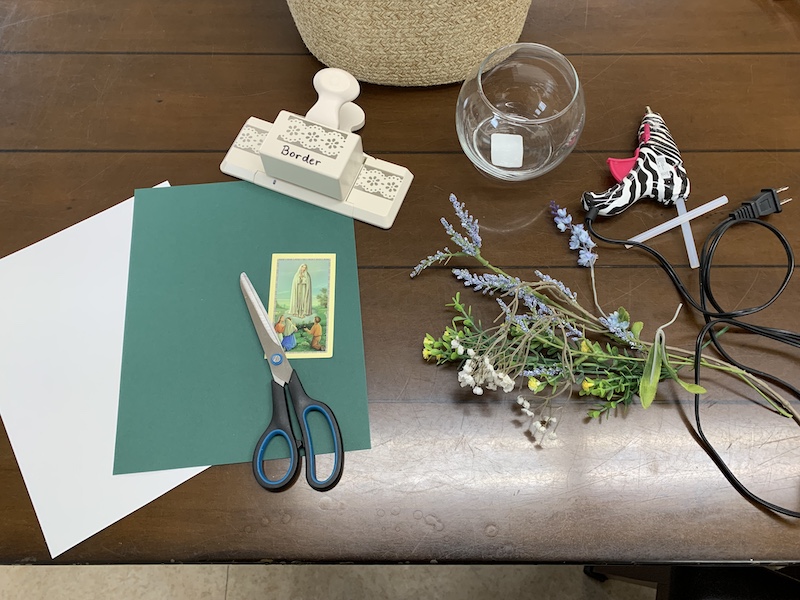
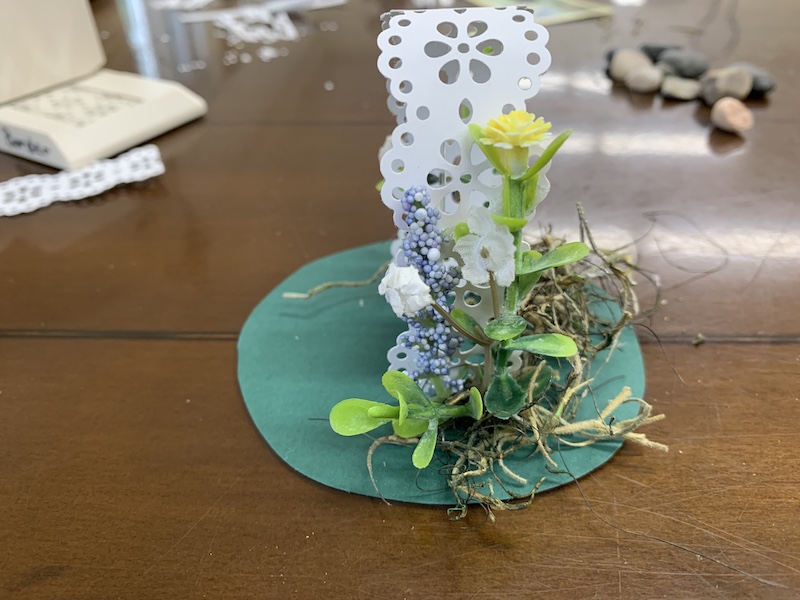
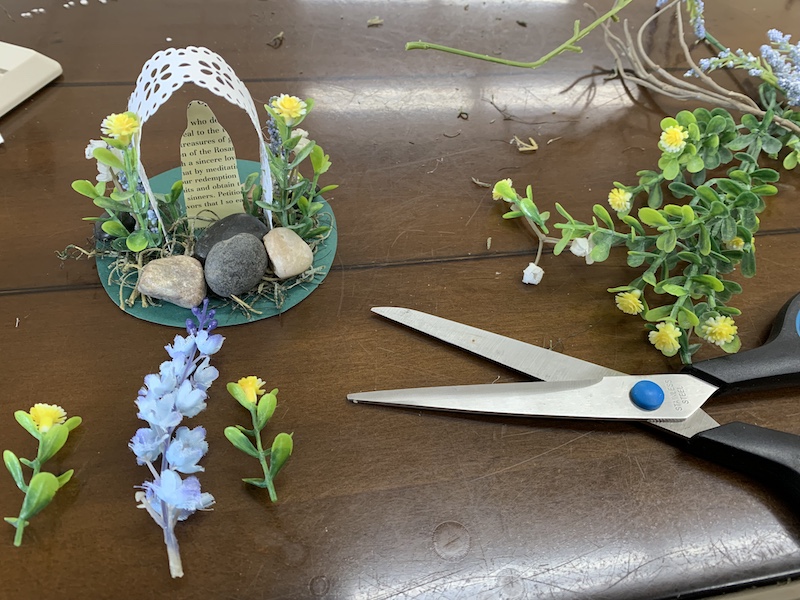
- Turn globe upside down on a piece of green paper. Trace around opening and cut out a circle for the base of the garden. See picture #1.
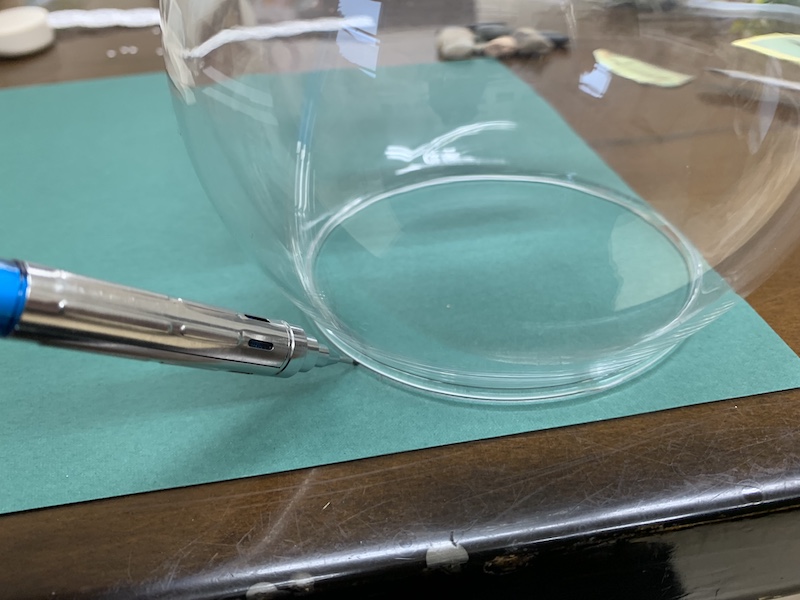
- Cut out Our Lady from your favorite holy card (or download pictures below), leaving a small tab at the bottom for gluing. See picture #2.
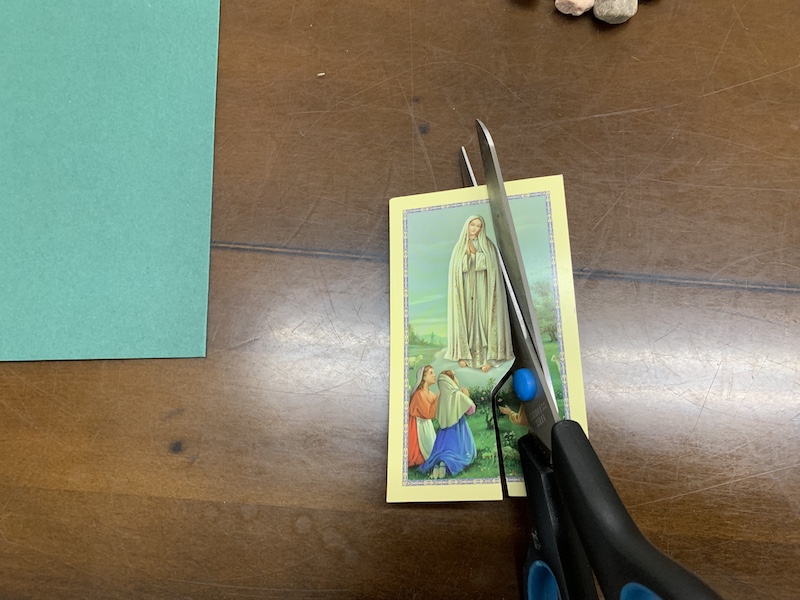
- Glue the picture standing upright to the center of the green circle. See picture #3.

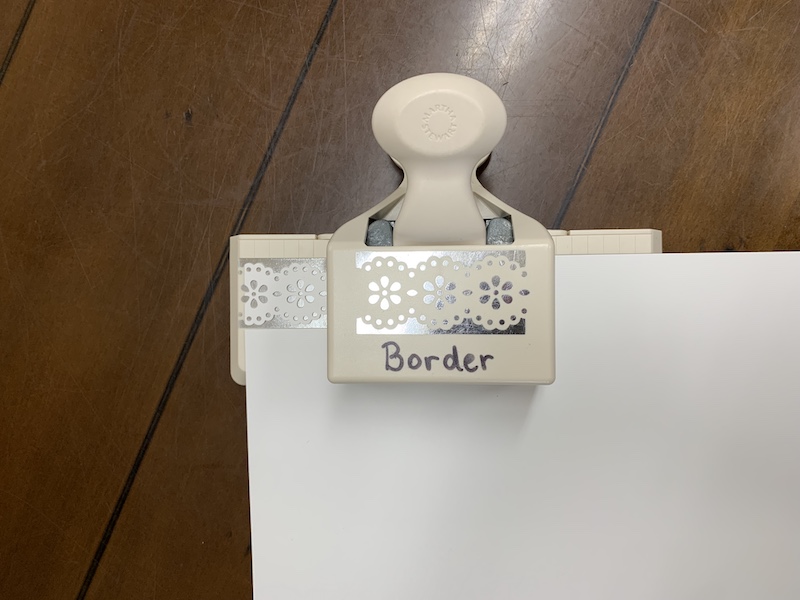
- Now using the border punch cut out a trellis from the white paper and glue the ends down on each side of the picture. See pictures #4 and #5.
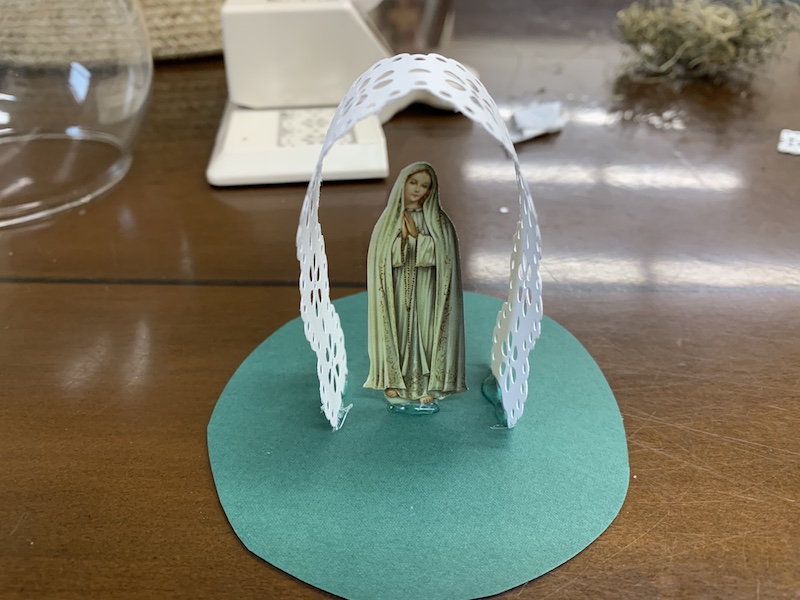
- Decorate with flowers, moss and rocks. See pictures #6 – #9.
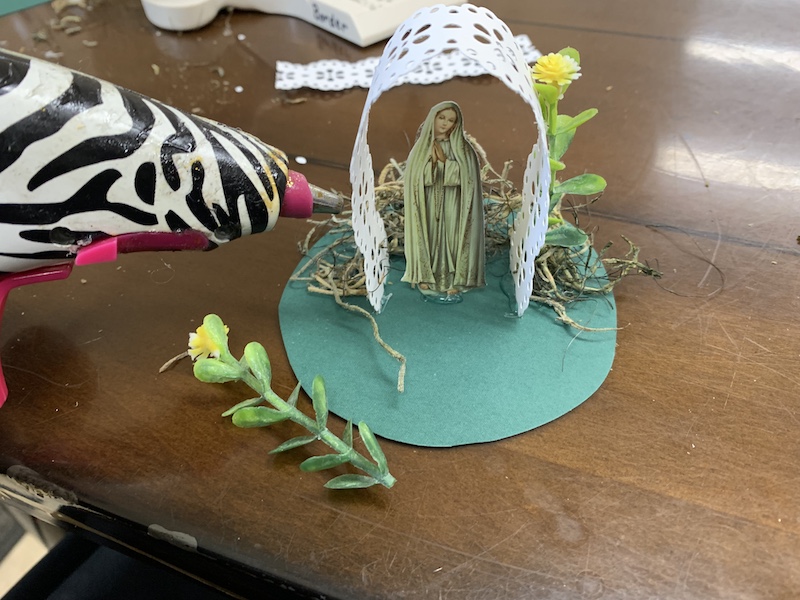
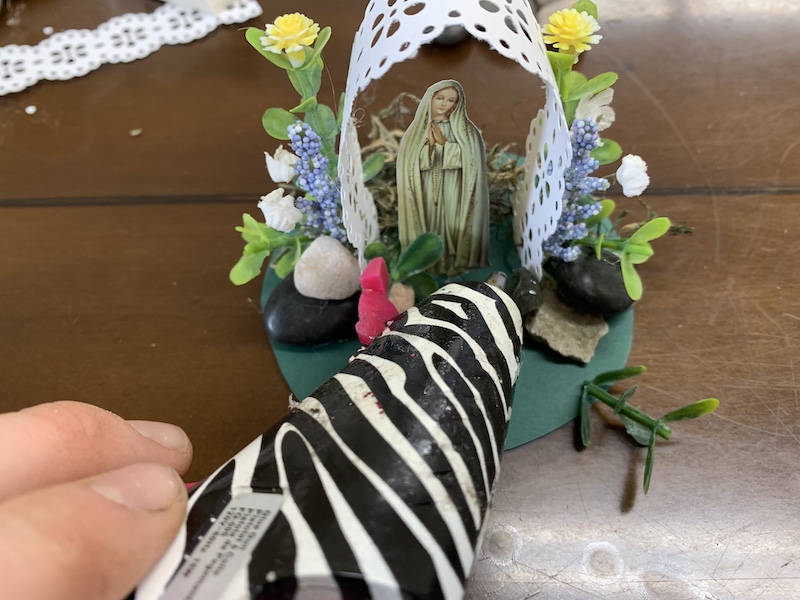
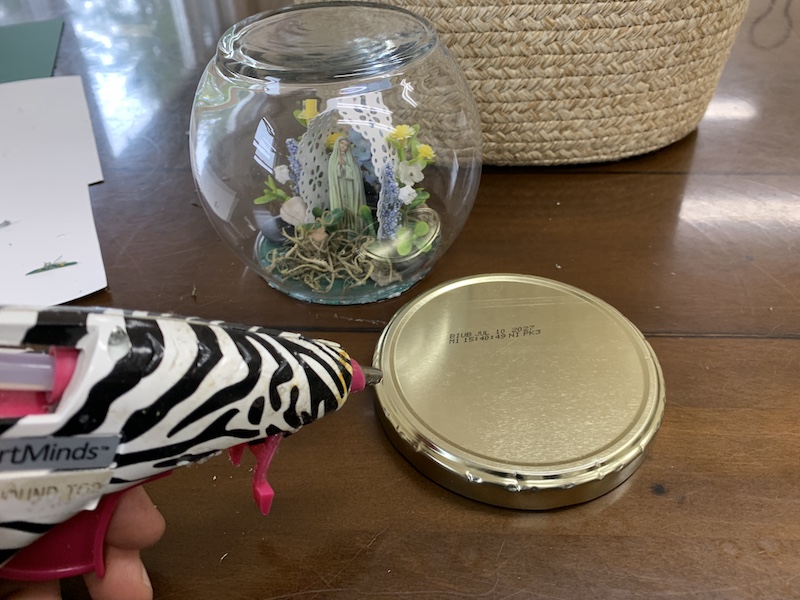
- Put some glue on the top of the lid and glue to the globe with the garden inside. See picture #10. To prevent scratching, glue a piece of felt to the bottom. If you don’t have a lid, a strong piece of cardboard would work instead.
Links for Supplies
Globe vase:
https://amzn.to/4nzxnsI
Punches:
https://amzn.to/4nCcWvl
https://amzn.to/3RwHrqB
Flowers:
https://amzn.to/4disOzS
https://amzn.to/43d9D4j
https://amzn.to/492M3uK
Rocks:
https://amzn.to/4ft5L6B
Grass/moss:
https://amzn.to/42Cfss3
Hot glue:
https://amzn.to/3Re01DU
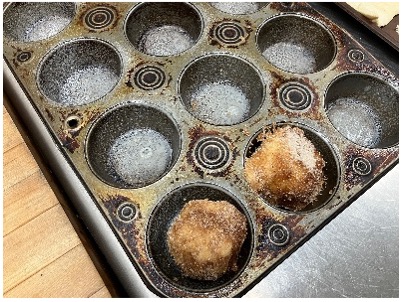
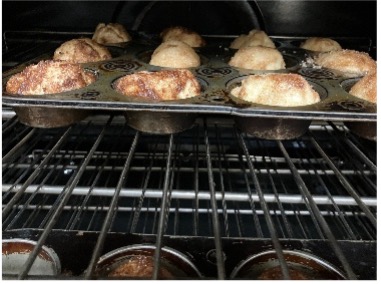
Easter Egg Nests
Easter Sunday is the greatest Church feast day of the whole year. On this day Our Lord conquered death and rose from the tomb. The egg is a symbol of new life and hope, because the egg seems lifeless but then out of it comes new life, and the shell, the symbol of the tomb, is left behind. That is why we have Easter eggs. These nests are easy, delicious and always a favorite with the Sisters
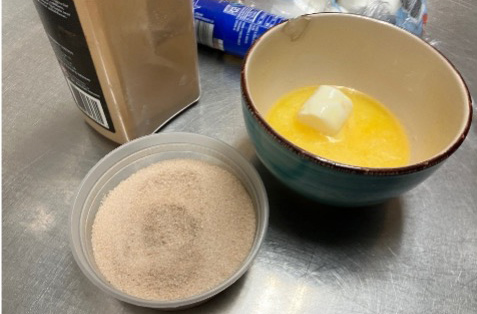
Ingredients
- 33 Jumbo marshmallows
- 1 Stick of butter or margarine
- 1 tsp Vanilla
- 3½ c. Cornflakes
- Peanut M&M’s (pastel colors)
- Cookie sheet lined with parchment paper
- Cooking spray
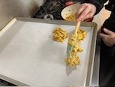
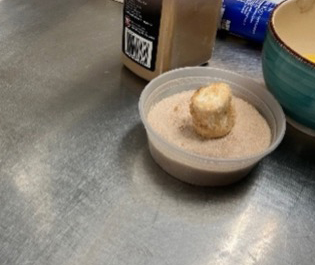
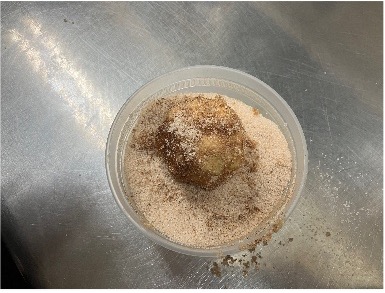
- In a medium pot melt the butter on medium to low heat. Add marshmallows, stirring constantly. When the marshmallows are almost melted, whisk to make creamy. Do not overcook or boil because this will make the nest hard. Stir in vanilla, add cornflakes and stir until well coated. See pictures #1-#4.
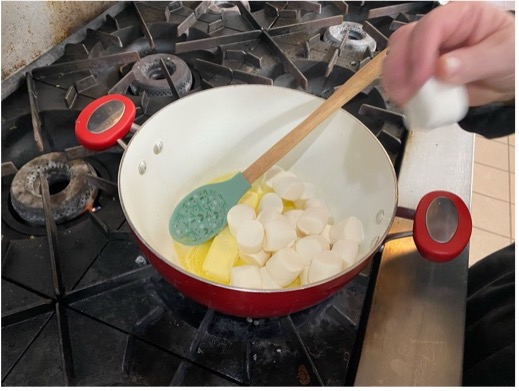
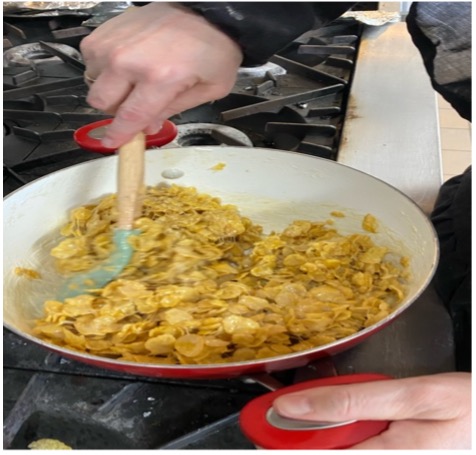
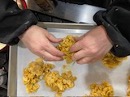
- Drop the cornflake mixture in large mounds onto the parchment-lined cookie sheet. Spray your hand with cooking spray (the mixture is very sticky) and form each mound into a nest shape. Let cool, then fill with 3-4 pastel colored peanut M&M’s. See pictures #5, #6, and #7.
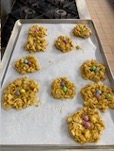
Enjoy a delicious treat for Easter!
Saint Veronica Meditation
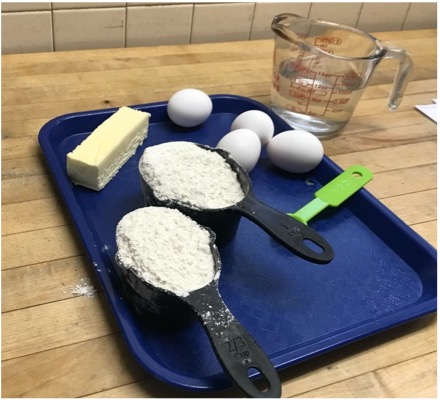
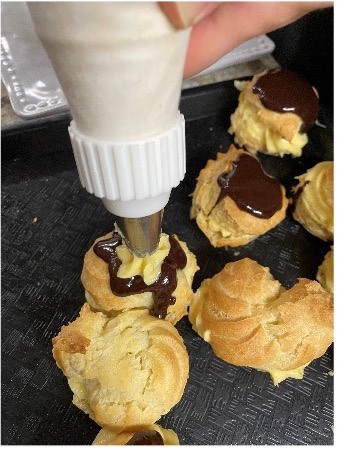
Saint Joseph Pastries (Zeppole di San Giuseppe)
The St. Joseph pastries are a custom from Italy. Each year they are baked on March 19th or the Solemnity of St. Joseph to honor St. Joseph. St. Joseph is the foster father of Our Lord, the spouse of the Mother of God, and the patron of the Universal Church. He is one of the greatest saints. Go to St. Joseph in all your needs and cares. He will understand and powerfully help you.
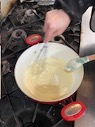
Pastry Dough Ingredients
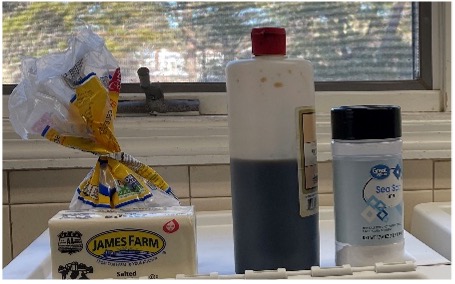
- ½ c. Butter
- 1 ¼ c. Water
- ½ tsp Salt
- 1 2/3 c. Flour
- 4 Large eggs
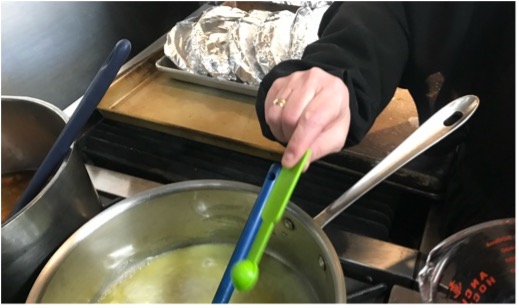
- Preheat oven to 400o F.
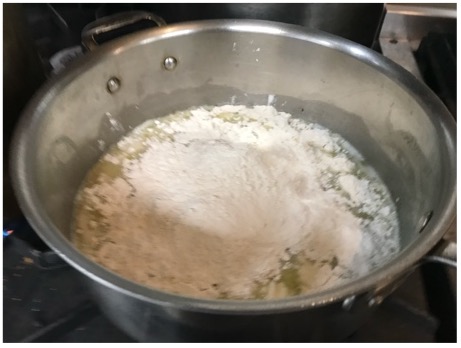
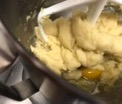
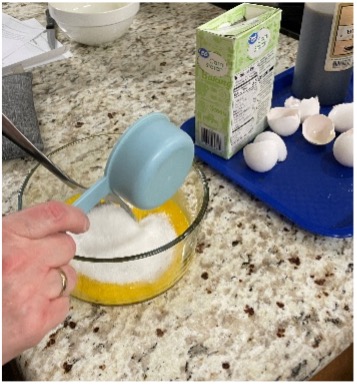
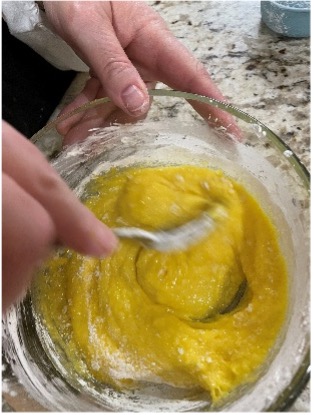
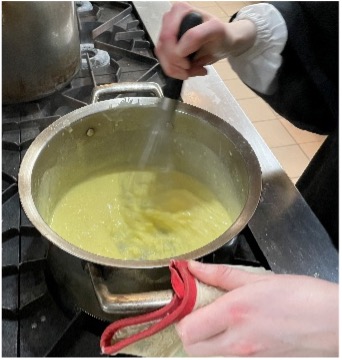
- In a medium pot melt butter, then add water and salt. As soon as the mixture comes to a boil, reduce the heat and add flour. Stir until thick but still able to be stirred. See pictures #1, #2, and #3. Pour into mixing bowl and let cool for 5-7 minutes.
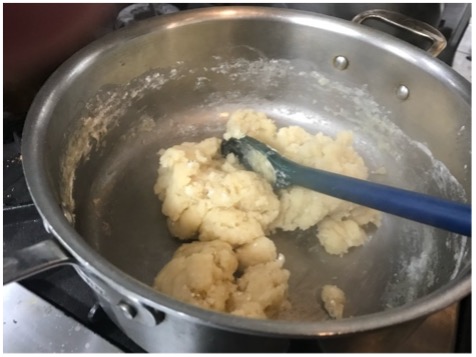
- Beat eggs one at a time into the flour mixture. (Be sure the mixture is no longer hot or the eggs will scramble.) The dough will become smooth as you add the last egg. See picture #4.
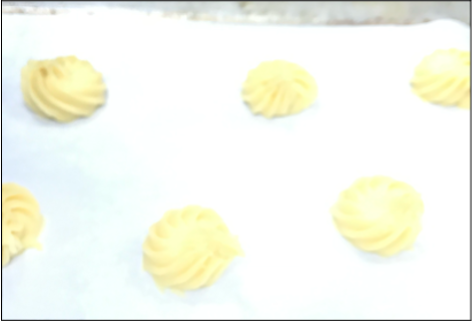
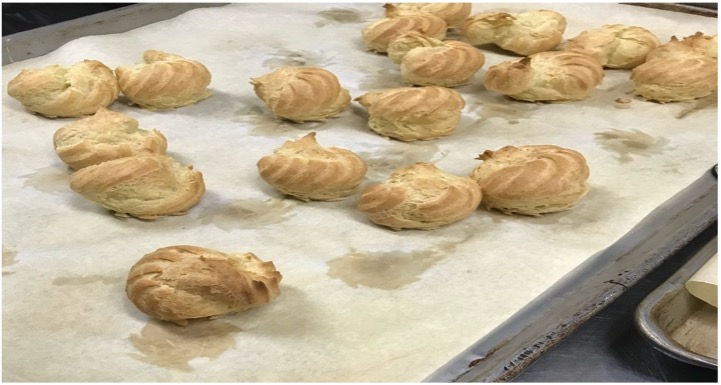
- Put the dough in a pastry bag and pipe onto a cookie sheet lined with parchment. Make the puffs small to moderate size according to preference. Bake them at 400° for 24-27 minutes. Be sure they are golden brown or they will sink in. Let cool completely. See pictures #5 and #6.
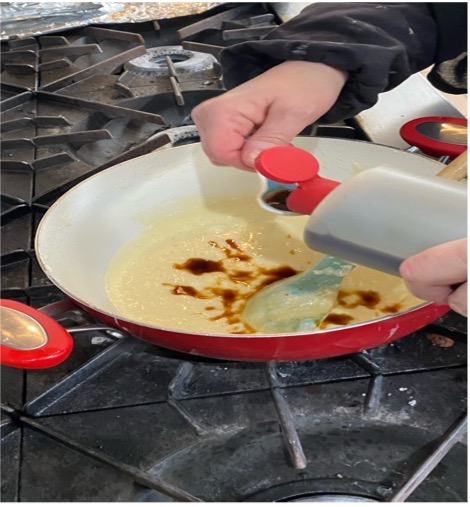
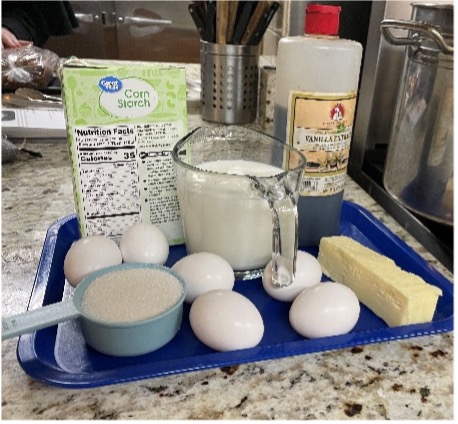
Pastry Cream Ingredients
- 6 Large egg yolks
- ½ c. Sugar plus 2 T. (if desired)
- ½ c. Cornstarch
- 1 ½ T. Vanilla
- 2 2/3 c. Milk
- ½ c. Butter
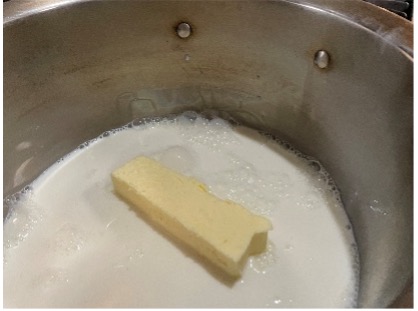
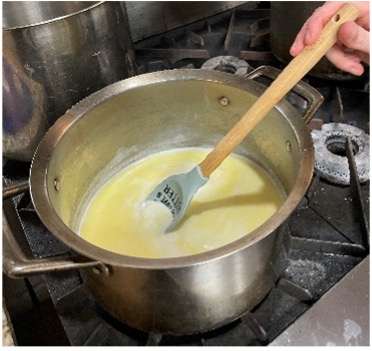
- In a medium bowl mix together egg yolks and sugar. Add cornstarch and whisk until smooth. See pictures #7 and #8.
- In a medium pot heat milk and butter until butter is melted, but do not boil. Turn heat to low and add in egg mixture, beating with a whisk to help make the cream smooth. Keep stirring continually because mixture thickens fast and will stick. Be careful not to overcook the cream, as it will burn easily. Remove from heat and add vanilla. Set aside, cover the pot, and let cool. See pictures #9, #10, #11, and #12.

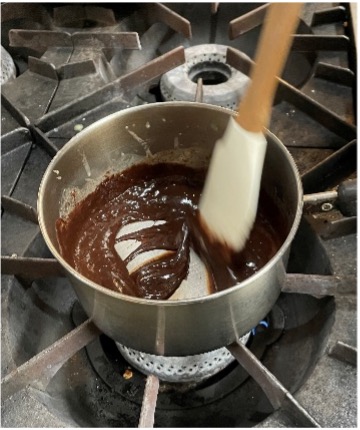
Ganache Ingredients
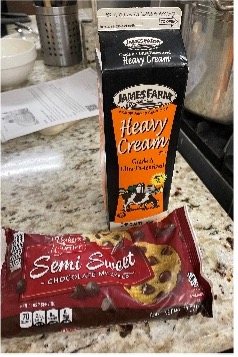
- ½ c. Heavy cream
- 1 c. Semi-sweet chocolate chips
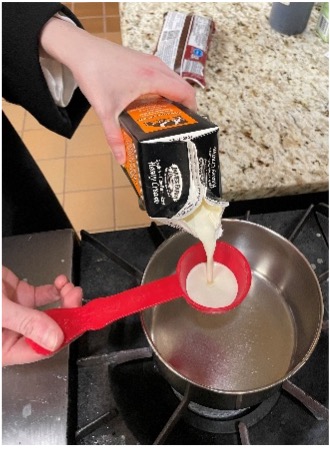
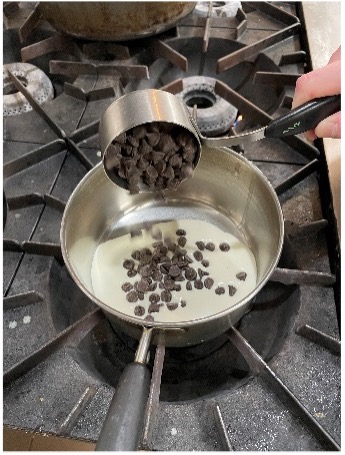
- In a small pot heat cream until warm but not boiling. Remove from heat and stir in chocolate chips until smooth. Let cool slightly. See pictures #13, #14, and #15.
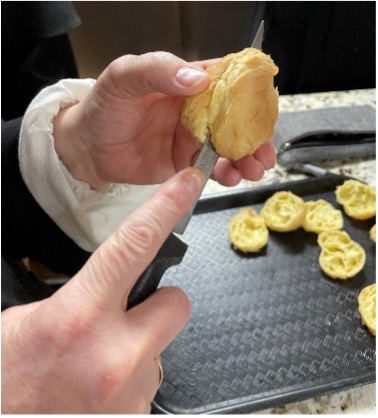
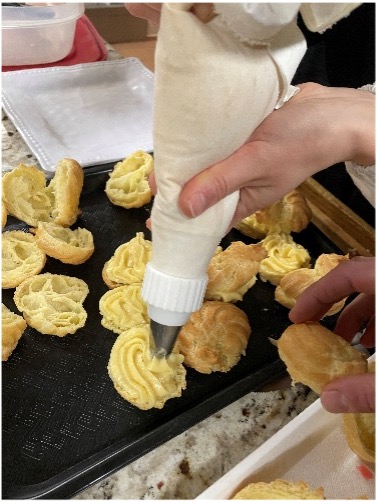
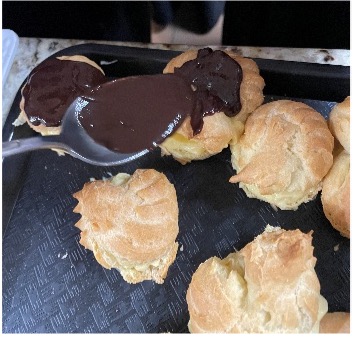
Assembly
- Cut open the pastries and pipe in the pastry cream (you may use a spoon if you prefer). Fill all of the pastries and reserve a little cream for garnish. Place tops on the pastries and drizzle with ganache (if desired). Top with a dot of pastry cream and a cherry. Sprinkle with powdered sugar and serve. These are best if eaten the same day they are made. See pictures #16, #17, #18, and #19.
Garnish
- Powdered sugar
- Maraschino cherries
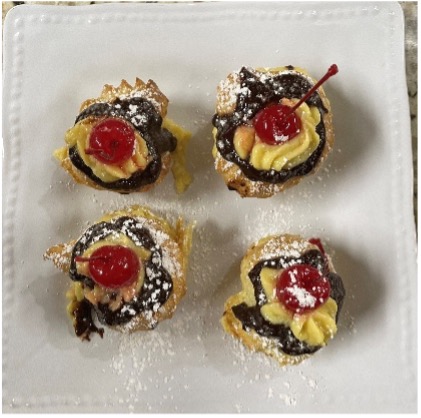
Enjoy a delicious treat in honor of St. Joseph!
Links for Ingredients
Flour: https://amzn.to/4bjt3br
Sugar: https://amzn.to/40y5Qxl
Vanilla: https://amzn.to/4rtHiAo
Corn Starch: https://amzn.to/4dr2aVA
Chocolate chips: https://amzn.to/417R68s
Saint Joseph Shrine
Saint Joseph was the foster-father of Our Lord and the spouse and guardian of Our Blessed Mother. He is the protector of Holy Mother the Church and one of the most powerful saints in Heaven. You can go to him in all your needs and he will help you.
Items Needed
- Cardstock paper – any color
- Construction paper – green and any color
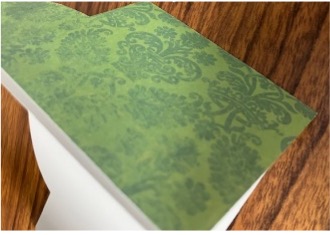
- Patterned scrapbook paper
- Lily template (see attached)
- Pictures of St. Joseph or holy cards (see attached file)
- Stencil template (see attached template)
- Prayers to St Joseph (see attached file)
- Adhesive foam squares
- Gem stickers
- Flower stickers
- Cross stickers
- Glue stick
- Ribbon
- Download and print the stencil template. Use the template to cut out the shrine on cardstock. It must be a heavy paper or it won’t stand up. See template below. Cut out other stencils and set aside. Fold shrine along lines.
- With the other stencils cut out 2 fronts on patterned paper. See picture #2. Glue to each door.
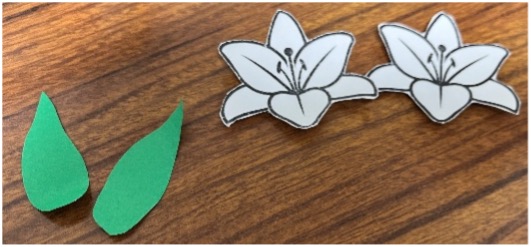
- Download and print the lily template. Cut out two lilies and glue one to the outside of each front piece. You can use foam squares for a 3D effect. See picture #3.
Add two leaves to each lily.
- Now for the inside cut out a piece of colored paper 2¼” x 3½”. The color of the paper should complement your holy card of St. Joseph. Glue in center of shrine. See picture #4.
- Download and print the St. Joseph pictures. Glue on one picture (or a St. Joseph holy card) or use two foam squares to attach if you prefer. Now add ribbon if desired. See picture #5.
- Cut two rectangles of paper measuring 2” x 2½”. Glue inside doors of shrine. See picture #6. Download, print, cut out and glue on the prayers to St. Joseph. See picture #6A.
- Now decorate the shrine inside and out with gems, flowers, crosses, and ribbon as desired.
Links for Supplies
Cardstock:
https://amzn.to/3P8LYhP
Construction paper:
https://amzn.to/3P6LZ60
Patterned paper:
https://amzn.to/46XNcTk
Flower punches:
https://amzn.to/4bJG8MD
Crosses:
https://amzn.to/4bsfqGY
Glue sticks:
https://amzn.to/4bclQvc
Ribbon:
https://amzn.to/40BONKO
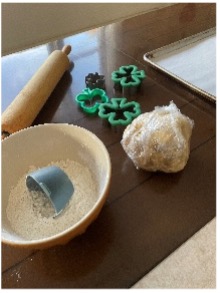
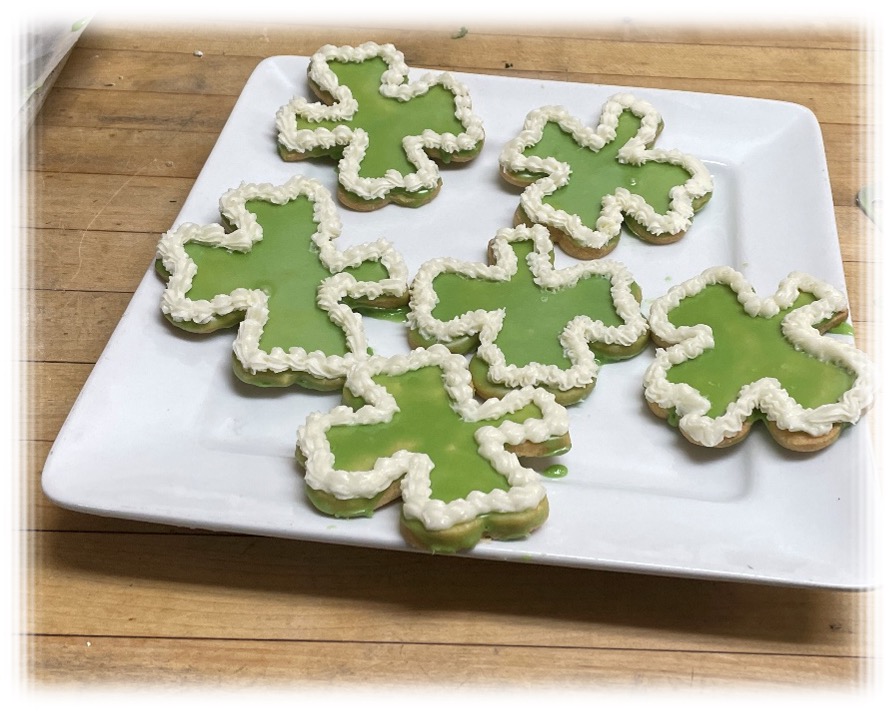
Shamrock Cookies
St. Patrick’s Day is a special day for everyone, especially the Irish. St. Patrick was a great Saint and did a lot for the Church in Ireland. As a boy, he was captured by pirates and sold as a slave in Ireland. He was made to tend the sheep and flocks of his master. Patrick rebelled and at first thought only of escape. However, seeing that escape was almost impossible, and helped by the grace of God, he became patient and spent much of his time in prayer. He lived in a pagan land surrounded by false worship and pagan rituals. Through constant prayer, he became very holy. He eventually did escape and returned home to become a Priest and later a Bishop. He was then sent back to Ireland and did all he could for the Irish people to teach them about God and the true Faith. St. Patrick converted Ireland to the Catholic Faith and will be revered by the Irish people forever.
These are delicious cookies that melt in your mouth. You can serve them frosted, or plain with just a sprinkle of sugar.
Cookie Dough Ingredients
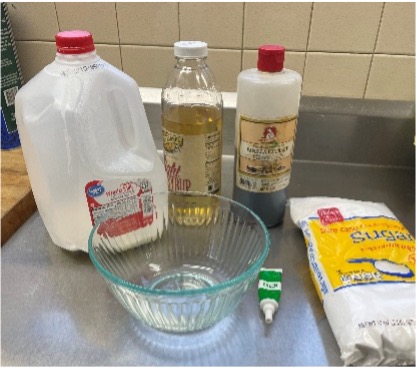
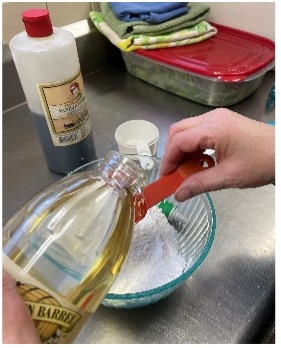
- 1 c. Butter
- ½ c. Granulated sugar
- 2 c. Flour
- Pinch of salt
- ½ tsp Baking powder
- Colored sugars (if desired)
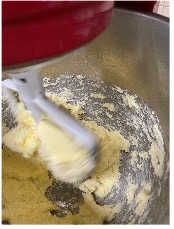
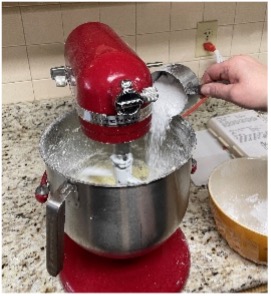
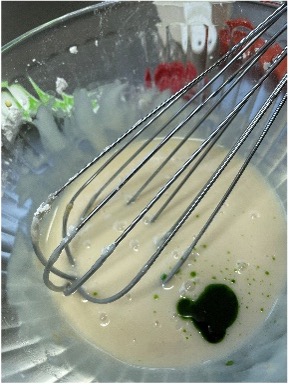
- In a large mixing bowl cream the butter, beating well until very soft and fluffy. Add the sugar and beat until smooth. See picture #1.
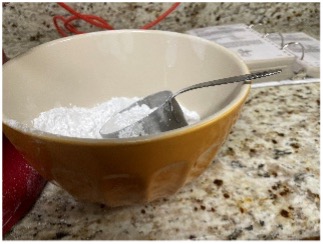
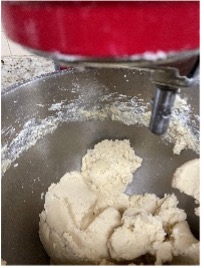
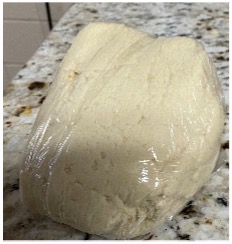
- In a separate bowl combine the flour, salt and baking powder. Add slowly to the butter mixture. When all is incorporated, form into a ball. Refrigerate if desired. See pictures #2, #3, and #4.
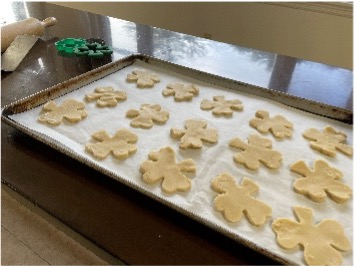
- Divide the ball of dough in half. Sprinkle your work surface with flour. Working with one half of the dough at a time, roll to about ½ – ¾ inch thickness, and cut with a shamrock-shaped cookie cutter. Repeat until all the dough is used. Place cookies on a cookie sheet lined with parchment paper. See pictures #5, #6, and #7.
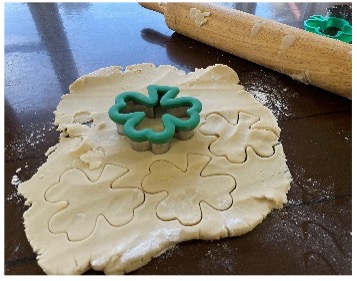
Note: If you prefer, instead of using a cookie cutter, form dough into 1½” balls and place on lined cookie sheet. Press balls flat to about ½” – ¾” thickness, using the bottom of a drinking glass.
If you will not be frosting the cookies, prick them with a fork and sprinkle with granulated sugar.
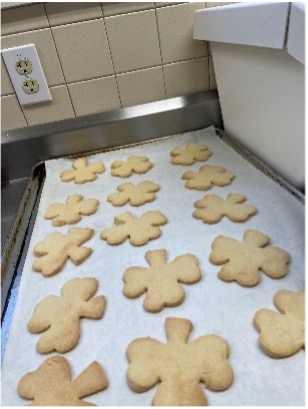
- Bake at 350o F for 20-25 minutes or until golden brown around the edges.
See picture #8. Remove from cookie sheet and let cool.
Frosting Ingredients
- ½ c. Butter
- 2 ¼ c. Powdered sugar
- 1-2 T. Milk or cream
- 1 tsp Vanilla
- Pinch of salt
- Food coloring
- In small mixing bowl cream butter until soft. Add sugar, salt and vanilla. Add milk a little at a time until the frosting reaches the desired consistency. Color as desired with food coloring. See pictures #9 and #10.
Cookie Glaze Ingredients
- 1 c. Powdered sugar
- 1 T. Corn syrup
- 2. T. Milk or water
- 1 tsp Vanilla
- Food dye
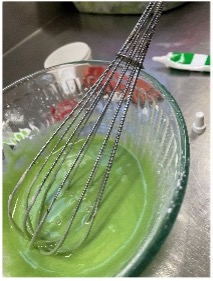
- In a small bowl combine sugar, corn syrup and vanilla. With a whisk add milk a little at a time until glaze is the desired consistency. Add food dye as desired. See pictures #11, #12 and #13.
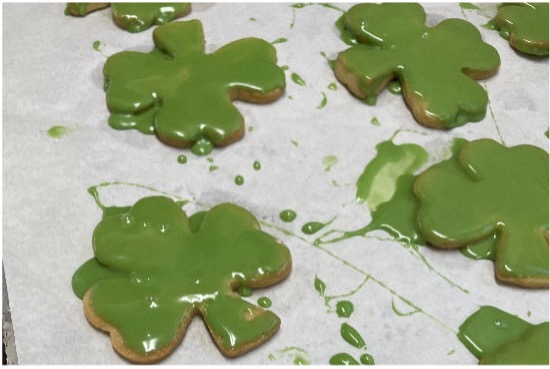
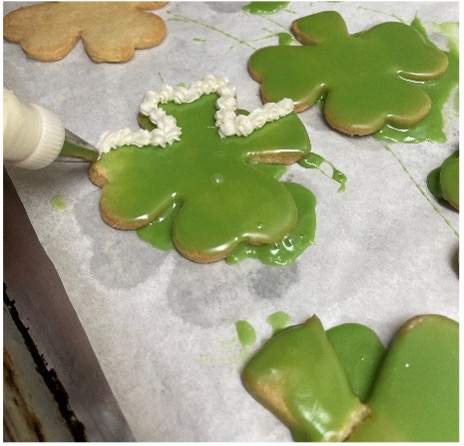
- Dip cookies in glaze or spread glaze with a knife. Let sit until glaze sets, about 20 minutes. Then put frosting into a piping bag with decorating tip and pipe edges as desired. If you prefer, simply frost the cookie and sprinkle with colored sugar. See pictures #14 and #15.
Enjoy your cookies, and Happy St. Patrick’s Day!
Links for Ingredients
Flour: https://amzn.to/4bjt3br
Sugar: https://amzn.to/40y5Qxl
Powdered Sugar: https://amzn.to/3P7ZYZh
Powdered Sugar: https://amzn.to/4rtHiAo
Colored Sugars: https://amzn.to/3PBaw35
Food Dye: https://amzn.to/4s7EIkJ
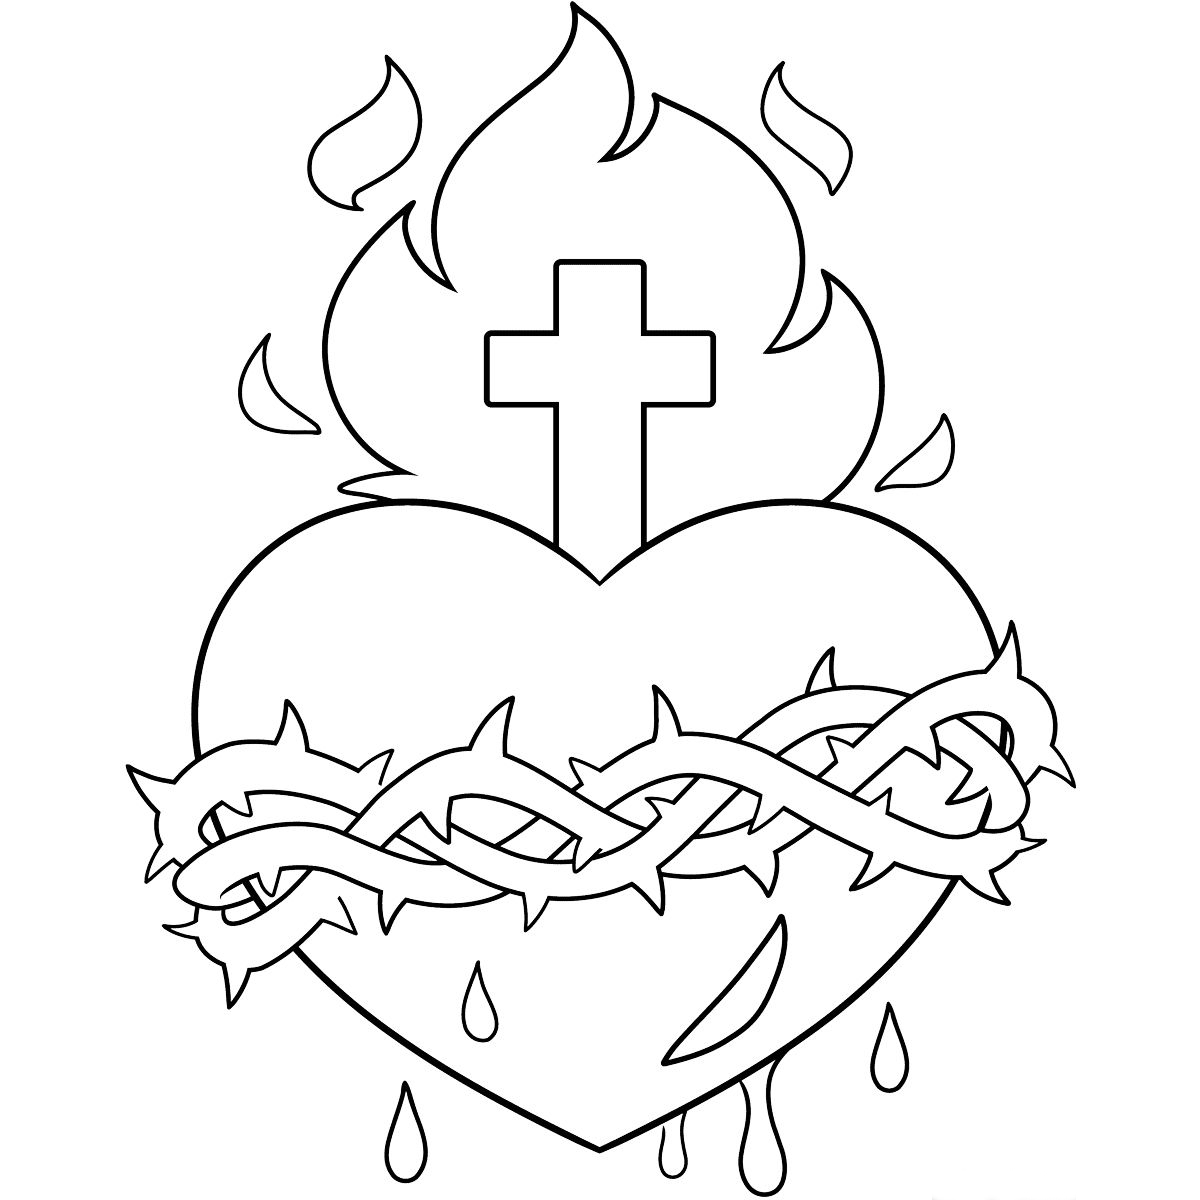
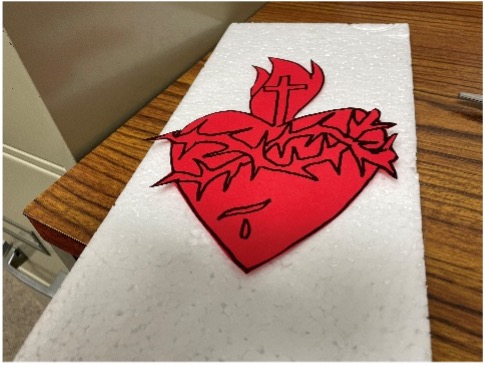
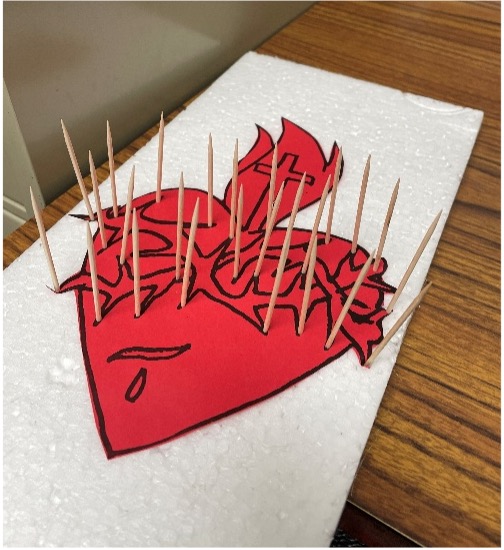
Lenten Sacrifice Calendar and Sacred Heart Project
Items Needed
- Download the Sacred Heart picture template – click here
- Red or white paper
- Foam sheet
- Toothpicks
- Tape or glue
- Print the Sacred Heart template on red or white paper.
- Have your child color the Heart, if desired, then cut out the Heart.
- Tape or glue the Sacred Heart image onto the foam sheet.
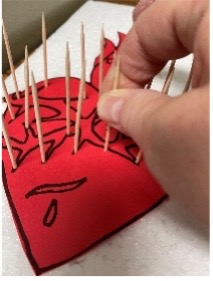
- Stick in toothpicks all over the crown of thorns.
Each time your child makes a sacrifice he removes a thorn from Our Lord’s Sacred Heart. This is a great way to help children stay focused during Lent. Also available is a calendar of Lenten sacrifices for children.
Links for Supplies for the Sacred Heart Project
Foam Boards: https://amzn.to/4rOkewQ
Toothpicks: https://amzn.to/3MKWJGe
Red Paper: https://amzn.to/4tI3edu
Stations of the Cross Coloring Booklet
Stations of the Cross Coloring Booklet
According to the Method of St. Alphonsus
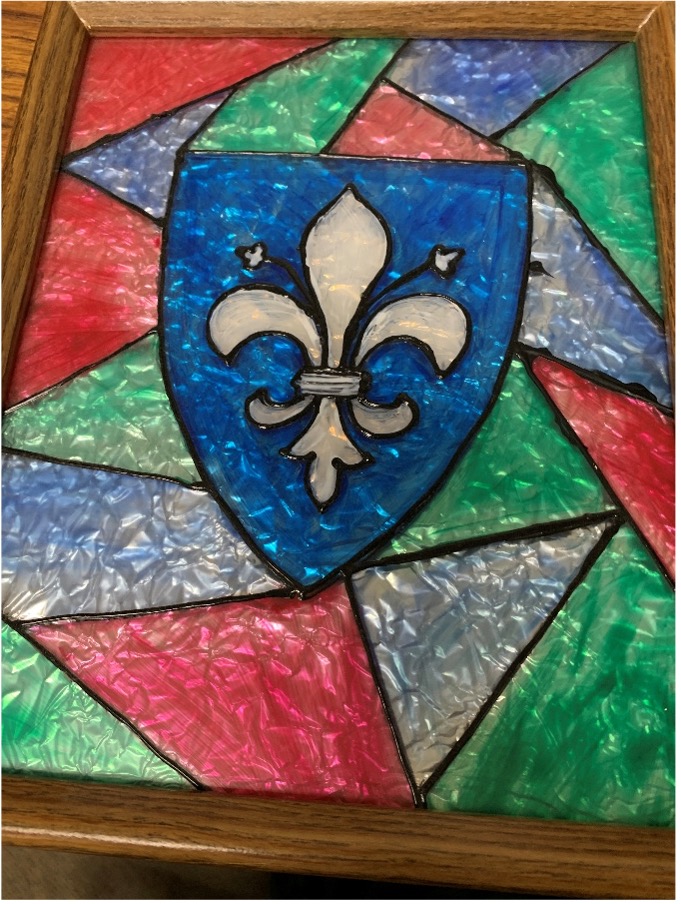
Stained Glass Window
Items Needed
- Inexpensive frame with glass
- Assorted acrylic paints, including black
- Clear glue
- Ruler
- Black Sharpie marker
- Paint brush
- Q-tips
- Aluminum foil
- Rubbing alcohol
- Emblem – see attached
- Tape
- Elmer’s white glue
- Paper plate
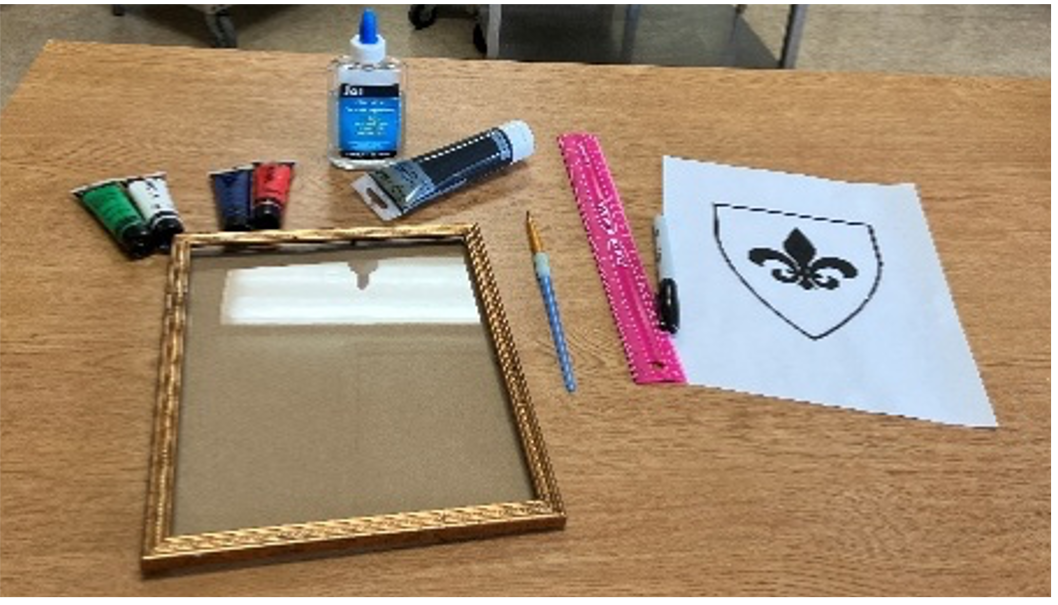
- Download the emblem template below.
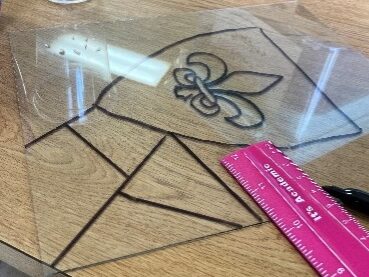
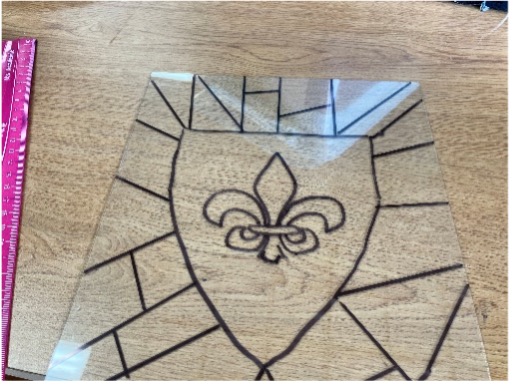
- Make sure the frame and glass are clean. Tape the emblem to the inside of the glass. See Picture #1.

- With the Sharpie marker trace the emblem onto the outside of the glass. See picture #2.
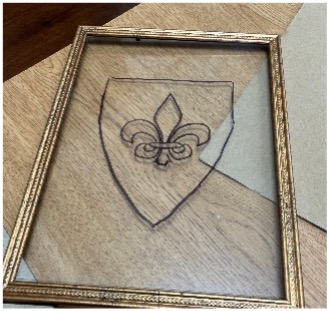
- Once you have finished tracing, use a ruler to draw straight lines for the stained-glass look. If you make any mistakes while drawing with the marker, use rubbing alcohol to remove Sharpie marks. See pictures #3 & #4.
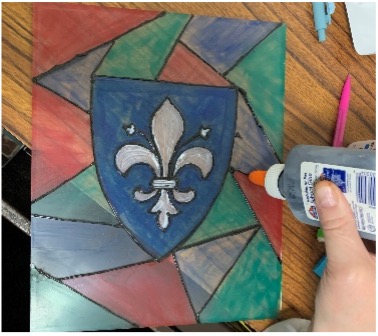
- Now, using the paper plate as a palette, mix a dab of clear glue and a dab of paint. See pictures #5 & #6. More glue will make the picture more opaque.
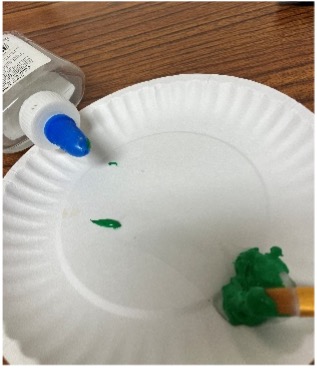
- Paint the window on the inside of the glass so you do not paint over the black lines. Be sure to clean your brush when you change colors. Set aside the glass to dry. See picture #7.
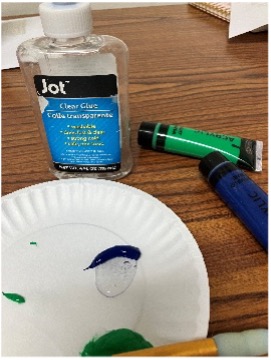
- Next, enhance the black outlines. Add some black paint to the bottle of Elmer’s glue and stir well. See pictures #8 and #9. Add more paint if needed to make the mixture very dark.
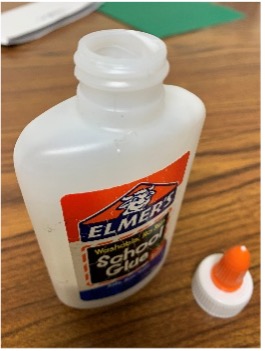
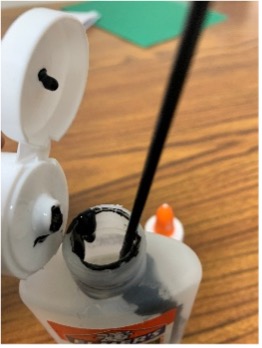
- Put the cap back on the glue and slowly apply the black glue along the marker lines on the front of the glass. See pictures #10 & 11.
- Before the black glue dries, take a toothpick and pop any air bubbles you may see. It is normal that the black glue will spread a little.
If you wish, instead of using the black glue, you could simply use a Sharpie marker and trace over the lines you have already made to make them thicker. This works well on smaller frames.
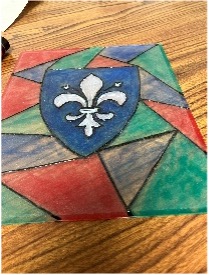
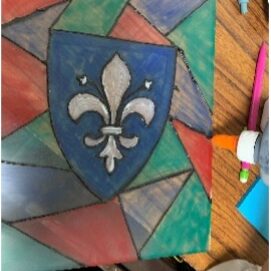
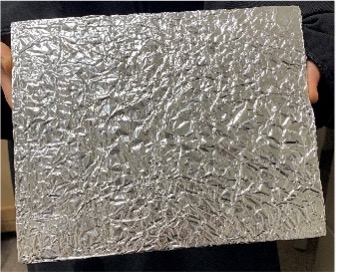
- For the finishing touch, take a piece of aluminum foil measured a little larger than your frame. Crumple it up so that it is all crinkly, then spread flat again. Put this on the back board of your picture. See picture #12. Put your picture together once everything is dry and you are all finished.
Links for Supplies for Stained-Glass Projects
Picture frames:
https://amzn.to/4qF21kt
Paints:
https://amzn.to/4tK409M large group
https://amzn.to/4rrf9uX small group
Clear Glue:
https://amzn.to/4aXTKDx large group
https://amzn.to/4kIpZKl small group
White Glue:
https://amzn.to/4aUMA2W
Markers:
https://amzn.to/4rsYIhA large group
https://amzn.to/4qFtFOt small group
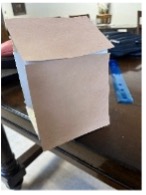
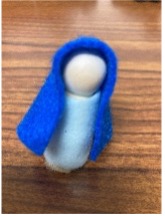
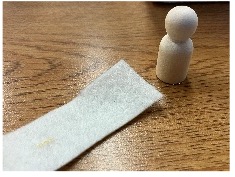
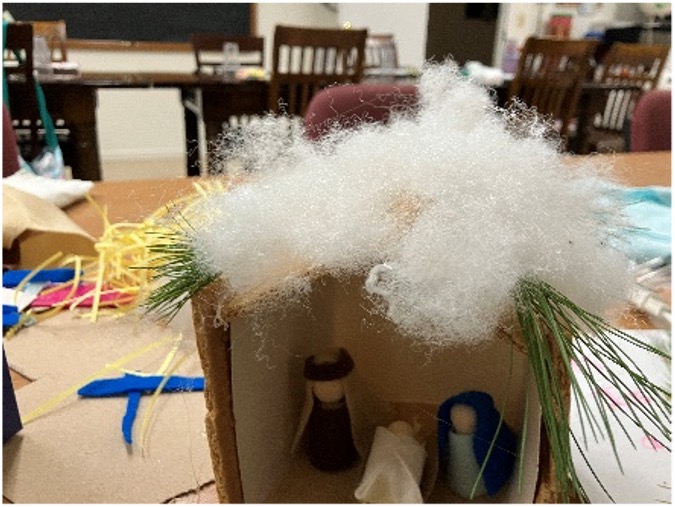
Holy Family’s House in Bethlehem
This is a great project for you to make with your child to help them remember the true meaning of Christmas and the Christmas season. The Month of January is dedicated to the Holy Family. What better way for us to remember the stable in Bethlehem and to imitate the Holy Family?
Items Needed
- 1 Box measuring 5”x5”
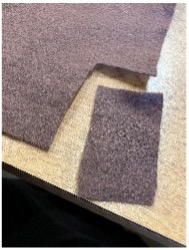
- Felt:
- Light blue
- Royal blue
- Brown
- Tan
- White
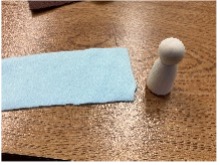
- 3 Peg people (varying sizes)
- Construction paper:
- Brown
- Yellow
- Hot glue
- Regular Glue
- Poly-fil or fake snow
- Sheet cardboard
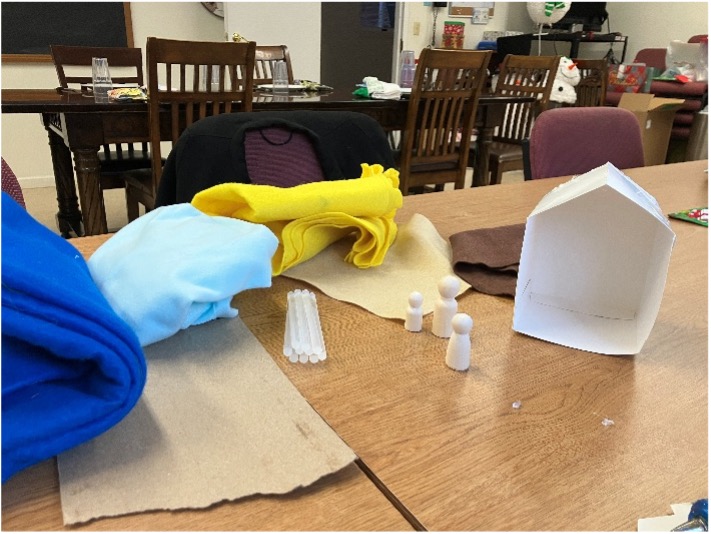
- Assemble the box, forming a peak with the lid. – See pictures 1, 2, and 3.
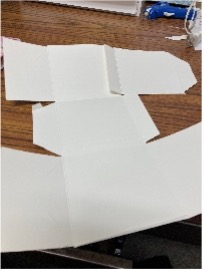
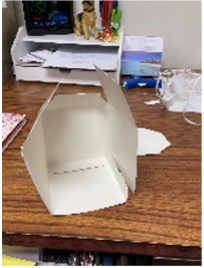
- Cut out one side of the box. – See picture #4.
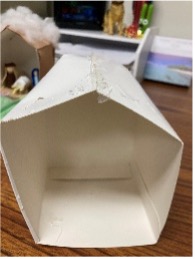
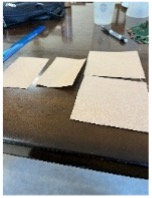
- Measure the box and cut out squares of brown paper to fit the sides and peak. – See pictures 5 and 6.
Glue paper onto the box and let dry.
- Now cut a rectangle of brown felt to wrap around the largest peg person to make St. Joseph. – See pictures 7 and 8.
Glue to peg using hot glue.
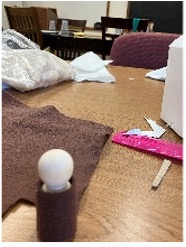
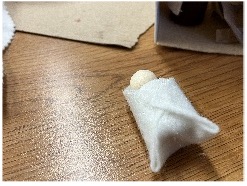
- Cut a rectangle of light brown felt and make a tuck in the middle of one of the long sides, gluing together inside the tuck. Place the open side on St. Joseph’s head. – See pictures 9 and 10.

- Take a small strip of brown felt and wrap around St. Joseph’s head for band. – See picture 11.
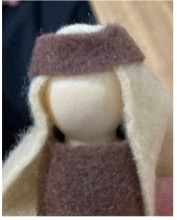
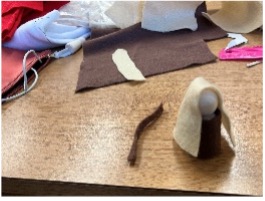
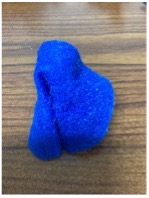
- Now cut a rectangle of light blue felt for Our Lady, wrap around her body and glue. – See Picture 12.
- Cut dark blue felt for Our Lady’s veil and glue in center (as done for St. Joseph), then place on head for her veil. – See pictures 13, 14, and 15.

- Cut a rectangle of white felt, wrap around smallest peg person, and glue to make the Baby Jesus. Cut a square of white felt for the baby blanket. Fold the square around the Baby and glue. See pictures 16 and 17.
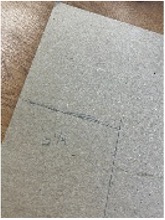
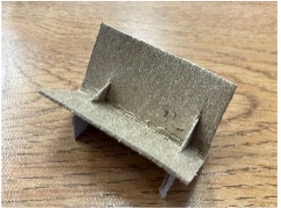
- Next make the manger by cutting a small square of cardboard and folding in half. Cut a small slit on each end. Slide two matching strips of cardboard into slits. Open up and you have a manger. See pictures 18 and 19.
- Cut yellow paper into small strips for hay and place in the manger.
- Cover the floor of the manger with a square of felt (any color). Add the Holy family and glue down. See picture 20.
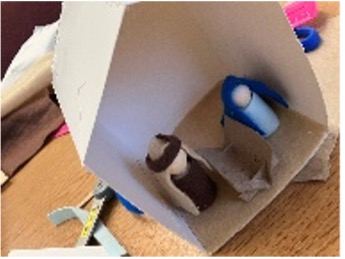
- Decorate the top of the manger with fake snow, leaves, or whatever you wish.
Place this Nativity scene in your child’s bedroom to remind them of the true meaning of Christmas.
Links for Supplies for the Project
Wooden Peg Doll: https://amzn.to/3MLRtlP
Hot Glue Gun and Sticks: https://amzn.to/4aQMnhv
Brown Construction Paper: https://amzn.to/4cjrvAz
Felt Sheets: https://amzn.to/4cOquk4
Fake Snow Powder: https://amzn.to/4aS78I9
Poly-fil: https://amzn.to/4r1K284
White Kraft Paper Favor Boxes:
https://amzn.to/4aS5hDb small group
https://amzn.to/4sa8VPQ large group
Empty Tombs
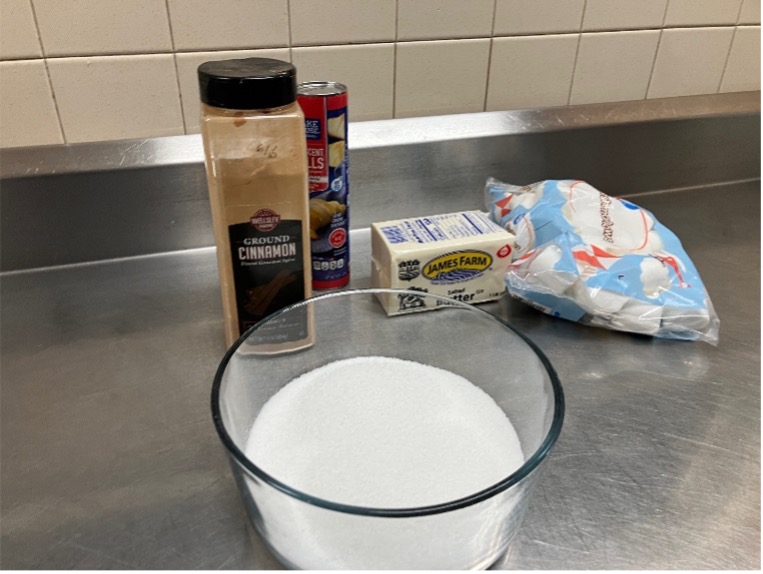
This is a great recipe that Moms can do with children and teach them about Our Lord’s Resurrection. They are called empty tombs in honor of Our Lord. On the day of the Resurrection the holy women went to anoint His body, and they found the tomb empty.
These are delicious sweet rolls with a gooey filling. The marshmallow melts as it bakes and leaves a hollow center. Hence the name “Empty Tombs”.
Items Needed
- 1 8oz package of croissant roll dough
- 1 bag regular size marshmallows
- ½ c sugar
- 1 ½ T cinnamon
- ½ c melted butter
- Greased muffin tin
- Preheat oven to 375°
- Melt butter and set aside
- Combine sugar and cinnamon in dish and stir together
- Separate rolls into 8 triangles
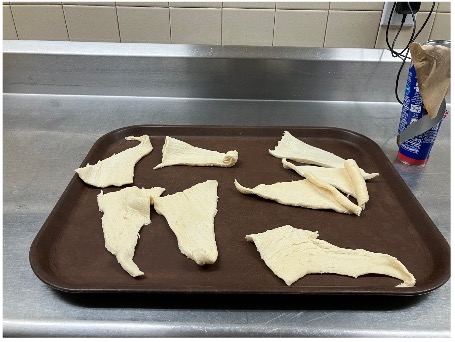
- Dip marshmallow in butter then roll in cinnamon sugar, place in center of croissant dough and wrap well. Make sure there are no cracks.

- Dip dough into melted butter, roll in cinnamon sugar and place in greased muffin tin.
- Repeat until all the triangles are used.
- Bake in oven 375o for 10 to 15 minutes or until golden brown. Allow to cool slightly and eat warm.
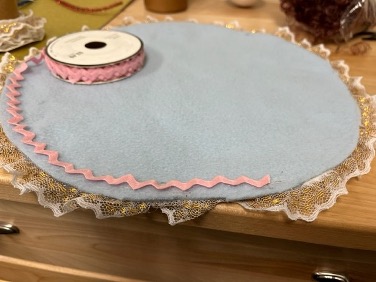
Angel Project
Materials Needed
- Styrofoam cup 9oz-12 oz
- 2 ½” Styrofoam ball
- felt – any color
- doll hair or yarn – any color
- googly eyes
- lace trim – if desired
- rickrack – if desired – Walmart or Amazon
- pipe cleaner – gold or any color
- gold glitter paper
- scissors
- hot glue or fabric glue
- red marker
- template for wings
How To Make Your Angel
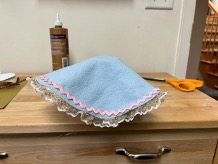
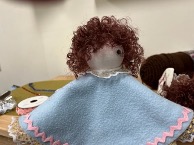
- Cut a circle of felt 9 in. in diameter – can use a 9 in. paper plate for a template
- Glue lace trim around edge of felt circle (see picture #1).
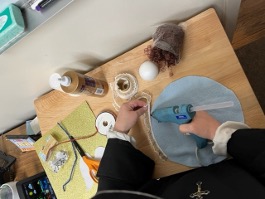
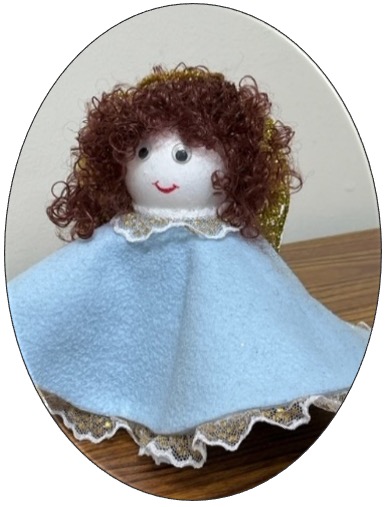
- Flip felt onto right side and glue on rickrack border if desired (see picture #2).
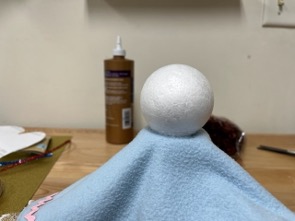
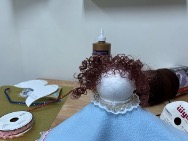
- Stand cup upside down and glue base of cup to center of felt circle to form the body of the angel (see picture #3 & 4).
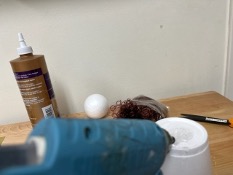
- Glue Styrofoam ball to body for the head (see picture #5).
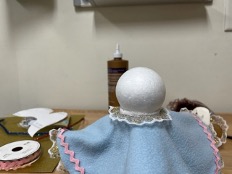
- Glue lace to neck if desired (see picture #6).
- Glue hair to head. You can use doll hair or yarn according to preference (see picture #7 & 8).
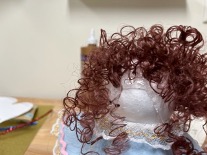
- Glue on the eyes (see picture #9).
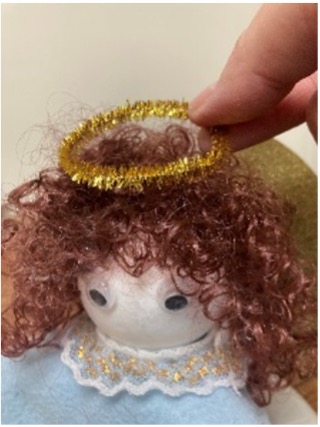
- Now form a halo in a circle using pipe cleaner. Glue onto the head (see picture #10).
- Using the wings template below trace wings on glitter paper. Carefully glue to the back (see pictures #11 and #12).
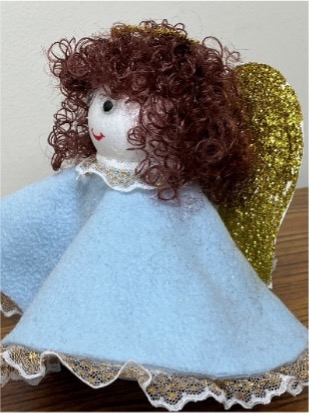
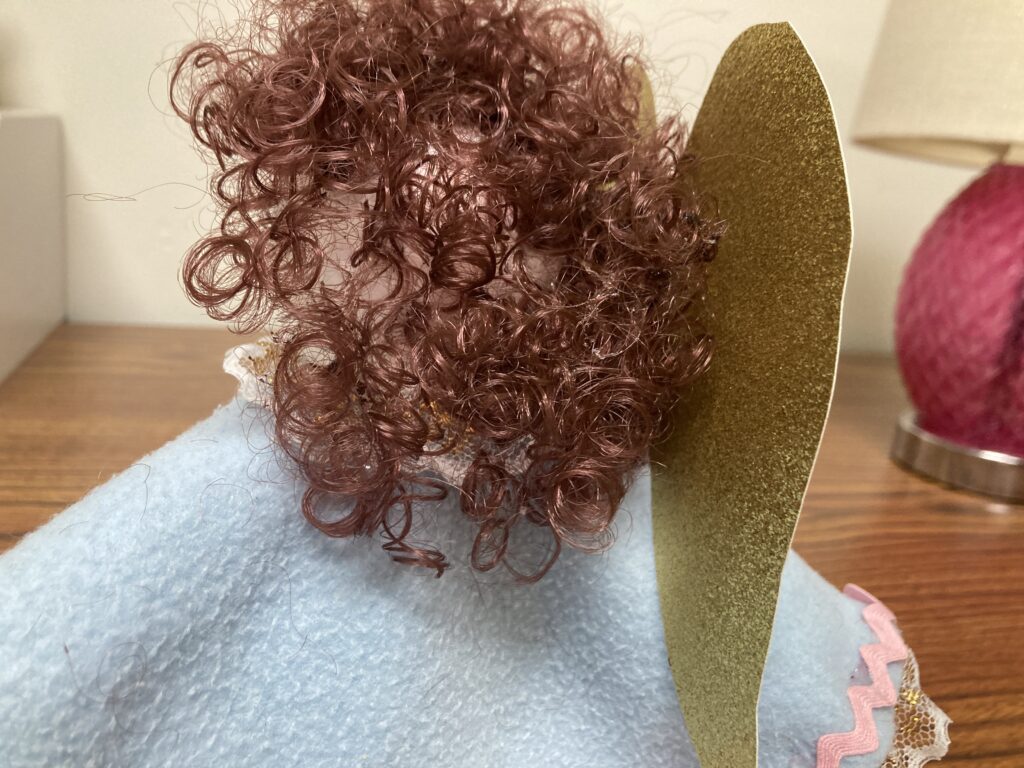
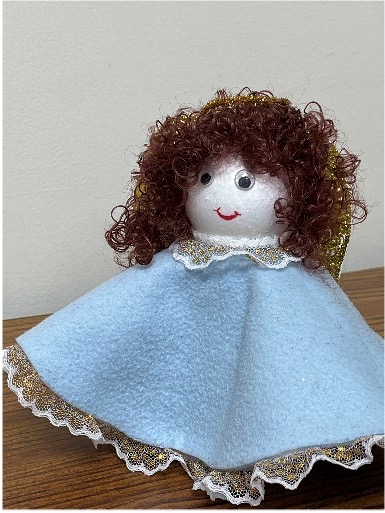
- With a red marker add a smile (see picture #13).
Your Angel is now complete.
Remember to pray to your Guardian Angel every day to help you be good.
Where To Purchase Some Supplies
- 2 ½” foam ball
https://www.amazon.com/Polystyrene-Styrofoam-Sculptures-Arrangements-Modeling/dp/B08R78KHJX/?th=1 - felt – any color
https://www.amazon.com/Assorted-Squares-Nonwoven-Patchwork-15x15cm/dp/B01MRWZEMV/ - doll hair or yarn – any color
https://www.amazon.com/Hygloss-Products-Colors-Curly-Assorted/dp/B07CL97VWL/ - googly eyes
https://www.dollartree.com/crafters-square-plastic-googly-eyes-125ct-packs/177528 - lace – if desired
https://www.amazon.com/Gathered-Trimmings-Embroidered-Applique-Embellishment/dp/B0797SJ4LL/ - pipe cleaner – gold or any color
https://www.amazon.com/Caydo-Pipe-Cleaners-Chenille-Decorations/dp/B0DQSWMGKT/ - glitter paper
https://www.amazon.com/SALEMAR-Cardstock-Sparkling-Scrapbook-Multicolor/dp/B0BXX66CN6/ - hot glue or fabric glue
https://www.amazon.com/Liumai-Switch-Crafts-Sticks-Project/dp/B0CP5M7MSQ/
Jesus in the Garden Coloring Page
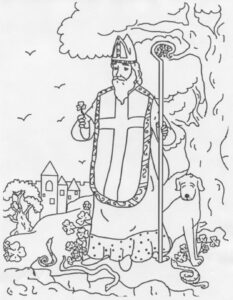
St. Patrick Coloring Page
St. John Bosco Audio Story and Coloring Page
Audio Story and Coloring Page
St. John Bosco – A Dream Vision of the Evil Animals

Explanation of Holy Week Ceremonies
by Father Colin Buckley, C.S.P.V